Useful and low cost projects for honing basic wood skills. Story by Steve Hay.
These are simple projects but many may overlook the learning curve they offer in terms of the hand tool skills that can be honed while making them. I have used pine as the main resource, because it is cheap and readily available. Other materials will work equally well, if not better, from a durability standpoint. Adding stylish pinstripes of veneer creates a nice contrast between the laminations.
Making the chopping board Firstly work out how long you want your chopping board to be, then workout the width. Divide the width of the board by the thickness of the timber to be used. My board will be 380 x 250mm made from 42mm wide x 19mm thick pine.
I divided 250 by 19 to give 13; multiplying this by my desired length of 380mm told me I needed 4.94 metres of timber, or two lengths of 2.4m plus one 0.9m short of 42mm x 19mm. For the stripes I used some offcuts of jarrah veneer. If possible your veneer should be longer than the length of the board.
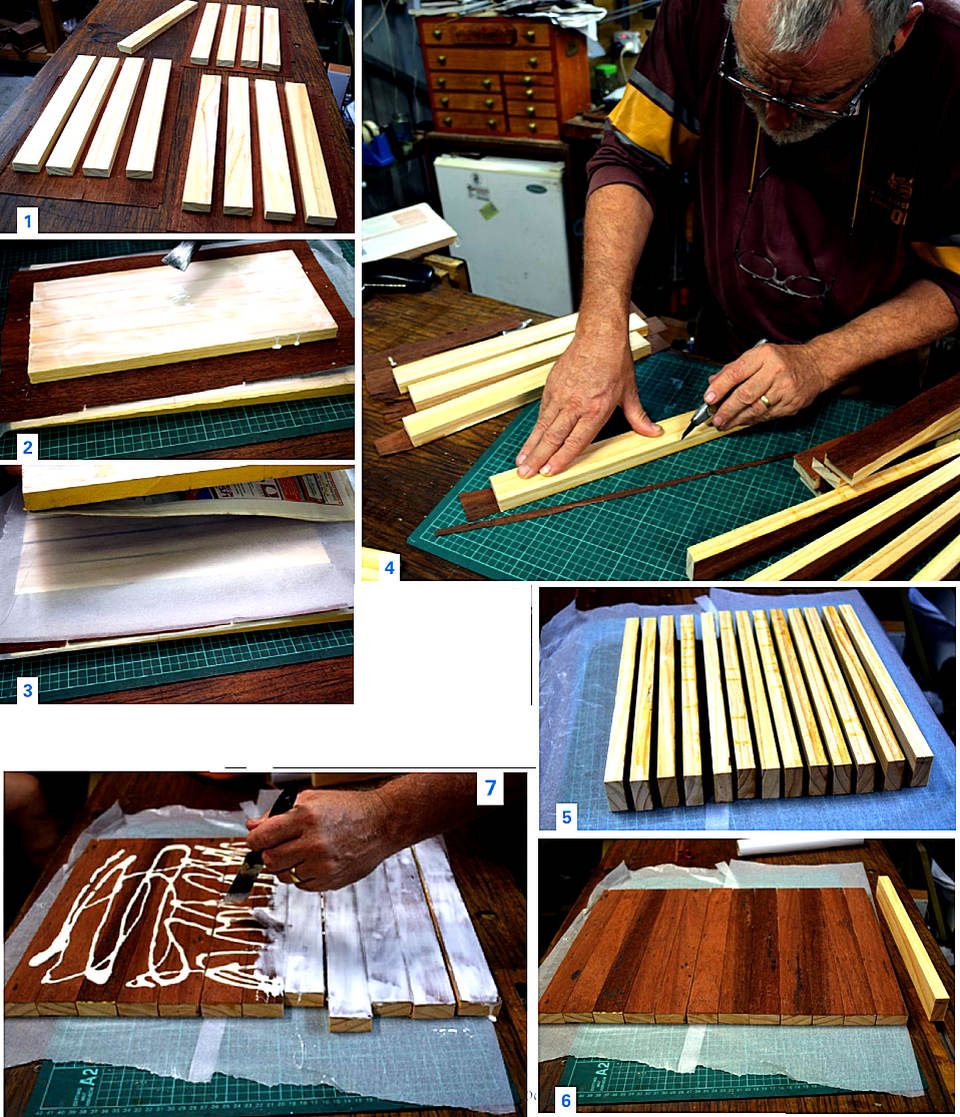
1. Cut desired number of pieces to the chosen length. Lay out all the pieces, except for one, on the veneer (photo 1).
2. Bunch them all together and apply waterproof glue (photo 2).
3. Turn glued surfaces over and clamp between two cauls (photo 3).
4. Once the glue has dried, remove from cauls and separate into individual pieces. Clean up overhanging veneer on both edges with a sharp knife (photo 4).
5. Lay pieces out with grain direction facing the same way (photo 5).
6. Turn all pieces over the same way with the un-veneered piece placed to one side (photo 6).
7. Apply waterproof glue to all exposed surface (photo 7).
8. Using the extra piece that wasn’t veneered as a base, stack all pieces on top of each other, applying more glue to the bare sides (photo 8). Do not put glue on the two outside edges!
9. Lay the assembly down flat and push as much of the board as you can into the final position before clamping. Use scrap blocks to protect the edges of the board (photo 9). Once clamped, wipe all excess glue from both sides using a wet rag. Allow to dry.
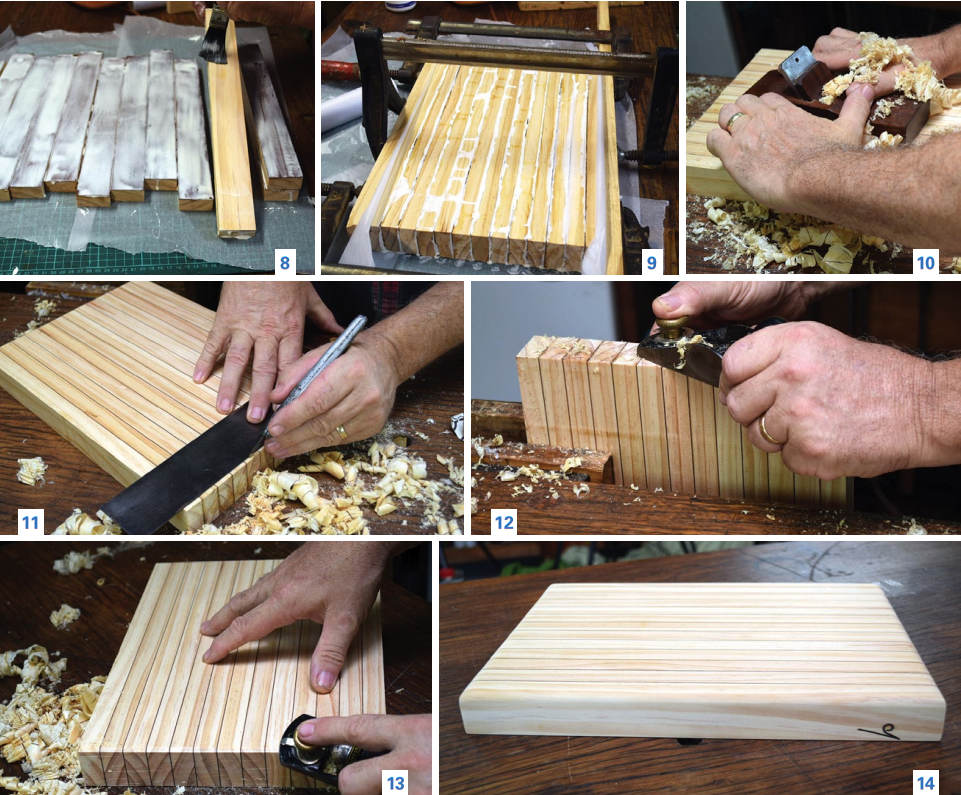
10. You may find you have some uneven pieces or there is a lot of dried glue. You can plane the uneven surface using a hogging plane. Mine is an old converted Footprint No.4 which has a convex shape ground into the blade. It’s not as savage as a full scrub plane but has more bite than a normal No.4 smoother.
11. At this stage you could put the board through a thicknesser or a wide belt or drum sander. However, if you want to keep this as a hand tool exercise and it doesn’t require a hogging plane sharpen up a good smoother and start smoothing (photo 10). If you haven’t already done so it’s good practice to just round over the corners of your smoother’s blade to prevent tracking or unsightly tramlines scarring your finished surface.
12. If required, finish off with a sander or a sanding block with 180 grit.
13. Dock the ends with a mitre or bench saw or keep going with the hand tool skill exercise as this is a fantastic opportunity to get some block plane practice in. Mark out the cut-off line you want to work to (photo 11).
14. Double check the blade is sharp and if you have an adjustable mouth model, have only a small mouth opening. Planing from both ends into the centre will eliminate grain tearout on the corners (photo 12).
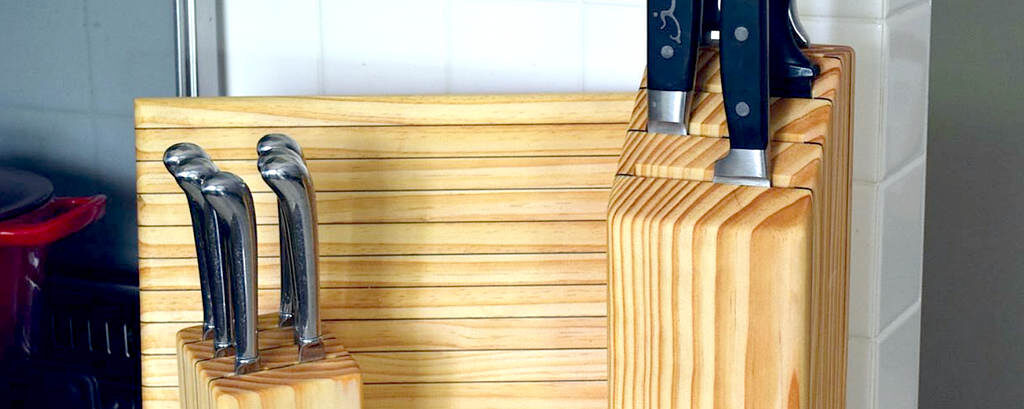
15. Profile the edges, this can be done with a plane (photo 13) or a round-over router bit. Turn the board over and sand off all sharp edges on the base and around the sides and corners. Photo 14 shows the finished board with the maker’s mark I burnt in with a pyrography unit.
Making the knife block
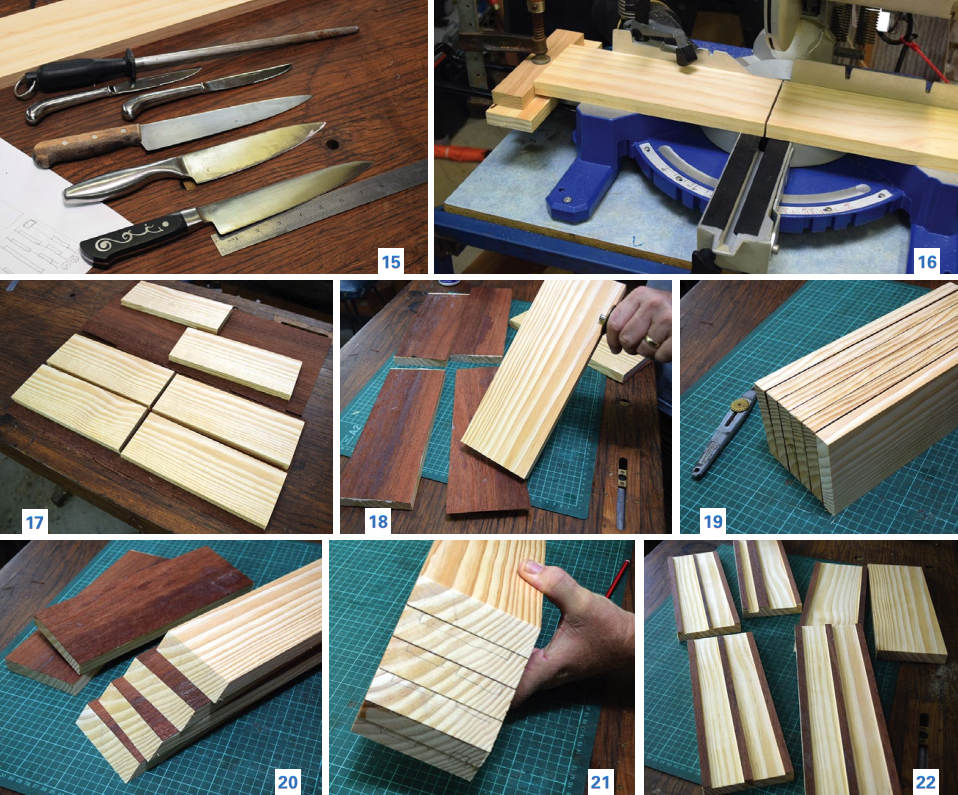
1. Select the knives and or implements you wish to store in the knife block (photo 15). Measure the length of the longest, and the width and thickness of each blade. You’ll need to add one or two millimetres clearance all around.
2. Organise how you want them to be arranged and draw a rough sketch denoting positions of each implement. This also lets you know how many pieces of timber you will require. The example here required six pieces.
3. The length of the longest implement will dictate the overall height of the knife block. At 300mm the sharpening steel was longest so I added a little extra for insurance and set my docking length to 310mm (photo 16). If you make the block from the one piece of timber you’ll get a good grain pattern; it’s not essential but looks good. If you’re going to use odd scraps for this project, disregard the last comment it will still look great.
4. Here I’m using a single length of 1800 x 110 x 19mm utility grade pine. Mark out and number six sections so you know the order they will go together.
5. Select your veneer and lay the pine out on top (photo 17). Glue the veneer to the pine as for the chopping board. Clean up the edges
the same way as well by trimming back the veneer with a knife.
6. Set your marking gauge and mark 10mm in from the edge (photo 18). Square up the pieces (photo 19).
7. Set aside the two pieces pieces that will go at the rear and cut 45° mitres on the tops of the other four (photo 20). Make sure the veneered face is uppermost.
8. Hold the pieces together and outline the compartments where you want them to go (photo 21). The best way to make the wide grooves shown in photo 22 is on the router table but a handheld router set to the required depth and width is also okay. A rebate block plane can also do the job.

9. Notice in photo 23 how the compartment for the steel is done in two halves, one in the front of piece No.6 and the other in the rear of piece No.5. When joined it makes the recess shown on the right in photo 24.
10. Dry assemble all pieces (photo 25). Mark and cut to length the overhanging pieces (photos 26, 27).
11. Double check all is okay before gluing up (photo 28). Leave to dry for 24 hours.
12. Hand plane the side flat (photo 29) or use a linisher or belt sander. Use a block plane on the sloping endgrain surface (photo 30) or use a linisher. Check for square as you go (photo 31).
13. Round over the edges as for the chopping board.
14. But wait there’s more.. .photo 32 shows the raw components for the steak knife block. It’s made the same way as the larger block using up scrap (photo 33). The slope was cut off after assembly. To finish off, all items were rubbed with a food safe rated oil.
These simple projects can be varied to construct handy storage units around the workshop as well as the kitchen. You could think about making a block to hold chisels, saws, card scrapers and so on. My advice is: do the kitchen projects first, you’ll be amazed how much shed time you’ll be granted if you look after the inside of the house first!
Photos: Steve Hay