The band saw is one of the most versatile power tools in any shop. From pattern cutting to resawing to joinery, it’s capable of jobs across the spectrum. The thin kerf of a band saw blade means less waste compared to a table saw or miter saw, and the downward cutting motion makes it one of the safest power tools to use. Despite these advantages, there is one big drawback that a lot of band saws suffer from: drift A saw that needs tuning or has a dull blade will really suffer, but even a well-maintained band saw can pull to one side during a cut There could be an issue with the tires — the crown, the axles, the alignment, the blade position on the crown — or it could be trouble with the blade itself, either in the set of the teeth or the tension the blade is under. While cutting freehand, drift can be actively worked against, but if you need to use a fence then you’d better hope it’s adjustable, and that you’ve adjusted it right However, there’s a fence design that skips the need for adjusting while still providing the benefits of a fence.

POINT FENCE. If you’ve done a bit of band saw work, then you’ve likely come across a singlepoint fence. The concept isn’t anything crazy: by keeping in contact with the workpiece at only one point, the fence maintains a consistent width (or thickness when resawing) while allowing for various angles of approach, and it makes controlling the direction of the workpiece easier.
The most common use of a point fence is resawing, but it’s often used when cutting curved pieces with a uniform width (or thickness). Less commonly though, a point fence can be used to counteract a drifting band saw, since there’s no worry about misalignment.

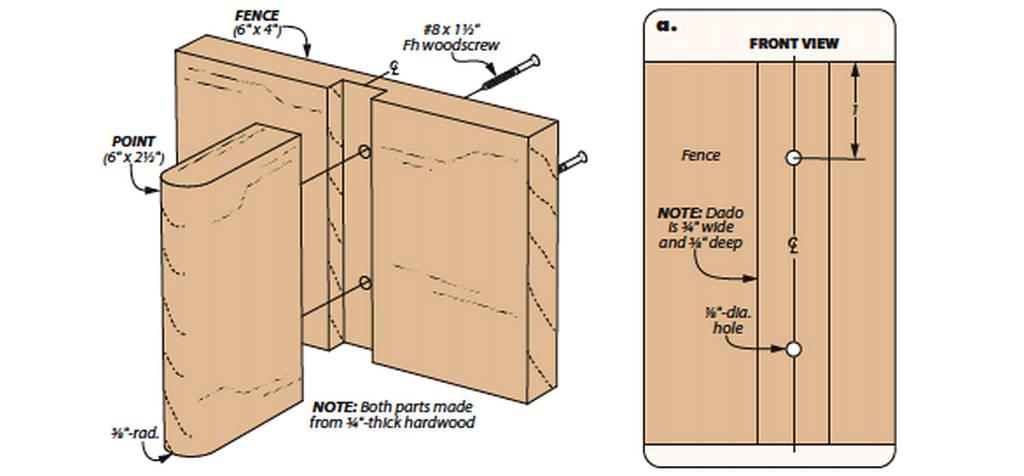
MAKING A POINT FENCE. A single-point fence can be as simple as a long board with a rounded end that gets clamped to the table. It can also be a complex, fully adjustable replacement for your stock band saw fence. How extensive you’d like your fence to be is up to you, but I prefer to take the middle ground.
The point fence illustrated above keeps it simple. It’s two pieces screwed together in a T-shape, then butted up to the stock fence of the band saw and held in place by F-damps. The fence can be short if you only plan on doing rip cuts, but a taller fence is better when it comes to resawing.
ROUNDED OR FLAT. There are differing ideas on on the best shape for the fence’s “point” Some people find a small flat helps get a straight cut started. Personally speaking, I prefer a rounded end that has truly a single point of contact. The rounded edge is easier for me to pivot on curved pieces as well as keeping straight rips under control. If you’re interested in a band saw point fence, it might be worth it to try both styles and see which you prefer.
USING A POINT FENCE
As I mentioned before, a big advantage to using a singlepoint fence is the control, like using a tool rest on a lathe. Not only does the fence keep a consistent width on the piece being cut, but it also allows you to easily adjust the angle of approach.
There’s a small bit of technique to using a point fence—keeping in contact with the fence. If your blade does drift, it may want to pull away from the point, so you’ll need to keep a bit of pressure applied against the fence while pushing through the cut As I mentioned before, the point fence is primarily an accessory for resawing and cutting curves. However, I find it useful for a variety of cuts, even joinery.
RESAWING. Whether it’s cutting a thick piece of stock into two usable boards or slicing a nicely figured piece into bookmatched veneers, resawing is incredibly useful and best done on a band saw. A point fence is ideal for resawing, as it eliminates any worry that the fence might be misaligned with the blade drift Resawing with a point fence ^ is easy. The point will help maintain a constant thickness, so you simply need to keep the cut straight and the workpiece pressed against the fence. This minimizes the blade marks and maximizes your material.
RIP CUTS. Straight cuts on the band saw are usually reserved for thin and small pieces, which could be a danger to try on the table saw. This is where counteracting drift really comes in handy. If you’ve gotten the hang of resawing and making curved cuts, then you have all the skills required. The key is keeping the piece against the fence and finding the best direction to approach the cut from.
CURVED CUTS. Most of the work I do at the band saw is curving cuts that simply wouldn’t be possible elsewhere. While many of these odd shapes are done freehand, a fence is useful for achieving a consistent thickness during the cut despite the shape (right photo above).
Again, some pressure must be applied against the point, as well as forward through the blade. Unlike with resawing however, you’ll want to adjust the angle of approach along with the curve to minimize chatter and blade marks. Depending on the drift of your saw, the piece may want to pull away from the fence on a curved cut, so a few test cuts beforehand can be helpful.
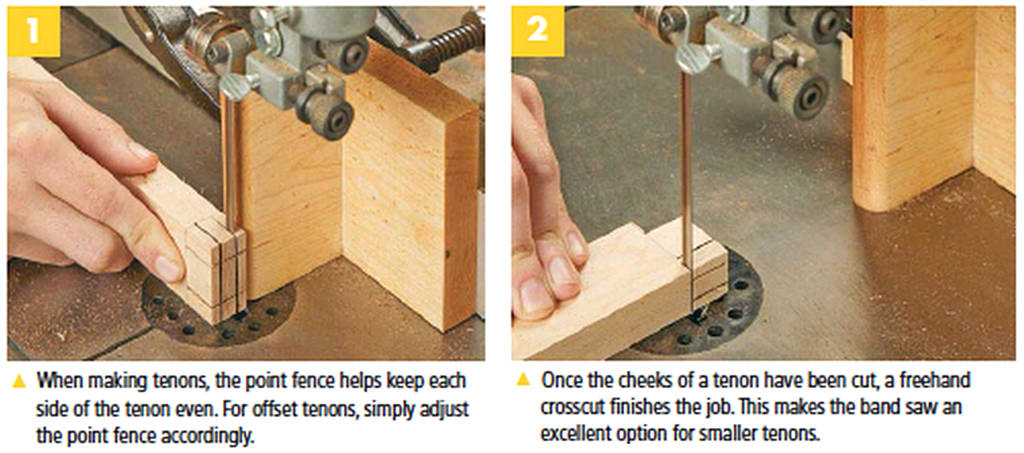
TENONS. A point fence is handy for small tenons, especially those on the ends of boards that would be awkward at the table saw. After laying out the tenon, begin by establishing the cheeks (Step 1). Then pull aside the fence and cut the waste freehand (Step 2).

THE BRIDLE JOINT
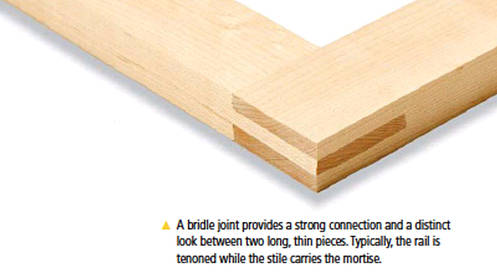
While tenons can be cut by about any tool under the sun, there’s one specific “band saw exclusive” joint that’s far easier to make when using a point fence. The bridle joint you see pictured to the right is a great choice for long, narrow pieces. It creates a strong bond and offers a distinct look, making it a popular option on many frames.
 Looking at the joint, you can see why I’d favor the band saw. While the tenon can be made as easily as any other, the shape of the mortise calls out to be made at the band saw. Of course, if drift is an issue, then getting those lines perfectly straight for a good fit can be a hassle. That’s where the point fence comes in.
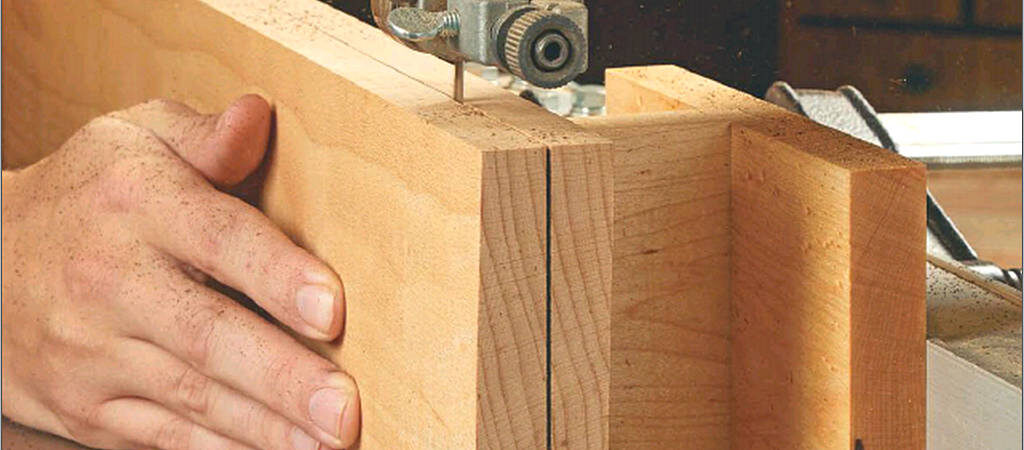
MAKING THE MORTISE. The first and most important step is to establish the sides of both the mortise and the tenon, as shown in Step 1 below. This is where the point fence is useful, as it’ll keep your cuts on-line. However, it’s also important to minimize the blade marks for a tight fit and a clean look. This means finding the right feed angle and keeping steady pressure? both against the point and into the blade.
First cut the mortise. The tenon is next, but the fence will need to be nudged slightly toward the blade to account for the kerf.
Once both sets of straight cuts have been made, it’s time to get rid of the waste with some freehand cutting. Usea long, curving cut through the waste to free up the mortise. Bump the bottom of the mortise against the blade to dean it up (Step 2). If the bottom of the mortise is looking rough, dean it up with a chisel.
Completing the tenon simply means cutting the shoulders (Step 3). This should leave you with a snug, sturdy join.


