With all the options available, choosing the joinery for a project can feel overwhelming. To be honest, it’s something a lot of woodworkers (myself included) obsess about a little too much.
An easy way to narrow your choices is by dividing joinery into two broad categories: case joinery and frame joinery. Case joints have flat, relatively wide parts. Think cabinets or boxes.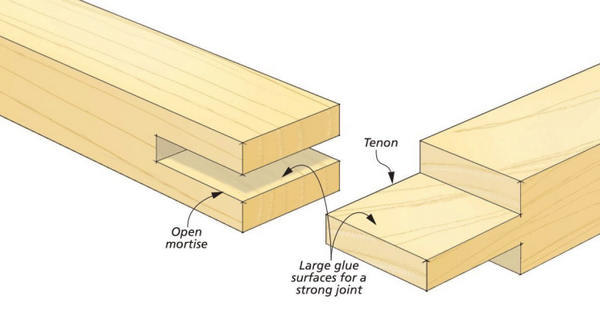
Frame assemblies cover such territory as picture frames, doors, even table bases and chairs. It’s the realm ruled by the mortise and tenon. So when design editor Dillon Baker went looking for the right joinery for his valet chair (page 28), the mortise and tenon was waiting. This joinery option has plenty of strength, but is out of sight once it’s assembled.
Instead Dillon chose a showier version called a bridle joint. You can see it in the leg and rail assemblies of the valet chair in the photos below. It works just as well in frame and panel settings, too in case you’re interested.
There are a couple of things I like about bridle joints. First, You get all the strength of a mortise and tenon. Along with it, the exposed joinery provides visual punctuation to the overall project. It’s almost like inlay — super strong inlay.
ANATOMY. The drawing above shows how the components work together. You can clearly see the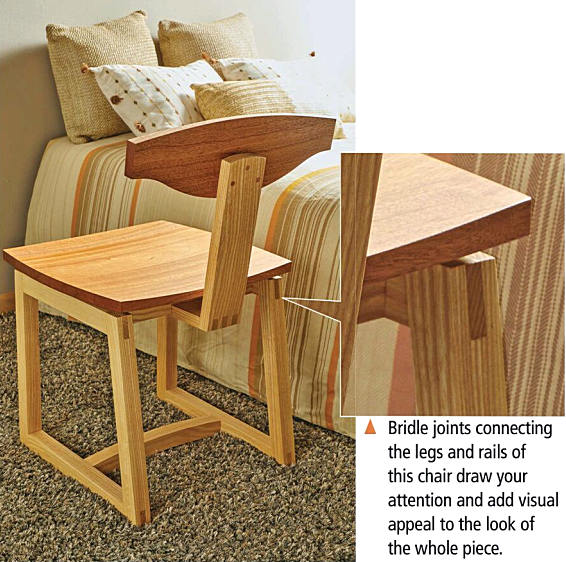 family resemblance – to regular mortise and tenon work.
Let’s start with the mortise. It extends all the way through the width of the workpiece. It’s also exposed on the end, looking like a large slot.
A through mortise allows the mating tenon to be longer (and stronger). You’ll also notice that there are no end shoulders on the tenon, either. Adding these up means there is a lot of face grain glue surface to go with the good looks. Come assembly time, the wide shoulders help register the parts. They also resist racking (diagonal) forces during the life of the project.
On a side note, this joint looks a lot like a super-sized finger joint. Take a quick glance at the valet chair again and you can see how the bridle joints on the legs and the finger joints in the back support are complementary.
SIMPLIFICATION. Using bridle joinery has other benefits, too. Sizing parts is simplified. The parts run the full length so there’s no depth of mortise/ length of tenon ciphering that has to take place. This really comes in handy when making frame and panel doors.
Another benefit is more process related. Cutting the mortise and forming the tenon are similar steps with this joint. This can reduce the number of tools needed and eases the setup when getting started.
For this article, I show how the joint is made at the table saw. All it takes is a simple jig.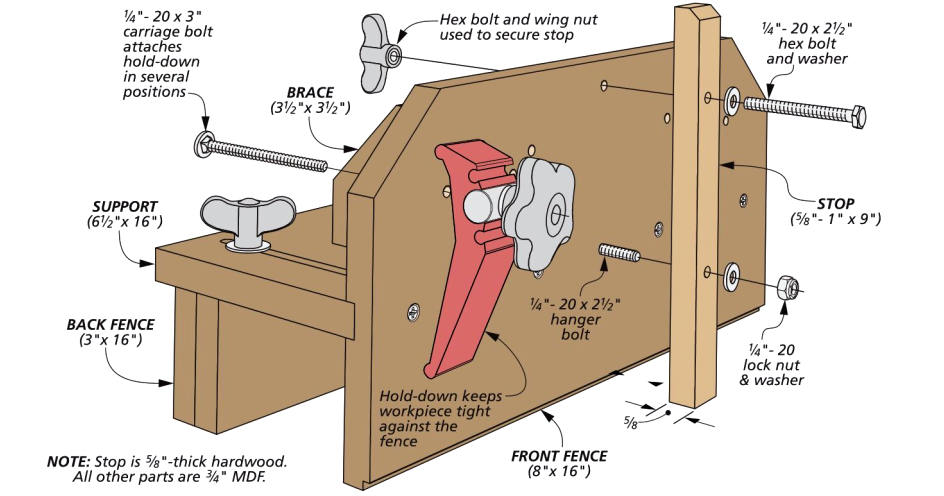
START WITH A TENONING JIG
The key to cutting a bridle joint is to use a tenoning jig. This kind of jig holds the workpiece vertically to the saw table. This allows you to create a deep mortise on the end of a workpiece, as well as the tenon for the mating part. I also find that this cutting action results in a smoother glue surface than a typical dado blade tenon-making operation.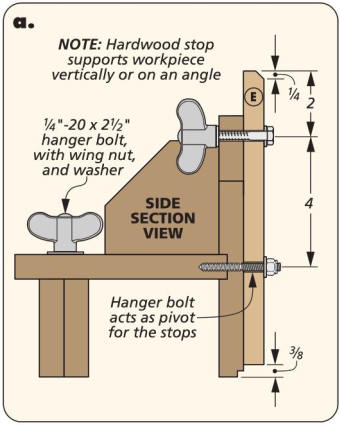
OLD-SCHOOL OR DIY. Tenoning jigs take two forms: cast iron jigs, or shop-made versions. Either type of jig will work for this method. Cast iron tenoning jigs go in and out of fashion. And we’re definitely in an ebb-tide situation right now.
SIMPLE & SHOP-MADE. I don’t want the lack of a jig to slow you down from learning how do this. The drawing above shows my favorite shop-made tenoning jig. It rides on your table saw’s rip fence. And it’s easily adjustable. The body can be adjusted to suit your rip fence. The stop handles square and angled joints with ease. Both plywood or MDF are solid material choices.
CUTTING THE JOINT
When cutting joinery with power tools, consistently sized parts make a huge difference. Spend some time planing and sizing the parts so that they’re the same thickness and width. Hitting a specific dimension isn’t as big of deal as consistency among parts. Otherwise, you’ll end up fiddling with every joint.
MORTISES, FIRST. The order of operations on a bridle joint is the same as with a regular mortise and tenon. Form the mortises then use them to gauge the size of the tenons. The tenon faces are easier to adjust than the inner recesses of the a mortise — even an open mortise.
Figure 1 on the next page shows you the setup for cutting the mortise. It shows a regular blade installed in the table saw. But if you have mortises that will be wider than H”, you can use a dado blade. Just be aware that a dado blade limits the length of the mortise.
Most of the time, the mortise is centered. I make one pass with the workpiece set just offcenter to the blade. Then I flip the workpiece around and make a second pass.
Take a moment to measure the width of the mortise. If necessary, bump the fence away from the blade to make it wider. Then fire up to cut a mortise on each end of all the relevant parts.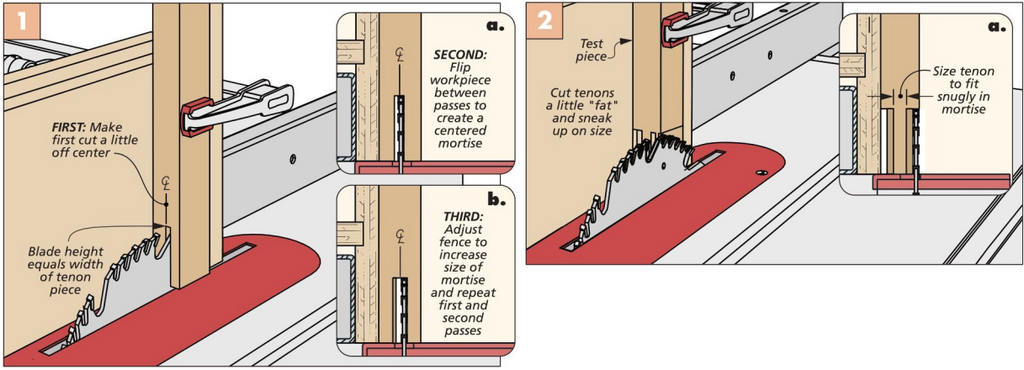
SHIFT FOR TENONS. The tenon-making step in Figure 2 looks nearly identical to how the mortises were formed. The big difference is that the workpiece is shifted so that the blade is cutting on the outside, leaving the tenon in the middle.
Just as with the mortise, the tenon is formed by making pairs of passes. You make a pass along one side of the workpiece, then flip it around for a second pass. This is detailed in Figure 2 If you’re using a standard blade, may need to make a series of passes (on all your parts) to work your way down to a tenon that’s close to fitting.
That’s not a bad thing. I prefer to cut the tenon thick, then make small adjustments to dial in the fit. Trying to get an acceptable fit in one go is asking for trouble.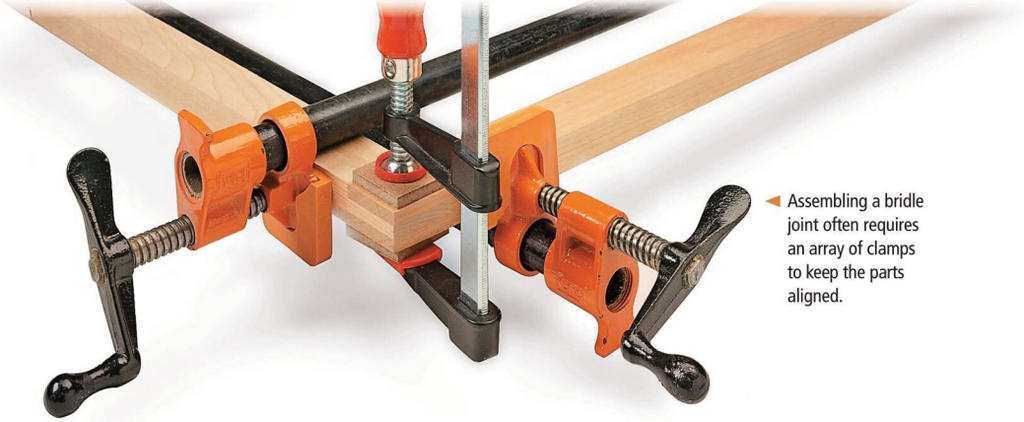
I’m aiming for a tenon to slide into the mortise with moderate resistance. Easy enough to do with my hands, without having to resort to clamps or heavy mallet blows. At this point, complete the remaining tenons on all the rest of your parts.
PAUSE FOR GROOVES. If your project is a chair or table, you can skip ahead to assembly advice below. For frame and panel work, you need to make the panel grooves at this point in the process. Just be sure to stop the groove short of the tenons. If you don’t, you’ll end up with gaps and misaligned parts.
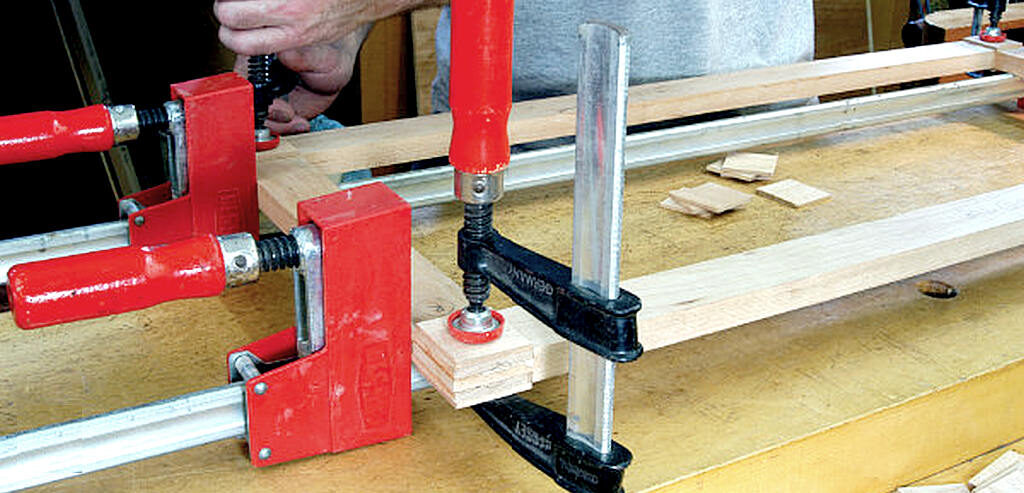
ASSEMBLY. If there’s a downside to bridle joinery, you’ll encounter it at glueup. The open-ended mortise means you have to apply clamps from both directions to ensure that the parts are fully seated. In addition, the mortise sides could flare away from the tenon requiring another clamp right on the joint. This is what you see in the photo below.
Bridle joinery and the table saw were made for each other. The skills are easily mastered. The payoff is a joinery option that not only stands the test of time, but also packs a visual punch. That’s a lesson worth learning.

