By Ellen Kaspern and Ken Burton
Last May, we had the good fortune of teaching a chairmaking class together at the Yestermorrow Design/Build School in Warren, VT. As we were putting the class together, we knew we wanted a chair that was: comfortable, contemporary yet classic, and relatively easy to build for woodworkers with limited experience. But we also wanted to include some sound chairmaking techniques to give the students a solid foundation upon which to advance their skills. As we put the class together, we developed the chair presented here, which seems to tick all those boxes. The chair’s comfort stems from the angles incorporated into its pattern-routed back legs. The woven seat and back are easier on the backside than solid wood, and the design is light and airy but still fits in well with many decors. The 1½”-wide webbing for the upholstery is available in a variety of colors; each chair requires 25 yards. Construction can be accomplished almost entirely with 90° joinery but also incorporates pattern-routing, a powerful technique for creating identical parts. The class went well: In just five days, we had gone from rough lumber to folks weaving their seats. If you have a need for a dining chair or four, we think you’ll enjoy building this design.
Shaped pieces with square joints
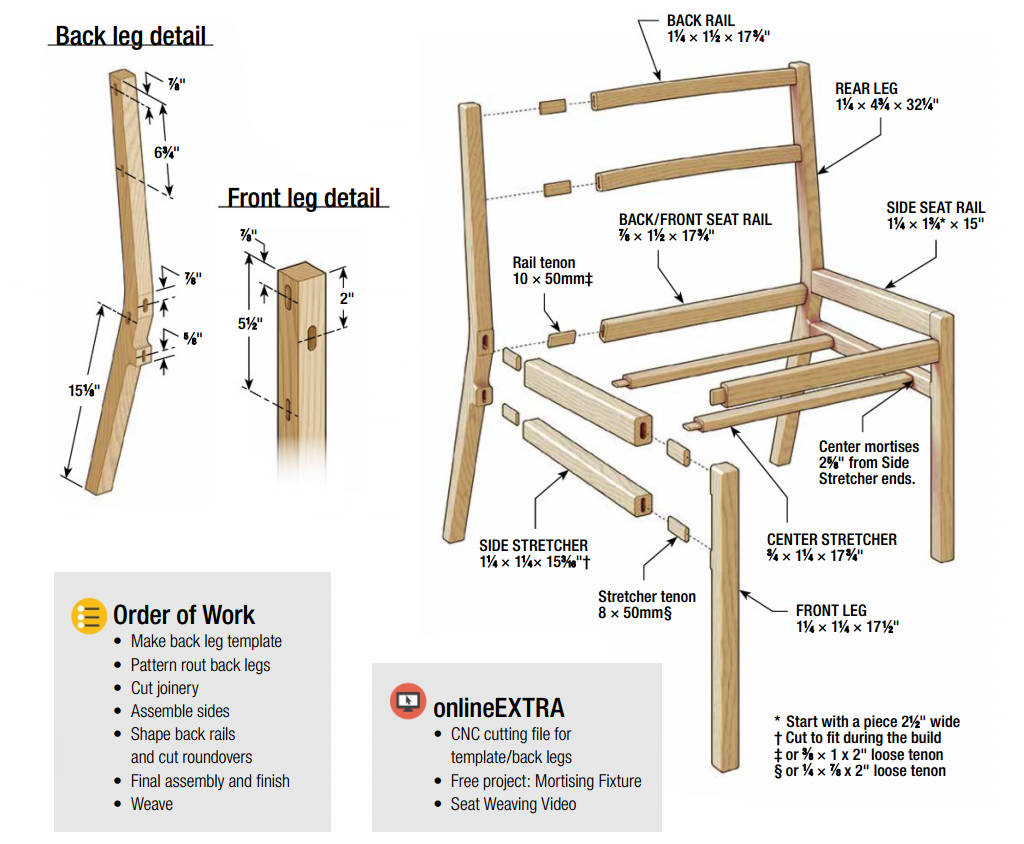
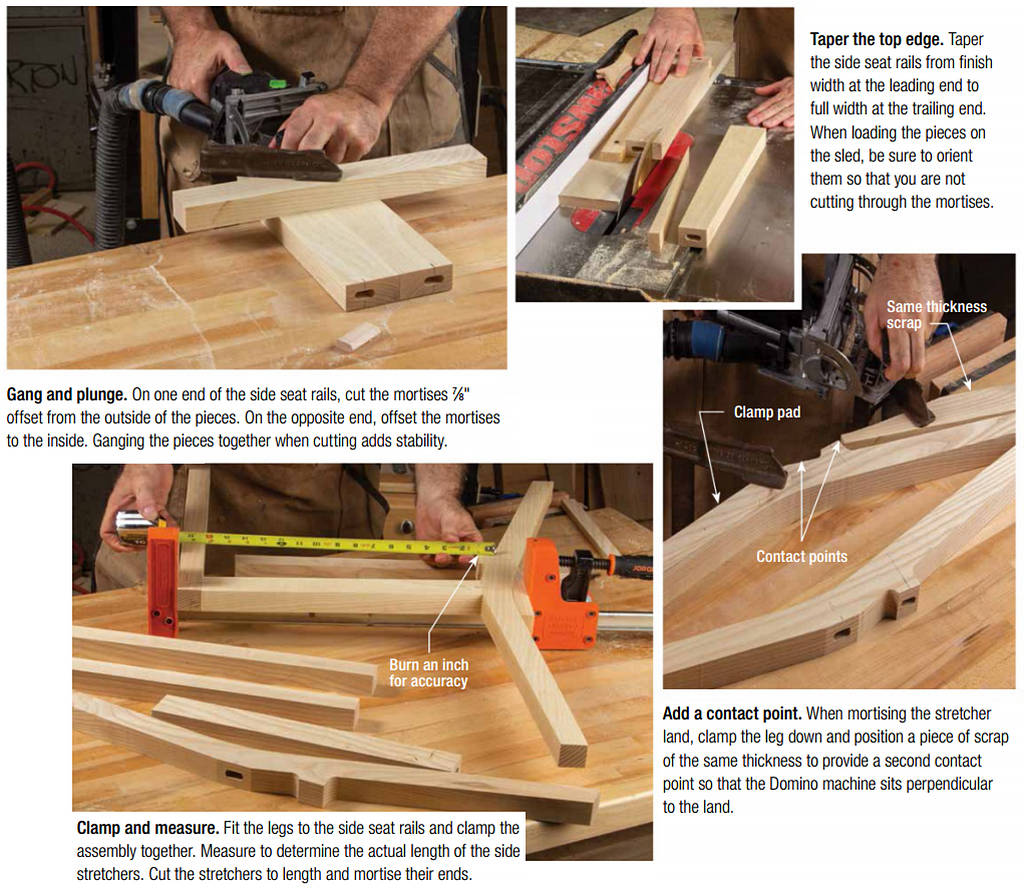
The back legs are cut from a single piece of wood and are bandsawn roughly to shape before being pattern routed to final size. The curve in the back rails is also sawn rather than bent. While the side seat rail appears to be a parallelogram, it actually begins as a rectangle. The parallelogram shape comes after the joinery is cut. As for the joinery, all the pieces are connected via loose tenons. In the class and in the photos presented here, these joints were cut with a Domino machine, but they could also be easily cut with a plunge router and mortising fixture or slot mortiser. Of particular note are the small flat lands on the back leg where the side seat rail and side stretcher connect. These surfaces are parallel to each other and perpendicular to the floor. The seat and back are woven with 1½” webbing. In the class, we used 1″ Shaker tape. Both work well, though purchase them first and adjust the dimensions as noted so that the spacing works out.
Make the back leg template
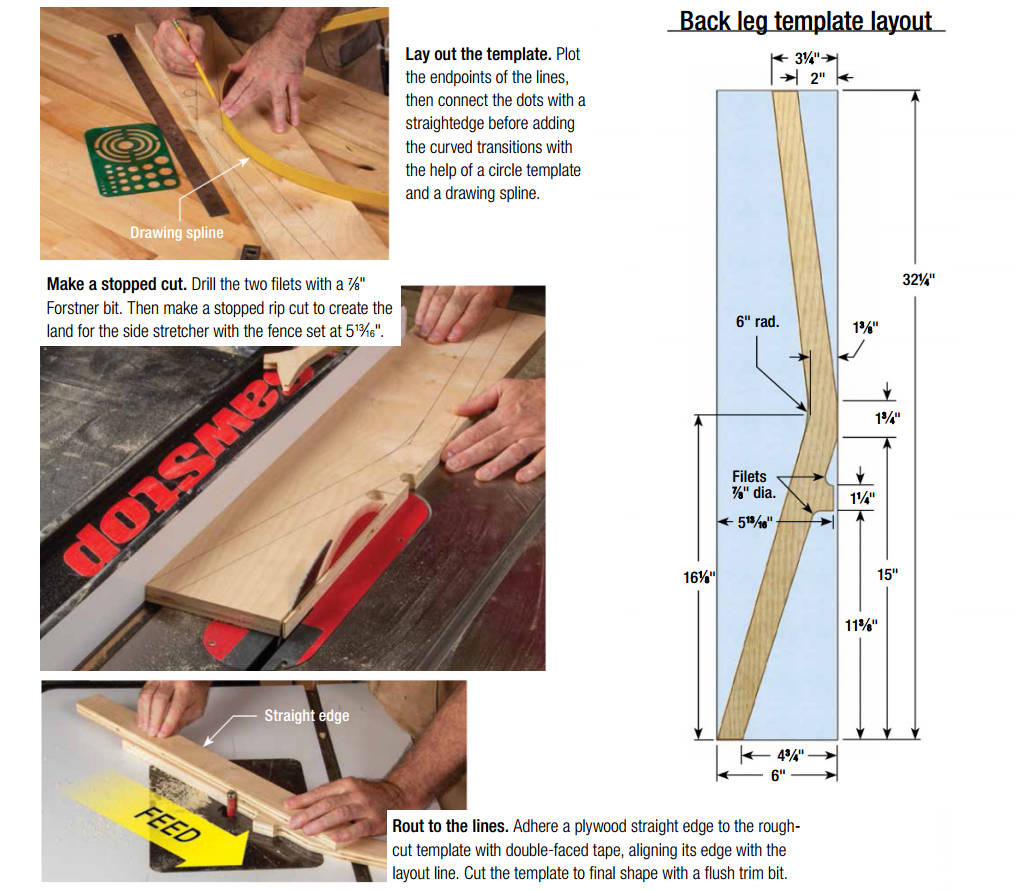
Cut a piece of ½” or ¾” thick sheet stock to size and lay out the shape as shown in the Back Leg Template Layout (right). After drilling the filets on the leg portion, rip away the front edge of the lower part of the template to make the land for the side stretcher. Bandsaw the rest of the template just outside your layout lines. Clean up the straight parts of the template at the router table and the curved portion at the drum sander.
Shape the back legs
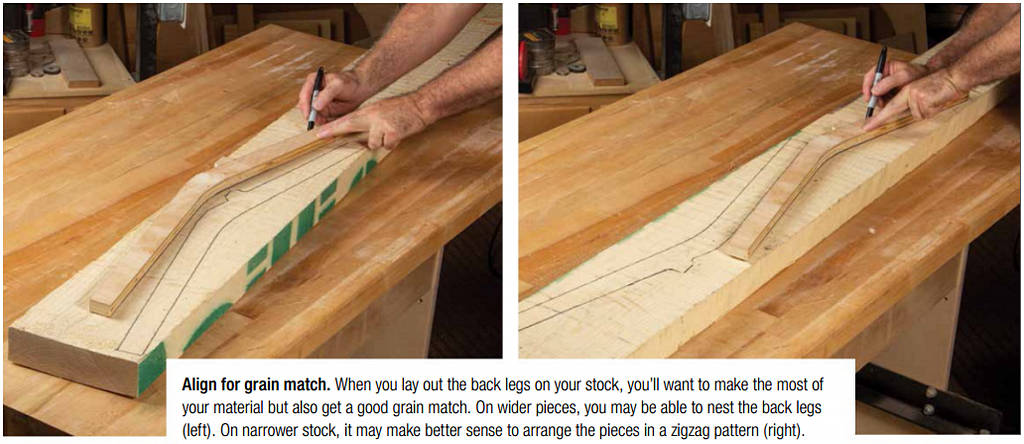
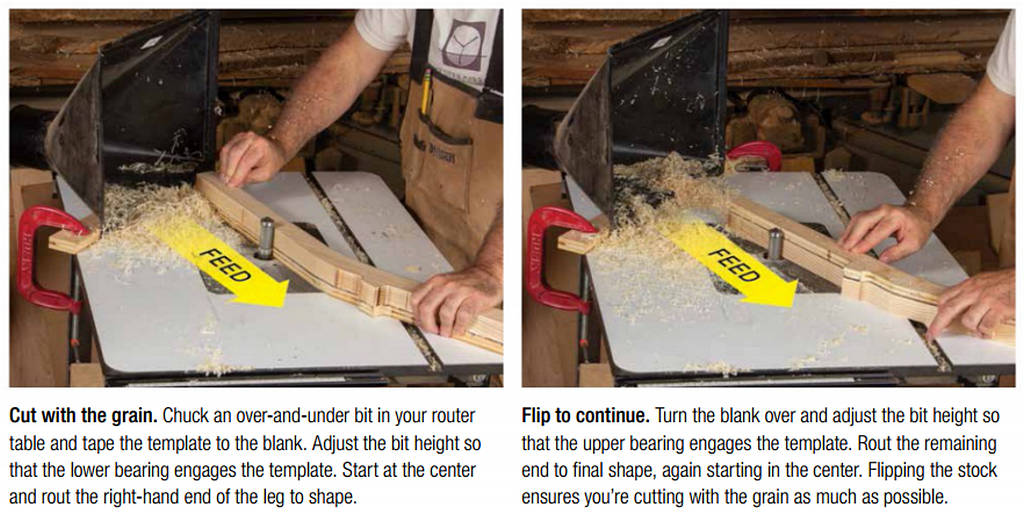
Use the template to help plan where to cut the back legs from your stock. Rough cut the pieces, then mill the stock for all four legs, the side seat rails, and the side stretchers to size. Pay particular attention to the grain on the legs and stretchers, as these will be visible. The seat and back rails will be covered with webbing, so you can hide less desirable grain patterns on these pieces. Retrace the template and bandsaw the back legs roughly to shape. Try to stay about 1/16″ outside of the layout line to allow enough material for routing, but not so much that the bit has to make too big a bite. Then rout the legs to final shape at the router table using the template as a guide. Note: when you double-face tape the template to the blank, squeeze the pieces together with a clamp briefly to ensure good adhesion.
Cut the joinery
Cut the front and back seat rails, back rails, and center stretchers to size. Note that the lengths of the pieces worked well with the 1½” wide webbing we used for the seat and back. If you’re using a different width of webbing, doublecheck the dimensions to be sure there is enough room for an odd number of both cross and longitudinal pieces. You can increase or decrease the width and depth of the chair by up to ½” or so as necessary. Cut the side seat rail-to-leg joints before tapering the side seat rails. Then rip them to final width, running the tapered edge along the fence. Clamp the side seat rails between the legs to get the length for the side stretchers. Then cut the stretcher-to-leg joints as well as the stretcher-to-stretcher joints, the back rail-to-leg joints, and the front and back seat rail-to-leg joints. Note, when mortising the lands on the rear legs for the stretchers, set the Domino to cut a little deeper than usual to make up for the gap that results from the legs’ shape.
Shape, assemble, and finish
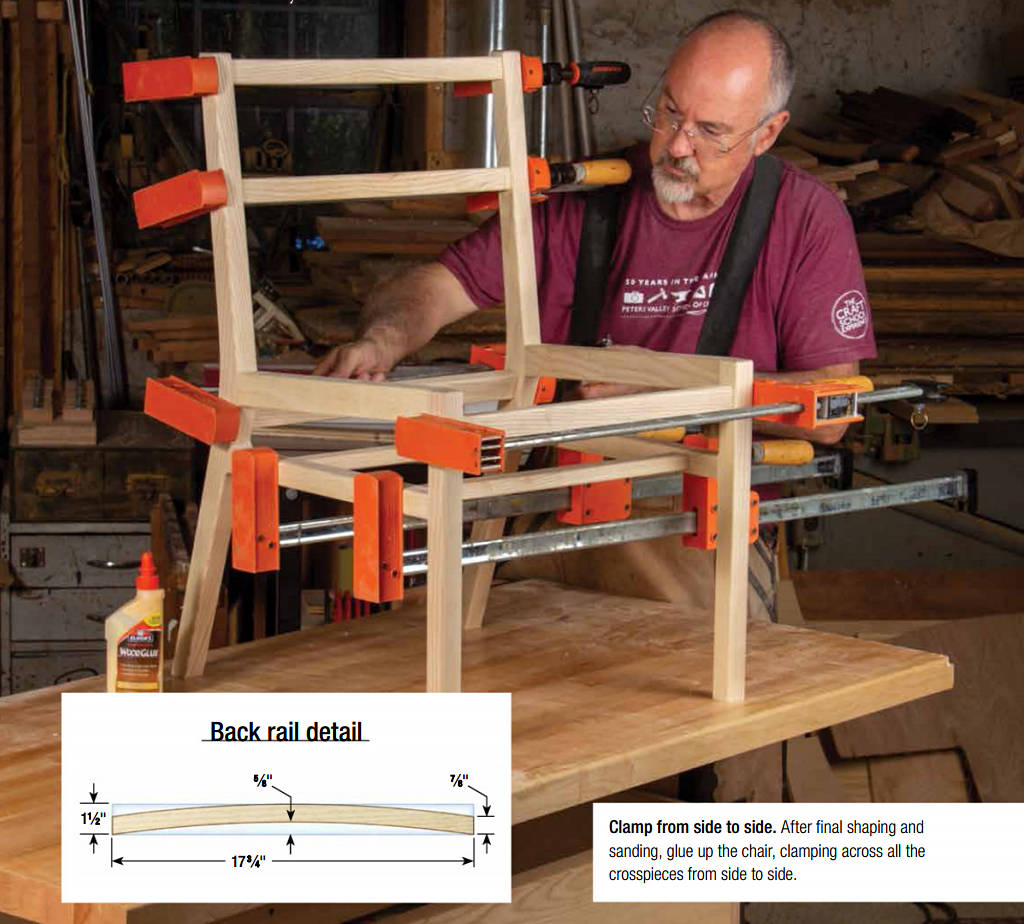
Glue up the two side assemblies individually. Cut the curves in the back rails as shown in the Back Rail Layout (below). Shape all the edges of the back rails, front and back seat rails, and center stretchers with a 3/16″ roundover bit chucked into your router table. Also, round all the edges of the side assemblies. Sand everything through 220 grit. Dry clamp to ensure all fits as planned. Then glue up. Clean up any excess glue and do a final sanding. When all looks good, finish as desired. We applied a coat of Seal-A-Cell followed by two coats of Arm-R-Seal.
Weave the seat and back
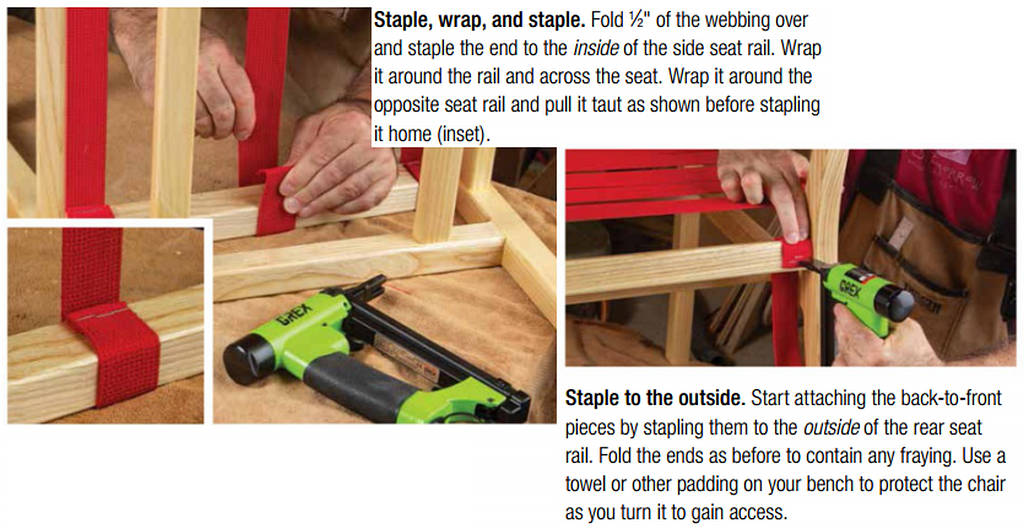
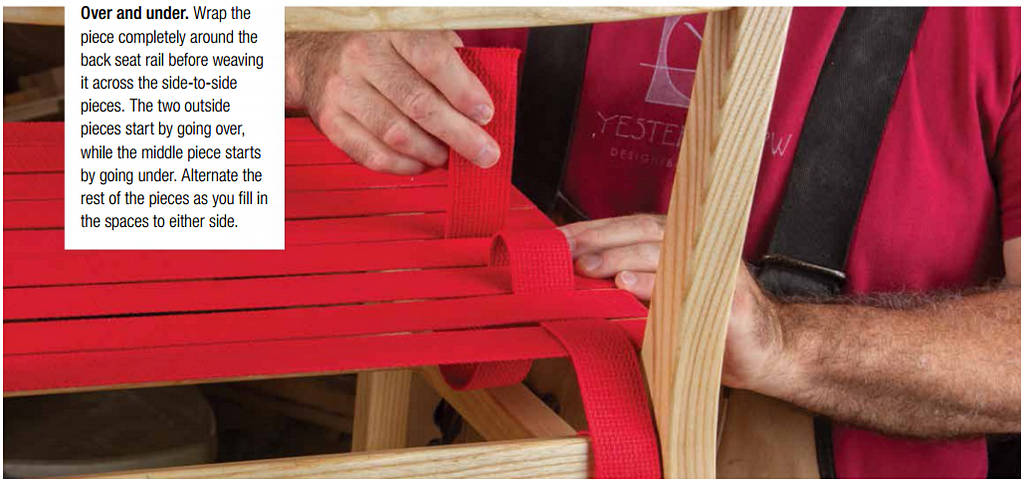
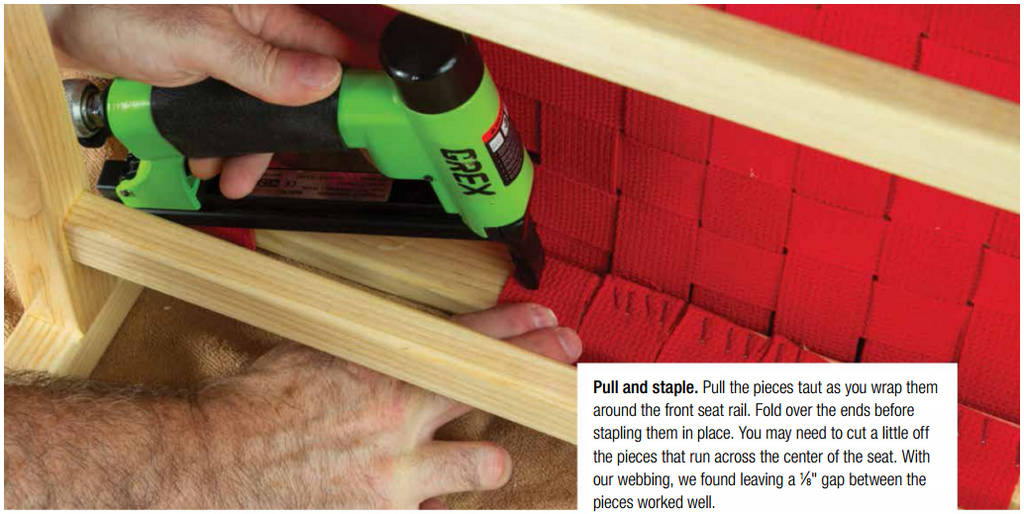
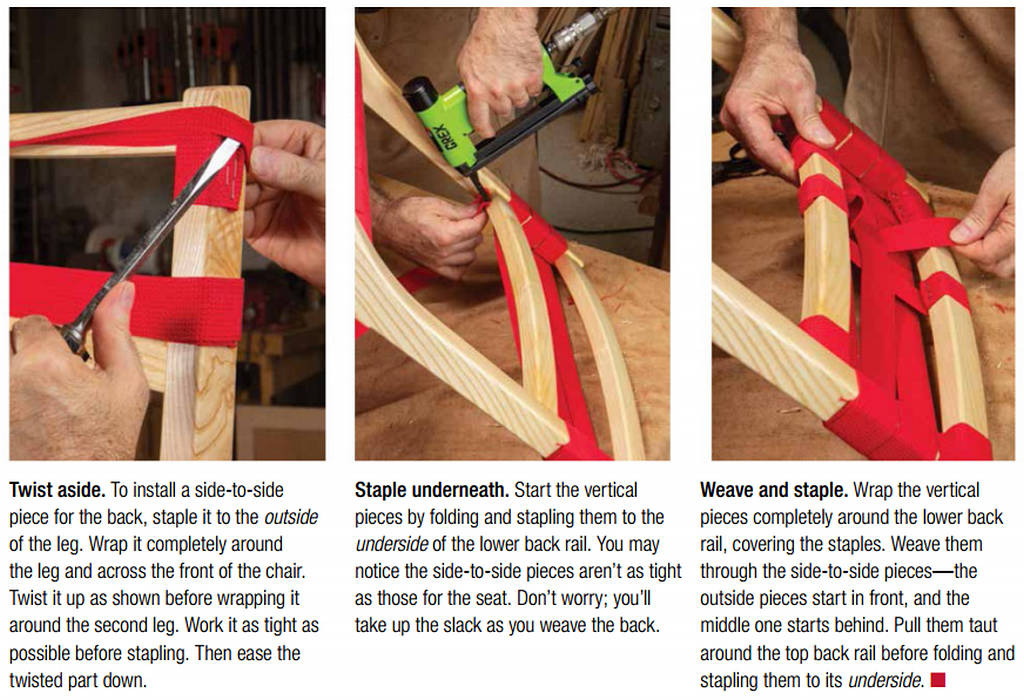
Unlike traditional Shaker tape upholstery that wraps completely around the surfaces it covers, the webbing on this chair only covers the top of the seat and the front of the backrest. So, instead of being wrapped in long strips, it is cut into individual pieces that are stapled in place. While a manual staple gun will work, the process goes a lot better with a pneumatic model (see Buyers Guide). Start by determining the length of the side-to-side pieces for the seat by pre-wrapping an uncut piece. (Ours were 29½” long.) Staple the front, back, and middle pieces in place. Then fill in the spaces on either side, spacing the pieces evenly. Next, determine the length of the back-to-front pieces. (Ours were 29″.) Staple the middle and the two outside pieces to the back seat rail before weaving them across the seat and stapling them to the front seat rail. To conceal the staples on the side-to-side pieces across the back, the pieces need to be longer than those for the seat. (Ours were 34″). Staple these in place, twisting them initially to hide the second set of staples. Then add the vertical pieces (ours were 16″ long), stapling them first to the lower back rail and then the underside of the top back rail. Have a seat and relax; you’ve earned it.
