Douglas Brooks wrangled a team of novice woodworkers over five days at JTA, supervising the transformation planks of Japanese red cedar into a river boat!
 Japanese Tools Australia sponsored the internationally renowned Douglas Brooks to share his insights and skills in a five-day workshop that saw the planks to the left woven together with simple tools and deep insight into a watertight Japanese river boat.
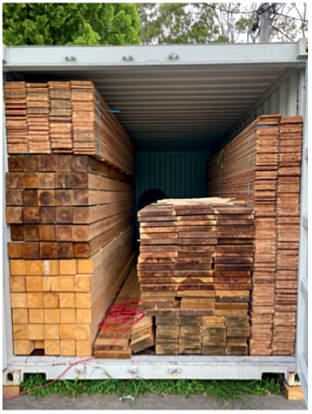
Mitch from JTA organised the importation of a container of Japanese red cedar (Sugi) because no equivalent Australian substitute in 300 x 30mm could be found (at an acceptable price).
Sugi has a story behind it. Japan is home to more than 4,000 species of timber. The firebombing of Japan in World War Two burnt down millions of traditional wooden homes. After the war the government decreed that terraces used for the growing of vegetables and some rice paddies be planted with the fast-growing boatbuilding timber Sugi. These ubiquitous forests were soon being harvested to supply stock for building whole new towns and cities.
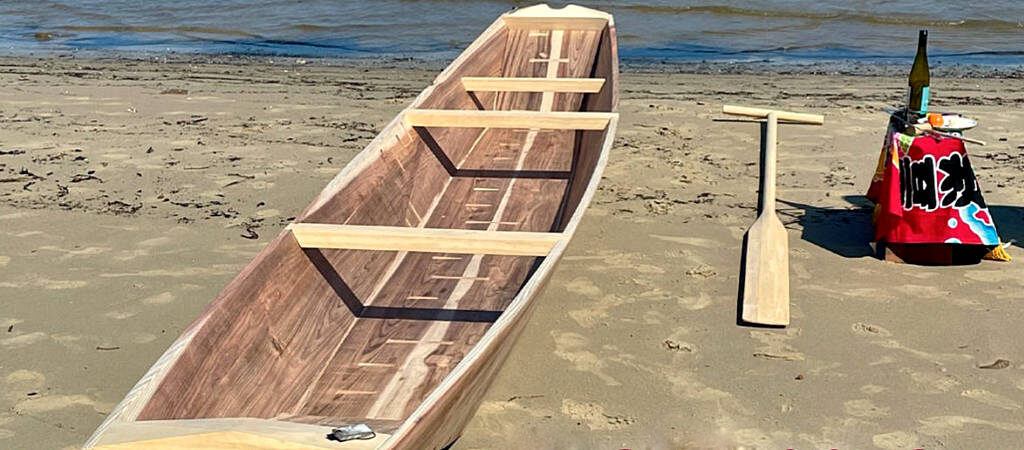
The Sugi river boat above is propelled by a sculling oar that allows the boat to navigate the narrow canals found in rice paddies. The suburbanisation of Japan has seen most rice paddies near large towns filled in for urban development. These days a narrow barge powered by a Tohatsu outboard is used when the rice paddies are flooded. Building the boat out of Japanese red cedar meant that traditional Japanese boatbuilding tools could be used and the techniques Douglas has mastered could be applied with an expectation of success.
1. The keel for the river boat was made using two 4m planks of 300 x 30mm-thick Japanese red cedar. The timbers were bookmatched to balance the stressses in the timbers and mated side-by-side on 90 x 45 framing timbers. Previous to the class arriving, Mitch and Christian had built three sets of frames to support the bracing timbers used in traditional Japanese boatbuilding (a Japanese boatshed would have sturdy rafters for just this purpose). The planks were laid as close as possible before a pull saw was used to “brush” the nearly closed joint. A saw fit joint relies on the set of the teeth to sweep away imperfections in the joint. Narrow wedges kept the boards less than 1mm apart.
2. When no light could be seen through the joint the vertical kerf marks were saw brushed away with a different sawing action. This time the saw was drawn across the grain, producing a ripping instead of a cross cut pattern in the kerf. This stops the ingress of water along an otherwise vertical kerf pattern.
3. When the boards were released from their stays they were mounted vertically and the horizontal kerf pattern checked (and in some cases carefully corrected).
4. Here we see wide clenched boatbuilding nails and tsubanomi tools that are used to create the path for the hand-wrought nails to travel along (a little like chisels, however they separate the grain instead of removing it). Plus solid wood wedges cut at 4.5° to conceal the nails.

5. Nail centres were then marked out before the wedge shapes were traced and then carefully cut out. The wedge depth is half the thickness of the plank.
6. With the wedge mortise cut, it was time to chase the future nail path back to its origin. Here you see the straight tsubanomi being hammered in and then out of the nail path. The hilt on the sides of the bolster accepts the removal blow from the hammer on its upward stroke.
7. The straight tsubanomi had done its job and can be seen penetrating the base of the wedge. When the nail is driven home, the distorted grain will want to return to its original place, locking the nail and the boards together and producing a waterproof seal.
8. “Killing” the timber is a standard practice in a lot of Japanese woodworking. Here you see the slightly curved peen of the Japanese hammer being used to hollow out the middle of the planks. The next step was to run a bead of urethane glue down the centre of one plank and then mist the matching plank with water before clamping them together. Killing the centre creates a seamless joint.

9. When the glue was dry the clamps were removed and the board returned to the vertical. The curved tsubanomi was then driven home into the second board, creating a path for the hand-wrought boat nail to follow. The nail itself was bent slightly (with hammer blows to its outer face) before being driven home with a hammer and then set with a punch.
10. The sloped mortise was then smeared with glue and the matching wedge hammered home. When the glue was dry the wedge was cut flush with a pull saw.
11. To add extra strength to the joint long chigiri blocks were cut with the same 4.5° slope as the wedges. These double-ended dovetail splines are immensly strong as well as being a delight to the eye. The bulk of the waste was drilled out before the chisels went to work. Great care was taken to leave more than just the pencil line on the plank. This meant the chigiri formed a friction fit and would not shrink in the future and fall out.
12. Japanese boatbuilders are a pragmatic bunch, if urethane glues existed one hundred years ago and were as cheap as they are today, they would have used it. The chigiri joint was smeared with glue and the trench misted with water before it was driven home.

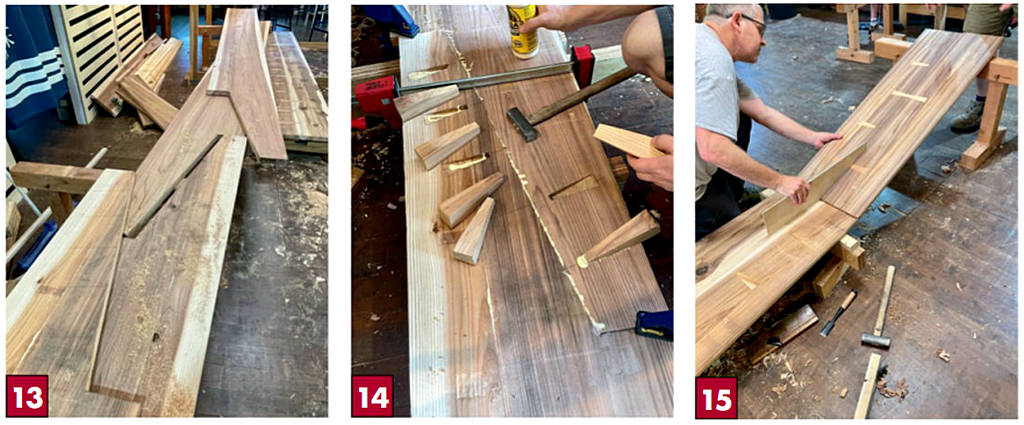
13. Traditionally a Japanese boabuilder would choose a tree in the forest and have it milled to thickness. The length of the container meant that the boards had to be cut down to fit, hence a scarf joint needed to be used to weave them back together again. One advantage of the scarf joint was that a slight “kick” in the board could be achieved. This reduced overall waste in the board.
14. The scarf joint took two teams Ia whole morning to saw fit into position. Once the joints were perfect the gunnel boards were glued and clamped together. Then the wedge trenches were cut, the tsubanomi used to map the path of the nails and then the nails themselves driven home and set. Wedges were then glued and hammered in place.
15. The river boat featured two transoms (we would call one the bow and the other the stern). The transoms relied on a tongue and groove joint for strength. This joint was also a major saw fit challenge. The angle was right when it matched the template.

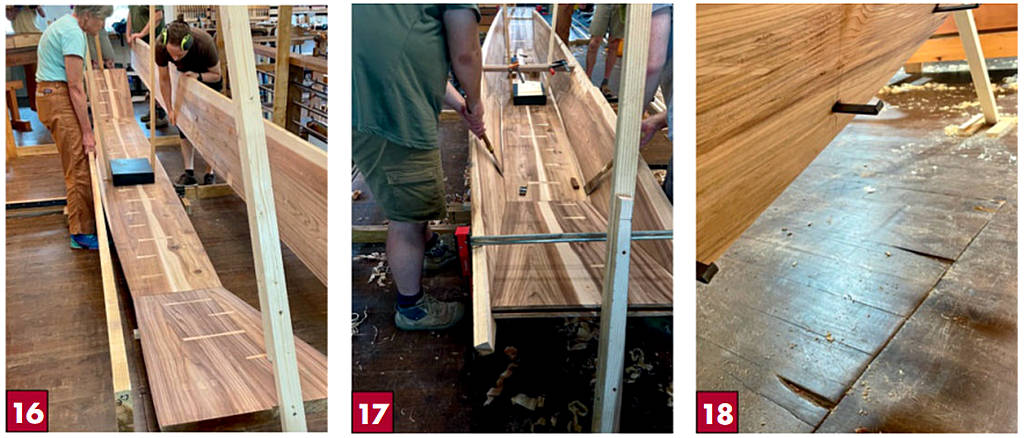
16. Notice the 20kg weight in the middle of the keel and the brace timbers flexing the keel to the correct curve. What you can’t see are the blocks under the ends of the keel that set the bend in the keel.
17. It was all hands to the deck in the image that you can’t see! The hull with the gunnels clamped in place was inverted and a felt tip pen run along the intersection of the hull and the overlapping gunnel. The waste was trimmed, then a 6mm splay was planed on the gunnels, before it was reassembled and saw fit to make it watertight.
18. The tsubanomi was used yet I again to create the path for the boat nails that locked the gunnels onto the keel and the transoms. Before the nails were driven home a small mortise was cut to conceal the clenched head of the nail.

19. The reason for planing a 6 x 30 mm splay on the mating face of the gunnels was to allow saws to access the intersection of the keel and gunnels without the handles of the saws getting in the way. This is one of many insights that Douglas has published and shared with future Japanese boat-builders. Knowledge was power, it was hard won and precious in a culture that didn’t publish text books, or have boatbuilding schools to share and disseminate knowledge. There is a lot to see in this photo. The string is stretched fore and aft then aligned with a single known height marked amidships on the planking. Keeping one’s eye in alignment with the string and the mark one can set marks the length of the plank for the shape of the gunnels.
20. The planar sheer line shadow points were then joined together in a seamless curve with the help of a flexible 38 x 19mm length of timber. This line was then roughly cut before being planed to true by hand. At this point the brace timbers were removed and the weight lifted from the centre of the keel. The graceful lines of the boat became evident when the gunnels were planed smooth.

21. The hallmark of Japanese boat-I building and carpentry is that every part of the tree is honoured, waste is kept at a mimimum, curved branches and trunks are utilised and the stresses in a log are balanced when it is milled into boards and assembled into a temple, a teahouse or a boat. The key to this different approach to working with wood is that a string line is used to mark the centre datum of all stock. In the west we create a flat face or side and use it as a datum. Using a centre datum is a real game changer.
22. The sculling oar lock on the stern and the bow block were a challenge to mark out and then cut. Douglas knew how to project the lines from the boat onto a block and then cut it to shape, however the teacher in him had the team resolve the issue… themselves.
23. Two mortises were then cut into to the gunnels to accommodate a thwart brace. Next step was to cut lapped dovetails onto the ends of the seat thwarts and then trace the matching dovetails onto the gunnels. The seat thwarts were then glued and screwed in place and all edges arrised with planes.
24. The final couple of steps in the making of the boat saw it inverted so that the outside edge of the gunnels could be planed smooth. The bow and stern sections of the gunnels were planed flush, while the keel sections were left with a 6mm overlap. This overlap not only gave the boat sleds to sit on when it was on a hard beach, they also helped to keep the boat on track when it was sculled in the water.

25. The final step was to cut out any loose knots that might allow water to find its way through the hull and insert friction fit blocks that penetrated 15mm into the 30mm-thick timbers. These blocks were then planed flush and again all edges were arrised to soften them and reduce the chance of the timbers splintering.
26. The team of seven. We all came with different skill sets and an expectation that we would learn something new. Douglas proved to be an excellent teacher who was always keen to share knowledge and explain why things were done the way they were. After having spent five days learning how to perfect a saw fit joint we were left with nothing but admiration for Japanese boatbuilders who crafted marvels in wood with the most basic of tools and equipment. Electricity did not make it to many country towns until 1964. Most of the master boatbuilders that Douglas apprenticed with started their careers building boats without any power tools.
27. After a short Shinto launch m ceremony we all got our feet wet as we launched the boat and climbed onboard.


