Unleashing your creativity doesn’t have to be hard. Making silicone molds opens a world of possibilities for crafting unique objects. Whether you’re into crafting, jewelry making, or prototyping, learning to create your own silicone molds is a valuable skill that pays off.
The Rise of DIY and the Demand for Custom Crafts
More people are turning towards DIY projects. Why? The satisfaction of creating something personalized is hard to beat. Custom crafts allow you to express yourself and even create gifts that show you care. Silicone molds help make this easier.
Why Silicone Molds are Superior: Benefits and Applications
Silicone molds offer several advantages:
- Flexibility: They can bend without breaking, making it easier to remove your projects.
- Durability: Silicone is long-lasting and resistant to wear.
- Detail: Fine details come out crisp and clear.
These features make silicone molds ideal for a variety of projects, from candles to resin art.
What You’ll Learn in This Guide
In the following sections, you’ll discover:
- How to choose the right silicone
- How to prepare your workspace and materials
- Techniques for making your master model
- Step-by-step mixing, pouring, and demolding instructions
- Tips for ensuring high-quality molds
Choosing the Right Silicone for Your Project
Types of Silicone Rubber: Platinum Cure vs. Tin Cure
Selecting the right silicone is crucial. Platinum cure silicone offers better clarity and durability but is pricier. Tin cure silicone is more affordable and easier to work with but may not hold detail as well.
Understanding Shore Hardness: Selecting the Right Durometer
The hardness of silicone uses a durometer scale. Softer silicone, usually a Shore A rating of 10-20, is great for flexible molds. Harder silicone, around Shore A 20-40, is better for rigid molds.
Sourcing High-Quality Silicone: Reputable Suppliers and Brands
Consider purchasing from well-known suppliers like Smooth-On or Alumilite. Read reviews to find the best product for your needs.
Preparing Your Mold-Making Workspace and Materials
Essential Tools and Equipment: A Complete Checklist
Gather essential tools before getting started:
- Silicone rubber
- Measuring cups
- Mixing sticks
- A scale
- Release agent
- Master model material (clay, resin, etc.)
Creating a Clean and Organized Workspace: Tips for Success
A clean workspace saves time and frustration. Begin by clearing your area of distractions and organizing your materials for easy access.
Safety Precautions: Protecting Yourself and Your Surroundings
Always wear gloves and a mask when handling silicone. Ensure proper ventilation if you’re working with chemicals.
Building Your Master Model: Techniques and Considerations
Master Model Materials: From Clay to 3D Prints
Your master model can be made from various materials, including:
- Clay: Easy to shape and modify.
- 3D Prints: Great for detailed designs.
- Found Objects: Try using existing items for unique molds.
Preparing the Master Model for Mold Making: Surface Treatment
Clean your model thoroughly. Apply a release agent for easy removal, preventing your silicone from sticking.
Master Model Design Considerations: Undercuts and Release Agents
Be aware of undercuts in your model. They can complicate the separation process. Consider using a release agent to ensure a smooth demolding.
Mixing and Pouring the Silicone Rubber
Accurate Measurement Techniques: Achieving the Correct Ratio
Follow the manufacturer’s instructions for the perfect silicone-to-hardener ratio. Most brands recommend a precise mix, often 1:1 or 10:1.
Proper Mixing Methods: Avoiding Air Bubbles and Inclusions
Mix slowly to avoid air bubbles. Use a vacuum chamber if possible, or carefully scrape the sides of your container during mixing.
Pouring Techniques for Different Mold Designs: Thin vs. Thick Sections
Pour silicone in thin layers for intricate designs to prevent bubbles. For thicker sections, pour from a higher point to help it reach all areas.
Demolding and Curing Your Silicone Mold
Optimal Curing Time and Conditions: Factors to Consider
Curing times vary, but most silicones take about 24 hours at room temperature. Ensure the area remains dust-free during curing.
Demolding Techniques: Gentle Release for Intricate Designs
Carefully bend the mold to coax your project out. Always start at the edges and work your way inward.
Inspecting and Finishing Your Silicone Mold: Quality Control
Check for imperfections after demolding. Trim rough edges with scissors or a craft knife for a polished finish.
Conclusion: Mastering Silicone Mold Making for Endless Possibilities
Creating silicone molds opens the door to countless crafting opportunities. You can produce unique items for personal use or even start a small business.
Key Takeaways and Next Steps
- Choose the right silicone for your project.
- Prepare your workspace to ensure success.
- Follow careful mixing and pouring techniques for best results.
Resources for Further Learning
Look for online tutorials, local workshops, and forum discussions to enhance your skills.
Inspiring Projects and Ideas
Consider creating molds for custom candle holders, soap designs, or even plant pots. The possibilities are nearly endless!
Start your journey in silicone mold making today and watch your creative ideas come to life!
How to Make a Silicone Mold: Step-by-Step Guide for Beginners
Making your own silicone mold might seem intimidating, but trust me, it’s simpler than you think. Today, I’ll guide you through creating a silicone mold of a resin snowflake, sharing tips and tricks I’ve learned along the way. Whether you’re a resin artist or just exploring new hobbies, this project is fun, easy, and opens up endless creative possibilities.
Preparing the Base for Your Mold

First, you need a sturdy, leak-proof base for your mold. I created mine using overlapping strips of clear packing tape. If you prefer, you can also use transfer tape, which works similarly and is available in rolls online. I personally favor packing tape because it’s easy to handle.
Once the tape is ready, place your mold housing on top of it. I use a custom, two-piece acrylic housing, secured with binder clips. If your mold housing isn’t airtight, seal the edges with 100% silicone caulk to prevent leaks. While some people use hot glue for this step, I’ve found caulk much more reliable in stopping leaks. Let the caulk cure overnight for the best results.
Mixing Your Silicone

When your base is ready, it’s time to mix the silicone rubber. For this project, I used the green silicone rubber from Let’s Resin. This product comes with clear instructions, which makes it great for beginners.
The silicone rubber requires a 1:1 ratio mix by weight. Grab a digital scale and measure equal parts of Part A and Part B. I like to shake the bottles for about 30 seconds before pouring to make sure everything is evenly combined. For my mold, I used 15 ounces of each part, totaling 30 ounces.
To save my wrist from extra work, I used an electric handheld mixer, also from Let’s Resin. It’s a rechargeable, easy-to-use tool that works for both resin and silicone. Mix the silicone for about five minutes, making sure to scrape the sides and bottom of your cup to fully incorporate both parts.
Setting Up Your Item for Molding

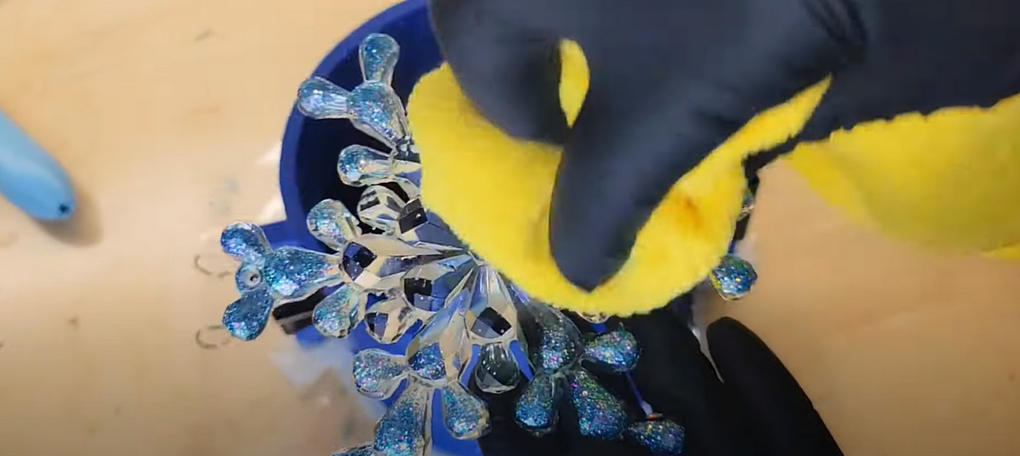
Before pouring the silicone, clean your snowflake (or whatever item you’re molding) thoroughly. Use a microfiber cloth to remove dust, smudges, or oils—anything left on the surface will transfer to your mold. Wear gloves to avoid leaving fingerprints.
Carefully press the snowflake onto the tape inside your mold housing to anchor it in place.
Pouring the Silicone Rubber

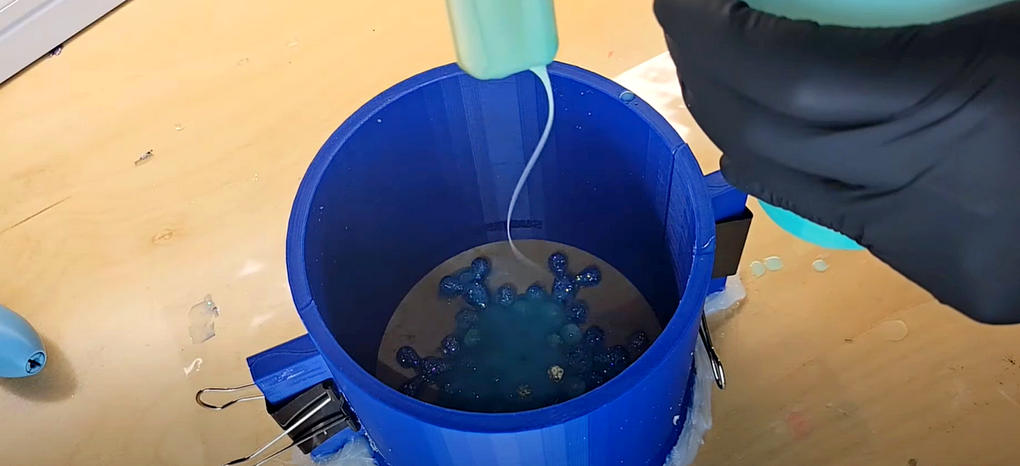
Now comes the fun part—pouring! To prevent air bubbles from forming in the intricate details of the snowflake, start by drizzling a thin layer of silicone rubber over it. This ensures the silicone fills every little surface.
For the main pour, hold your silicone cup high above a stir stick positioned over the housing. Let the silicone flow down the stick into the mold. This technique reduces air bubbles. Pour until the mold is about 1/8 inch above the snowflake. Don’t go too thin; a solid mold needs a bit of thickness for durability.
Let the silicone cure for the recommended time, usually about 24 hours.
Removing the Mold and Cleaning It Up

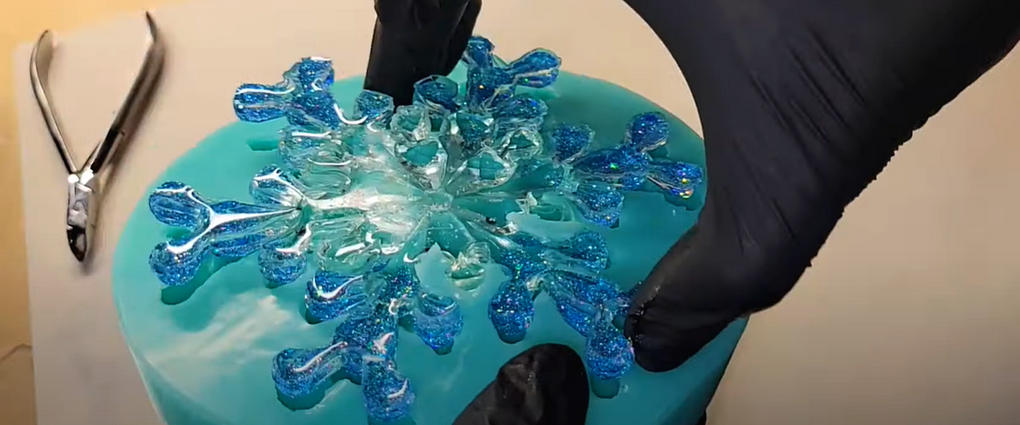
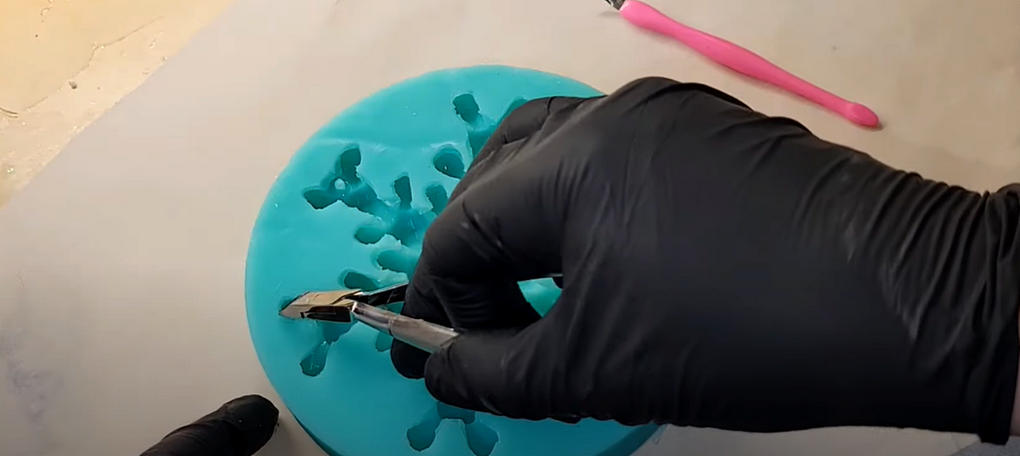
Once cured, carefully take the mold housing apart. Remove the packing tape and inspect your mold. If silicone leaked under your snowflake, don’t worry—it happens! Use a cuticle trimmer or nippers to clean up the edges. Go slowly to avoid damaging the mold.
Next, pop your item out of the mold. You’ll see all the beautiful details from the snowflake perfectly transferred to the silicone.

Tips for Using Your Mold
This snowflake mold is now ready for resin casting! If you notice uneven edges or excess silicone, trim it up before using. For cleaning tools like the mixer paddle, wipe off silicone with a paper towel, or use isopropyl alcohol for resin clean-up.
What Can You Make Molds Of?
The possibilities are endless. You can mold resin pieces, ceramics, acrylics, and more. Just make sure the object you’re using is clean and sturdy. For beginners, start with simple items to practice your technique.
Final Thoughts
Making your own silicone molds is easier than you might think. Once you try it, you’ll wonder why you didn’t start sooner. It’s a great way to customize your projects and bring your ideas to life.
If you’ve got questions, drop them in the comments below. I’d love to hear about your projects and help you troubleshoot. Don’t forget to subscribe to my YouTube channel, NapTime Creations, for more tips and tutorials.
Happy mold-making!
