A thickness planer allows you to work with lumber in thicknesses you can’t find in a hardware store or home center. Portable planers, sometimes called lunch box planers, like these are a common choice for many woodworkers. But there’s one issue with them — they’re just too dam heavy to really fulfill that portable part. 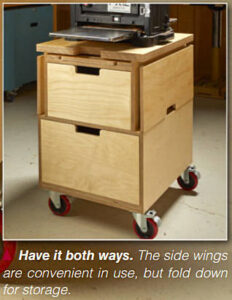
That’s where the cart shown here comes in handy. No more backbreaking lifting as you lift your planer in and out storage, and since it has wheels you can move it anywhere you’d like to accommodate any length of board.
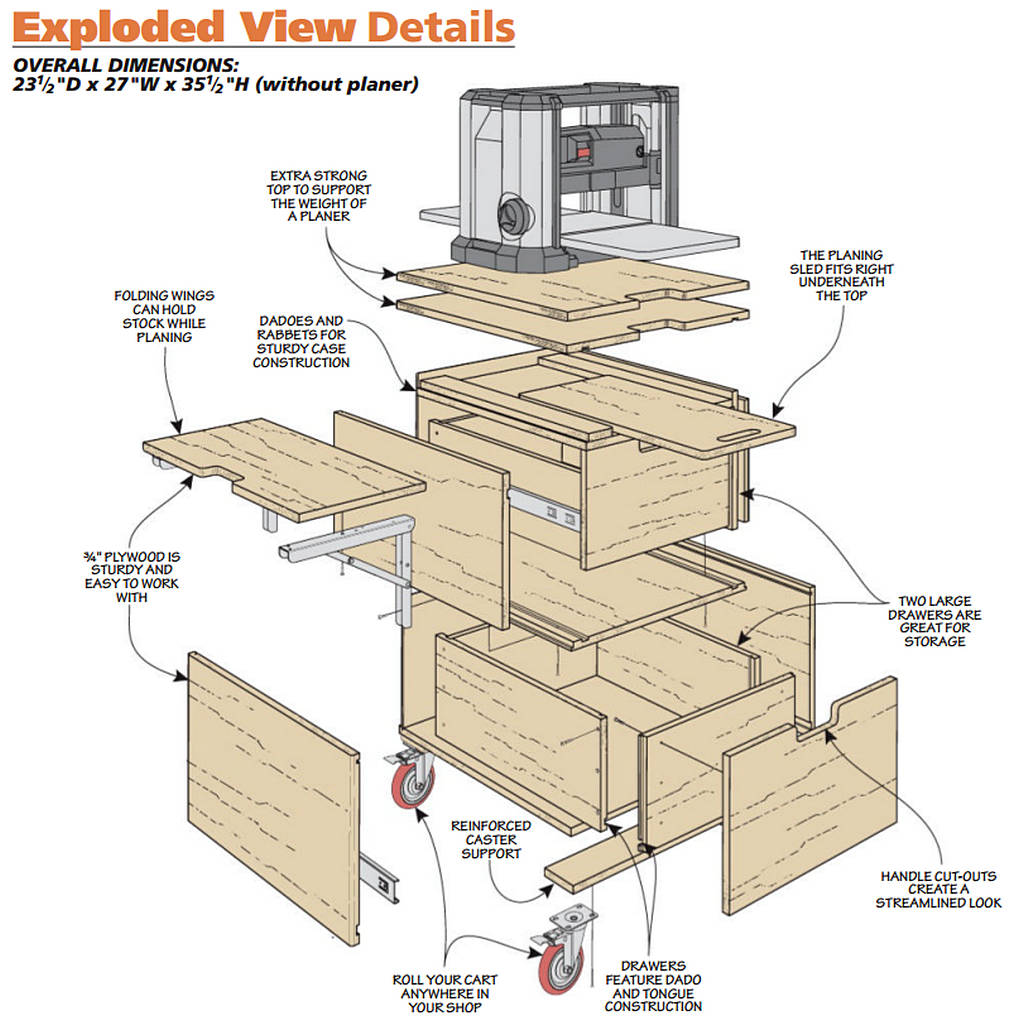
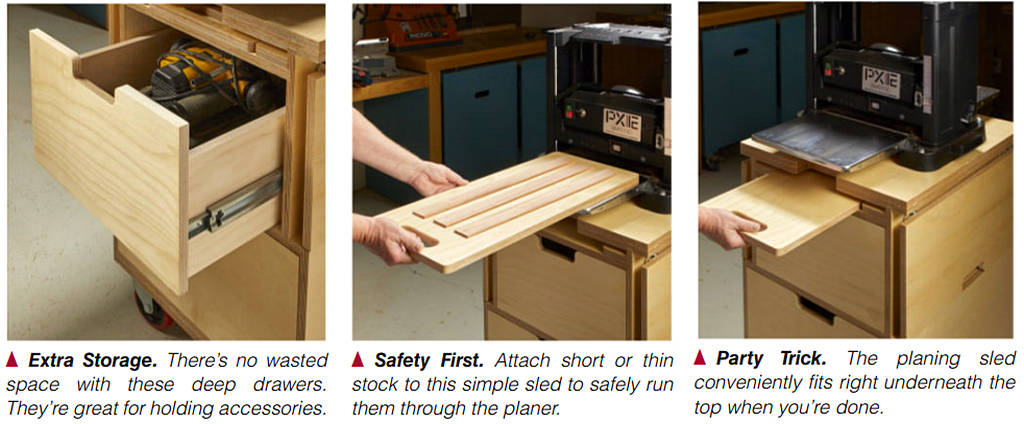
Every bit of space in the shop is valuable, so we’ve made sure that every inch of space in this cart is utilized. There are 8 two large drawers for storage of common shop supplies. Folding side wings provide extra work space (when you need it), and an on-board planing sled is perfect for small, thin boards that would otherwise be unsafe to run through the machine. To get the build rolling, if s time to head to the shop and start breaking down plywood.
Build Your Cart Base
Before we start, let’s talk about tackling those sheets of plywood. Your table saw or track saw will make quick work of this step. Be sure to take the time to label each piece clearly as you cut it. Trust me, you’ll thank yourself for this later.
This cart starts, basically, with a pair of boxes. These boxes are built on top of each other, one at a time. This construction method is approachable, and allows you to work on this in chunks.
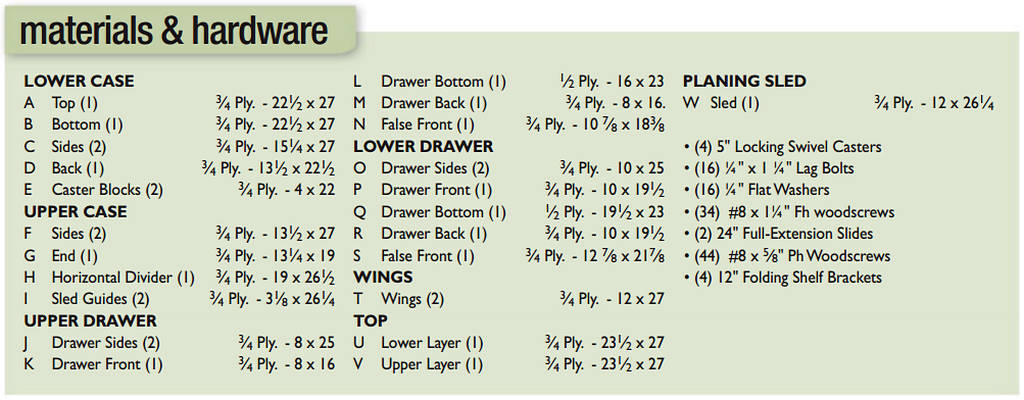
LOWER CASE. The construction of the planer cart cabinet features almost no screws at all. Ample use of rabbets, dadoes, and grooves create mechanical strength and glue does the rest. You can make these various cuts on either the table saw or using a router with a straightedge. You could also use a combination of the two, keeping one set at 1/2″ and the other at 1/4″. I’m using nominal dimensions throughout the build, but you’ll want to set your tools to match the material you’re actually using. Most plywood, including the Baltic birch used here, is slightly undersize.
To make my life easier, I try to make all of my identical cuts at the same time so I didn’t have to keep resetting for each piece. Looking at the lower case in Figure 1, that meant the 1/4″ dadoes in the top, bottom, and sides are first (See Figure 1b). These dadoes hold the back piece in place, and are located in the same place on all four pieces. You’ll use the rip fence to form the dado in two passes. Set the fence to the correct measurement for your stock, then cut all four pieces. Once the outside edge is defined, move the fence over a nudge and finish the cut. Cutting a test piece is essential to a proper fit, don’t trust your eyes alone.
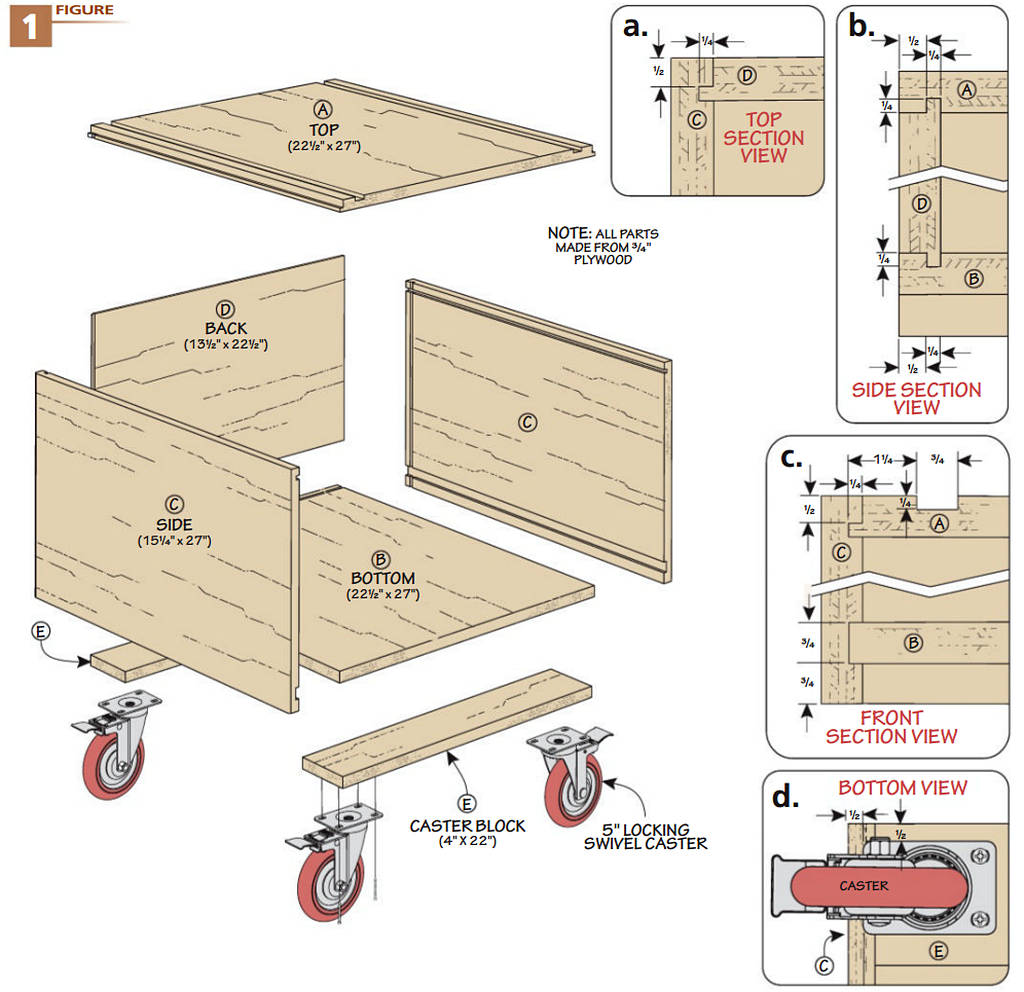
You should cut the grooves that run near the top of the side pieces at the same time you cut those dadoes. You can see how they’re positioned in Figure la. Now, let’s get the back rabbet to fit in the dadoes.
Since I had to swap in a dado stack already, I went ahead and took care of that. Then I buried the dado blade in a sacrificial fence attached to the rip fence and cut the rabbets all the way around the back. I used the same setup to cut the two rabbets that run along the outside edges of the top. Remove the sacrificial fence to cut the remaining grooves in the sides and top.
I decided to clean up all of the ridges left behind from the dado blade with a sanding block. This gives the joint a cleaner look and ensures a strong glue bond — even if no one else sees it.
Now it’s time for some assembly. Apply a slow setting glue to the dadoes and grooves and clamp everything up. Make sure the assembly is square.
Since planers are quite heavy, I decided to reinforce the bottom a bit with caster blocks. After the glue was all dry, I screwed the casters in place and started the upper case.
One quick note on casters: you might be tempted to get the small, inexpensive ones, but that’s usually not a good idea. A bigger caster is much less likely to get caught on something and tip your entire cart onto the floor.
UPPER CASE
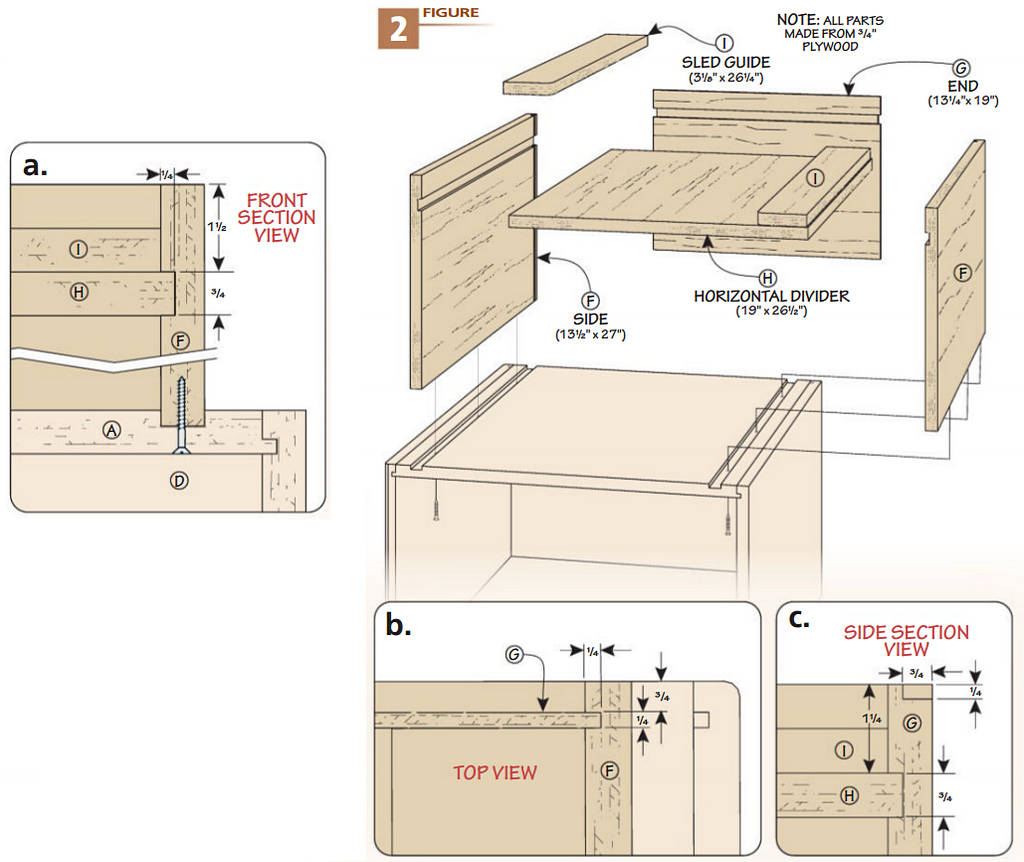
Building the upper case is similar to the lower. Cutting in the correct order will make quick work of your time at the table saw. I started with the smaller 1/4″ dadoes on the sides.
Now, it’s back to a wide dado blade and sacrificial fence again. Cut the rabbets on the three sides of the end panel. The bottom edge will simply sit flat on the lower case.
There are two different grooves to cut — the two on the side panel and one on the end panel. The cuts on the side panels are located 1½” from the top, and are on same face as the narrower dadoes you cut earlier. The groove on the end panel is also located 1½” from the top, but it’s located on the opposite face as the rabbets. This layout is visible is Figure 2c below. Like before, I cleaned up the bottoms of all my cuts with a sanding block before assembling. You could also use a small rabbet plane.
For assembly, start with dropping the sides in to the grooves that run along the top of the lower case. Each side gets glued and screwed from the bottom— but don’t tighten them all the way yet. Leaving them loose will give you play to install everything else. Add glue and drop the end panel into place. Make sure the rabbeted end is facing up. Spreading the sides slightly will allow the horizontal divider to be installed. Lightly clamp everything together, check for square, then finish driving in the screws.
The final detail to take care of is a pair of sled guides. These will “block out” the area for the sled that we’ll make in a bit. For these, I simply cut them to size before gluing and pin nailing them in place. Up next is creating a set of storage drawers.
Drawers & Final Details
I wanted the drawers for this cart to be sturdy, yet quick to build, so I used simple tongue and dado joinery to hold everything together. These are great mechanical joints, and provide a positive connection that won’t pull apart over time as you open and close the drawers.
Cut a narrow dado along the front end of each of the drawer sides, as in Figure 3d. A wider dado at the rear captures the drawer back (Figure 3c).
Then take care of the rabbets (tongues) on the drawer fronts. Adjust the dado blade setup to cut the grooves for the drawer bottom, as shown in Figures 3a and 3e. Glue everything up and finish with screws.
DRAWER INSTALLATION. Installing the drawer slides will go more smoothly if you use spacer blocks to mount the slides inside the case. You’ll need to measure the offset to figure out exactly where you want to mount the mating drawer slide on the drawer box. You want to take into account the distance (up and down), as well as the distance front-to-back.
When mounting the slides, you want to drive your screws into to the slotted screw slots first. This gives you some wiggle room when positioning the slide to ensure perfect alignment. After you’ve test fit the drawer in the case, make any adjustments that you need and drive a few screws into the “non slotted” round holes.
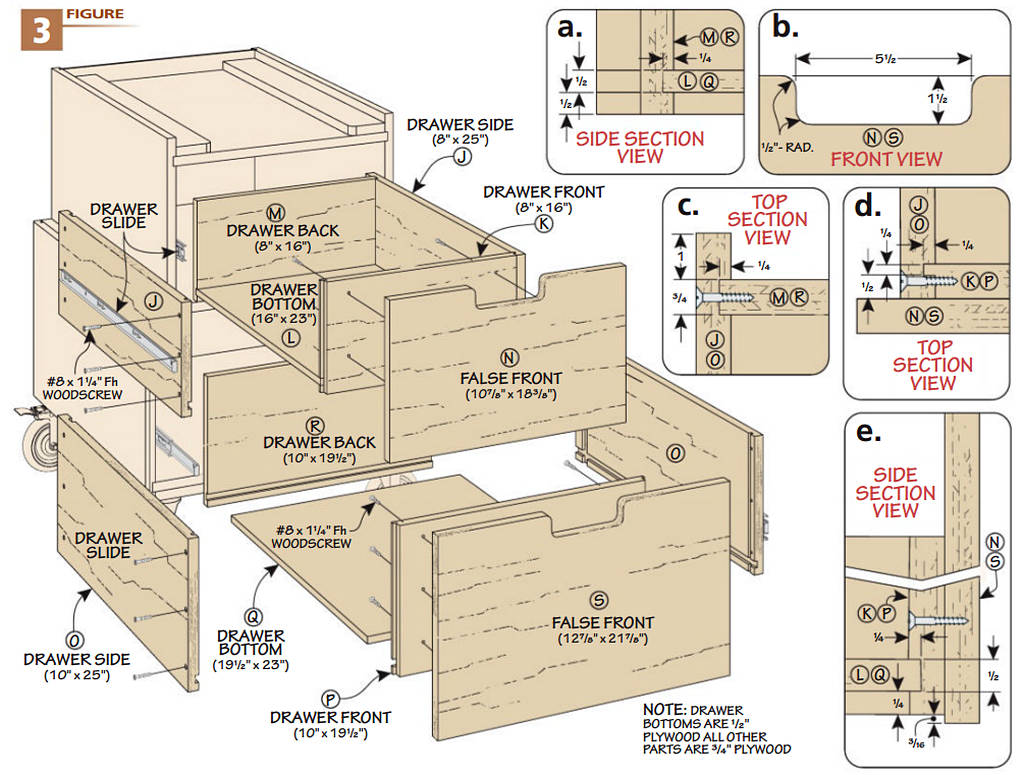
FALSE FRONTS. Now move onto the false front. The idea behind a false front is two-fold. It’s a clean look on the front of the cart, but it also is actually easier to build. This is because now that you have the drawer box mounted to the case, you can fine-tune the position of the false front before you actually attach it, which leads to an even reveal all the way around.
The hand cutout for the front can be made by drilling out the comers and finishing the cut with a jigsaw. However, you’ll get much better results if you make a router template to finish everything up.
There are a few different sized cutouts in this build, so I actually made a half template. It includes the inner radius, outer radius, and a few inches on either side of those. Clamp it in place and clean up half of the handle, then flip it to the opposite side of the cutout to finish up.
Lastly, ease the edges with sandpaper. Now you’re ready to mount it. Use double-sided tape on the false front. Position it for an even reveal, then push it onto the drawer box. Open the drawer and drive four screws from the back side. Repeat the same process for the other drawer.
FOLD-UP WINGS
The side wings of the cart are a convenient place to stack stock when using your planer, and fold away for equally convenient storage for the cart itself.
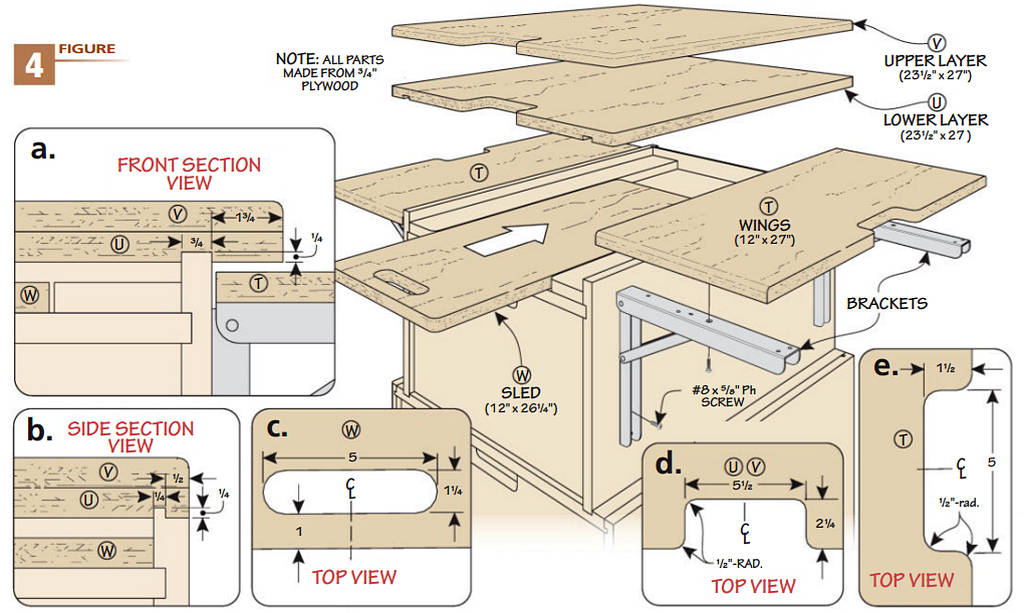
Handholds on the wings are made using the same method as the drawer cutouts. The dimensions are shown in Figure 4e. Use your router template to create a smooth, even profile.
The wings aren’t difficult to install, but can be a bit finicky to get lined up correctly. After struggling for a bit, I turned the cart on its side. I screwed the hardware to the cabinet itself first, then attached the wings. I used a paper wedge to shim the wing out a bit so there was just enough clearance between it and the cabinet to fold without binding (Figure 4a).
TOP & PLANING SLED
The top itself is constructed of two layers of plywood. The bottom face features a pair of grooves and a dado that interlock with the upper case (Figures 4a and 4b). Up until this point all my joinery had been cut on the table saw. However, I decided last minute I didn’t want the ends of the dadoes to be exposed on the sides of my top. So I broke out my compact router, attached an edge guide, and cut a stopped dado for a cleaner overall look.
With the lower layer complete, I glued on the top layer before making the cutout. The process is effectively the same; drill out the comers, rough out with jigsaw, finish with router— you’ll need to make a new template since the opening is deeper. You’re finally ready to glue the top to the cabinet.
The planing sled is the last bit to build. After cutting to size you need to radius the outside comers and cut a handhold, as in Figure 4c. Like the cutouts, I made a router template to clean up the edges.
Two coats of spray lacquer protect the plywood surfaces. After installing your planer on top, you’re ready for your next project with the ideal milling station.
