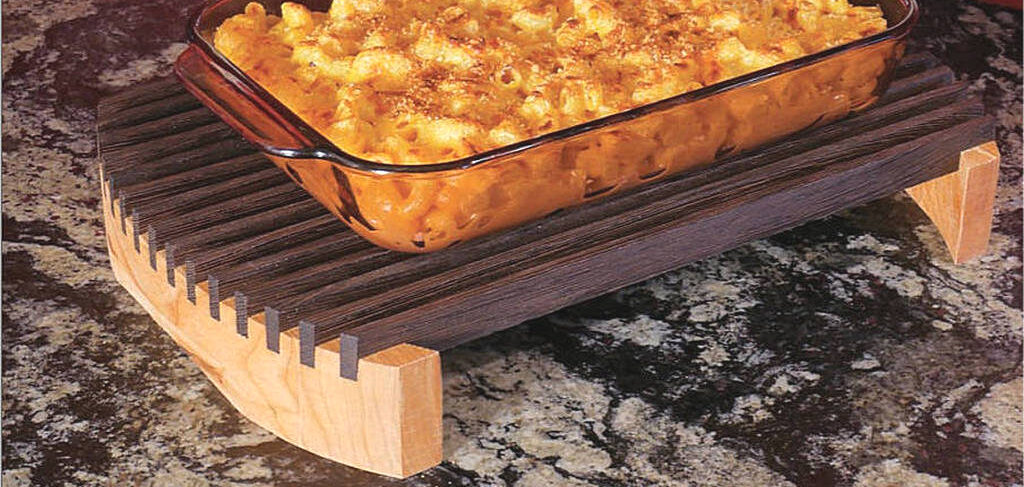
Combining straight lines and gentle curves, this trivet is both practical to use and pleasing to the eye.
What’s a tivet?” was the question my granddaughter Maya asked as she looked at the trivet (photo above), sitting on my workbench.
“They keep hot things from harming your counter or table-top,” I replied.
Her baffled expression told me that the concept had not gotten through completely, so I grabbed a chunk of wood and said, “Pretend this is a pot or a pan and it is supcr-duper hot What would happen if I put it on this trivet like this?” As I put the piece on the trivet, she replied with a perfectly reasonable tone, “Your hand would get burned.” I decided to just leave the conversation at that.
Small objects like this can make great woodworking projects. Just because they’re small doesn’t mean they’re lacking in details. In fact, the more subtle details a small project has, in my opinion, the more it raises the project up from merely functional to fabulous. I’ll try to convince you of that in the case of this slatted trivet, which measures about 10″ by 15″ and with a Material List of only two parts (but 17 pieces). Let’s get started!
Jack-O’-Lantern Trivet Project
Trivets come in all shapes and sizes to suit nearly any occasion or season. If you’re looking for a cute Halloween option that’s fun to make on a scroll saw. the downloadable free plan for our “Jack-O’-Lantern Trivet” (middle) is available at woodworkersjournal.com. Find it and several other options by using the search word “trivet.”

Kicking Off with an Actual Design
Sometimes we all just get an idea in our head and commence to making sawdust. But with this project, I began with a few sketches, which I then brought to art director Jeff Jacobson. He liked the concept and added a few details and refinements of his own. Then we headed down to the shop to mock-up a version. Mock-ups — test builds made quickly from scrap — are a great way to move from a drawing to the final concept. Seeing your idea in 3D and trying it makes all the difference.
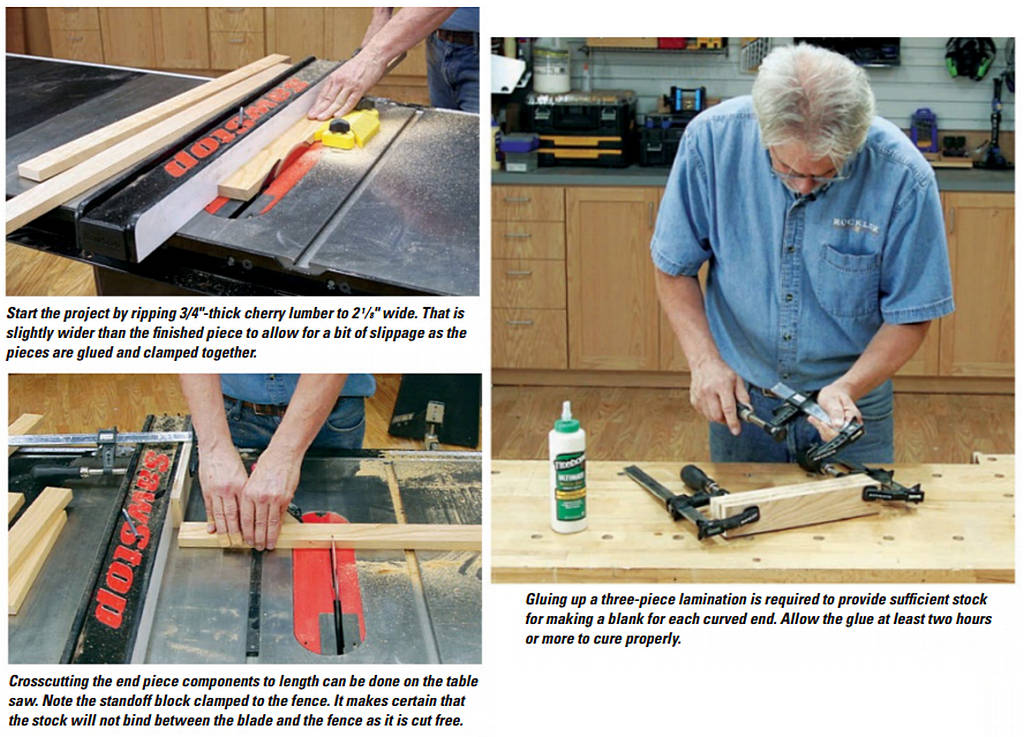
 From the mock-up we decided to modify a couple of things. We went from two to three laminations for the end blanks to accommodate a change in the “handle” concept. It went from a drop-cut with a straight bit to a large cove made by a bowl-cutting bit. The handle is then exposed by shaping the ends in a specific curve. We also changed the slats from 1/8″ thick to 1/4″ thick, and instead of having the top edge of the slats be flush to the tops of the ends, we only let them into the ends 3/8″, which is half their width. Almost time to get busy.
A final detail to decide was what species of wood I was going to use to make the trivet. A few years ago, I made a table primarily from wenge with cherry accents. It struck me as a really handsome combination when finished with a clear topcoat. So I chose cherry for the ends and wenge for the slats. I started by ripping 3/4″-thick cherry a bit over wide at 2⅛»”. Next, I crosscut those pieces to 11″, an inch longer than the finished ends will be when completed. I glued up the end blanks, three to an end. Be sure to allow the glue to cure before you begin the next machining steps.
Machining the Ends
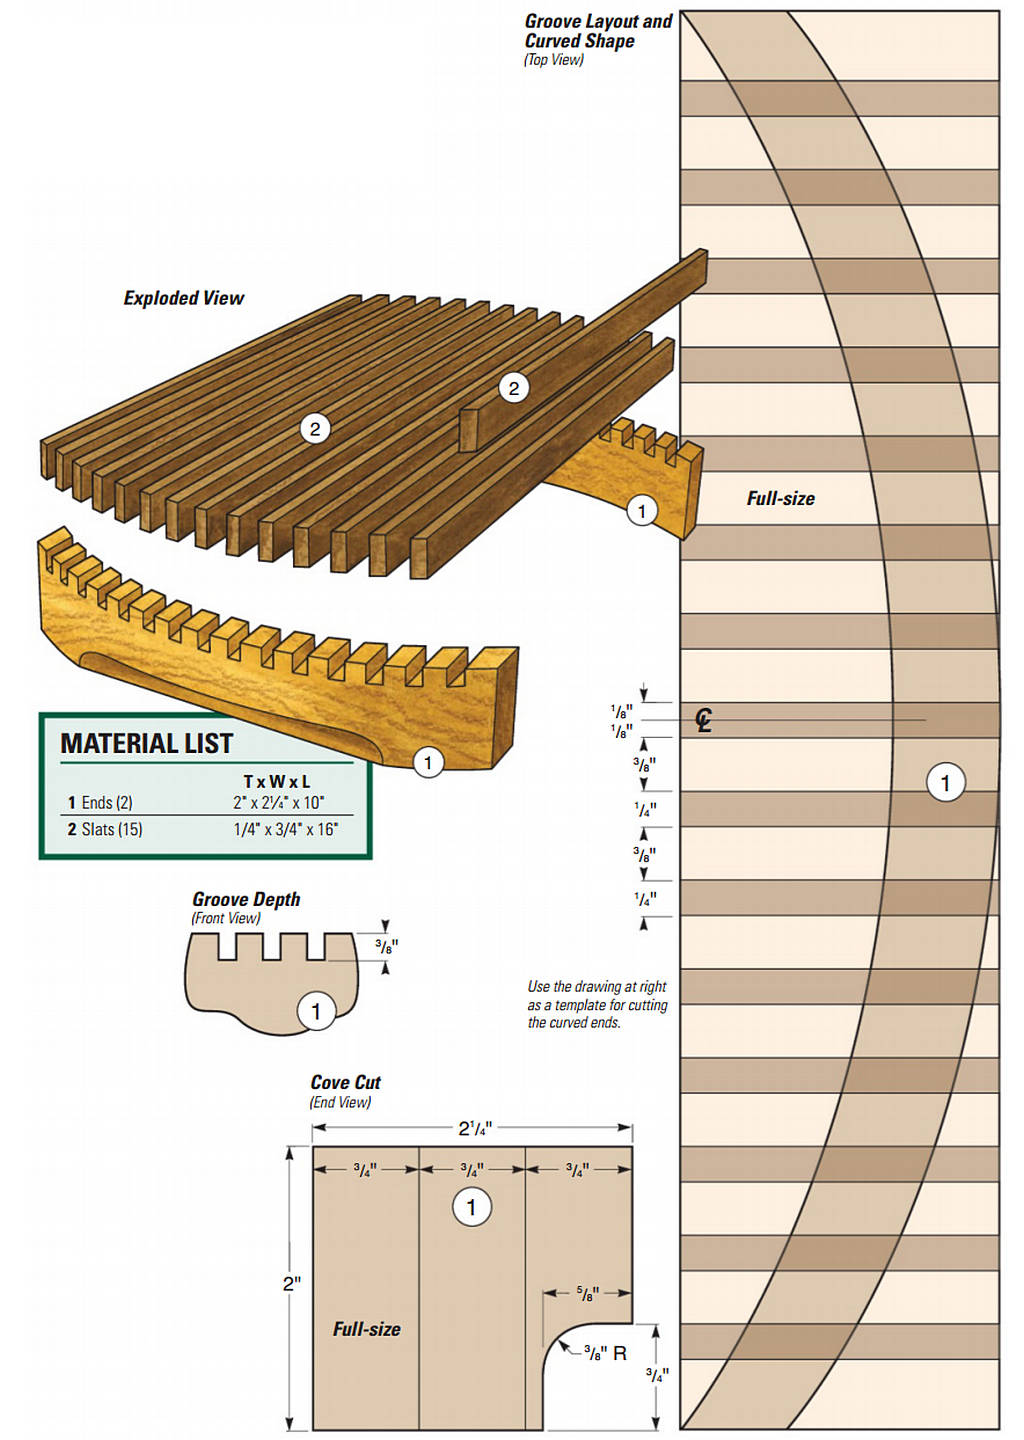
When the glue has cured, head back to the table saw to trim the end blanks to 2″ wide and crosscut them down to their 10″ lengths. Your next step is best done on a router table. One of the design features of the trivet is the handle — it’s the recessed area in the center of the ends that provides a space for your fingers to grip and lift the trivet. You’ll form that shape with a bowl-cutting bit chucked into your router table. Using a featherboard to press the end blanks tight to the fence, rout a 5/8″ by 5/8″ cove into one edge of the end blanks. See the Cove Cut Drawing on the next page. I made these cuts in several passes, raising the bit with each pass.
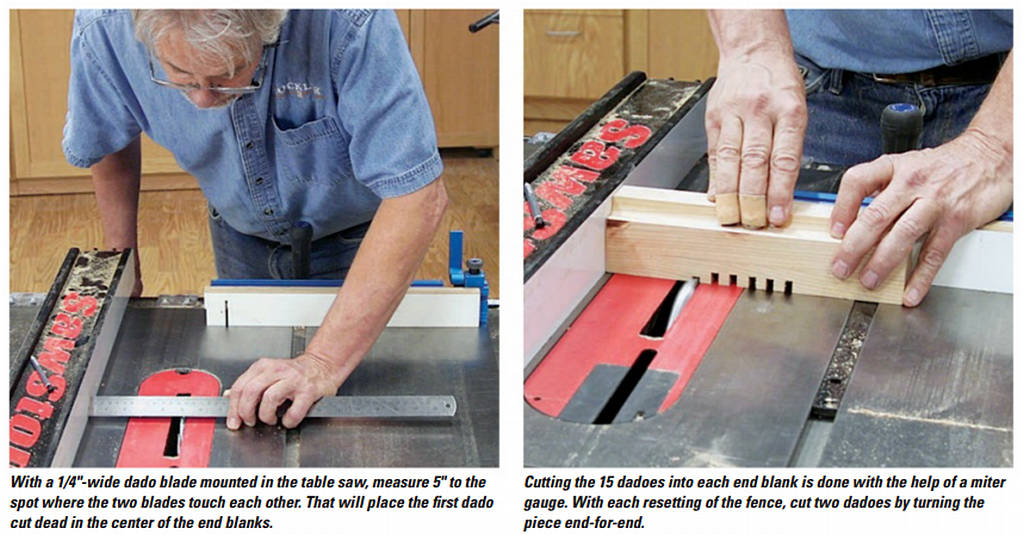
With the coves formed in the bottom of the end blanks, now it’s time to machine the dadoes into the top face of the blanks. The dadoes are 1/4″ wide and 3/8″ deep. I used a dado blade on the table saw, testing my setup in a scrap piece of lumber. As the blanks are exactly 10″ long, I was able to cut the center dado with the fence set exactly 5″ from the center of the dado blades width. After cutting the first dado dead center in each blank, I moved the fence 5/8″ closer to locate the next two dadoes on each block. I cut one dado and then turned the blank end-for-end to cut the next one. There are 15 dadoes on each end blank, spaced 3/8″ apart. This technique of turning the blanks end-for-end spaced the cuts symmetrically out from the center so that I could be sure the slats would align well later on.
Carrying Out Next Steps
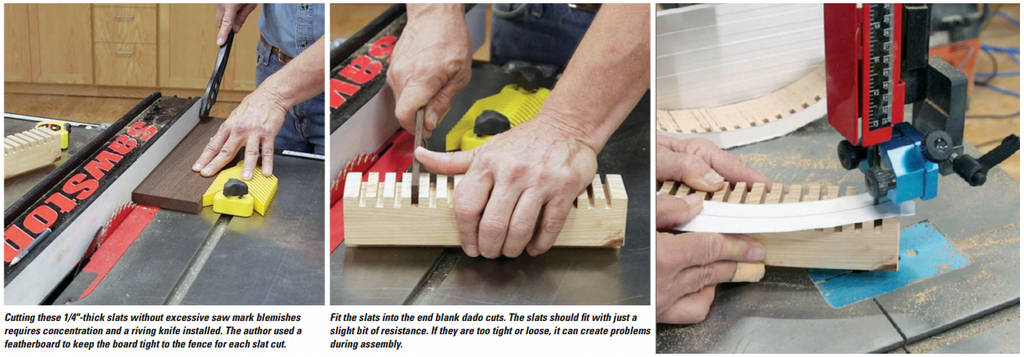
With the dadoes cut, I moved on to the slats. You’ll need 15, and I chose a nice, clear piece of wenge for them. I sized the slat workpieces to 16″ long, an inch oversized of the center slat. As I would be gluing 15 slats in place, I did not want the placement of them to be fussy. (Plan ahead and work smarter, not harder.) I used a thin-kerf blade that left a very smooth finish on the faces of the slats so I could skip sanding them. Set the rip fence to make a l/4″-wide cut. Slice off the first slat and test its fit in the dadoes. It should slide into place with just a bit of resistance. If the slats are too loose or too tight, assembly will be much harder. Notice the yellow featherboard in the left photo, above. Your focus should be on accurately and safely cutting each of the 1/4″ slats, so using the featherboard to hold the board tight to the fence makes that easier. The magnetic Magswitch featherboard I used is easy to reset for each successive cut. When they’re all cut, set the slats aside and move on to shaping the ends.
It was a good thing that we had made a mock-up version of the trivet for many reasons, but one of them was that I learned that I needed a bit of help to cut the curved shape of the ends well. With the mock-up, I flexed a thin piece of stock and drew the curves onto the top of the end blanks with a pencil. Then I went to the band saw and made the cuts. Something about the interrupted lines drawn on the top of the dadoes made it hard for me to accurately cut the curve. We came up with the idea of making a paper template that I could tack-glue onto the top of the blanks, and that worked much better for me. For that reason, were providing a full-size drawing of the curved shape on page 37 for you to use to make your own paper templates. We also have a downloadable PDF available at woodworkersjournal.com for the full-size curves that you can print out and use as a template.
I used a l/4″-wide band saw blade to make these cuts. With the paper tacked to the top of the blanks, I made the two parallel cuts to create the end curves. The outside cut exposed the “handle” very nicely. Although I was much more accurate with my cuts on the blanks with my paper template, I still needed to do a significant amount of sanding to remove all of the saw marks. I used a stationary belt sander for that task. Once that was done, it was time to glue the slats in place.
Before I got started with the glue, I cut a piece of 3/4″ plywood to 10½” by 11″ to be used as a spacer to keep the ends aligned as the slats were glued in place. I tried very hard to keep the glue squeeze-out on the top of the trivet’s ends to a minimum — I worried that getting it out of all those gaps would be a bit of a pain. I was only partly successful.
I carefully put glue into each of the dadoes and then pressed the slats down firmly. I put a small piece of plywood on top of the assembly and a gallon of paint on top of that to act as a clamp. I allowed the glue plenty of time to cure completely.
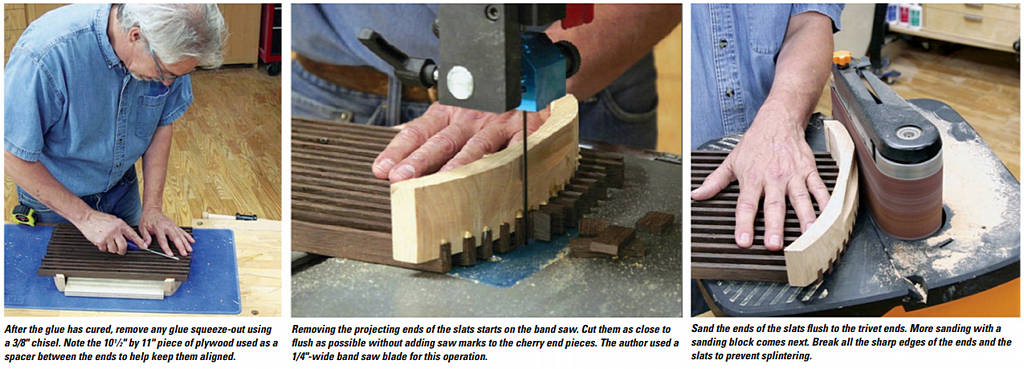
Next up, I was back at the band saw cutting the overhanging ends off of the wenge slats to match the end curves. I tried to cut very close to the cherry ends but not into them — only the wenge. Following that, I sanded the ends of the slats perfectly smooth with the cherry ends.
Remember how I tried hard not to have glue flow onto the tops of the ends in the gaps between the slats? Well, it did not work for every gap. So I grabbed a 3/8″-wide chisel to clean out the dried glue. I was apprehensive, but it went pretty quickly. I then grabbed a sanding block and sanded the whole thing, starting with 100-grit and going up to 180-grit. I even took the time to gently break the top corners of the slats to make them less sharp and less likely to splinter over time.
For a topcoat, I used Watco Natural wipe-on finish. It pops the grain of both the cherry and the wenge really well. The red highlights of the wenge and its very dark coloring compliment the rich color of the cherry. I was very pleased with the result. One reason that I chose the Watco finish is that if the trivet gets nicked up or starts to look worn over time, a quick clean up with soap and water followed by another coat or two of the Watco will make it look brand new.
The dimensions of this trivet are made to work well with a standard 9″ x 13″ baking dish. I can see it put to use in the kitchen with a multitude of pots and pans or even used on a dining table to present your favorite lasagna.
And one more thing. Even though we were very deliberate when designing this trivet, we had a small serendipitous discovery along the way. After I had cut the curved ends from the end blanks, I grabbed the waste from the cuts and was going to throw them away. Then I noticed that the small drop cuts from the inside of the curves were large enough and already dadoed in such a way that you can make another smaller trivet by putting them together with a few more slats.
It could be two trivets for the price of one! As the Viking’s old coach, Bud Grant, would say… sometimes it is better to be lucky than good.

