Colin Simpson injects glamour into a turned bowl by incorporating metal leafing and scorching techniques.
I’ve been asked on a few occasions whether it’s possible to undercut a bowl using just a bowl gouge. The answer is yes, but not by very much. If you want a deep undercut, then you’ll need cranked tools or scrapers. Both tools can create tom grain, especially on end-grain, which equates to more sanding.
An undercut bowl usually points towards a sharp curve on the piece’s interior at the transition between side wall and bottom. This can cause problems when it comes to using a bowl gouge as it’s difficult to maintain bevel support.
This article will show you how to overcome these problems and also introduces metal leafing and scorching – three techniques in one!
Shaping the bowl
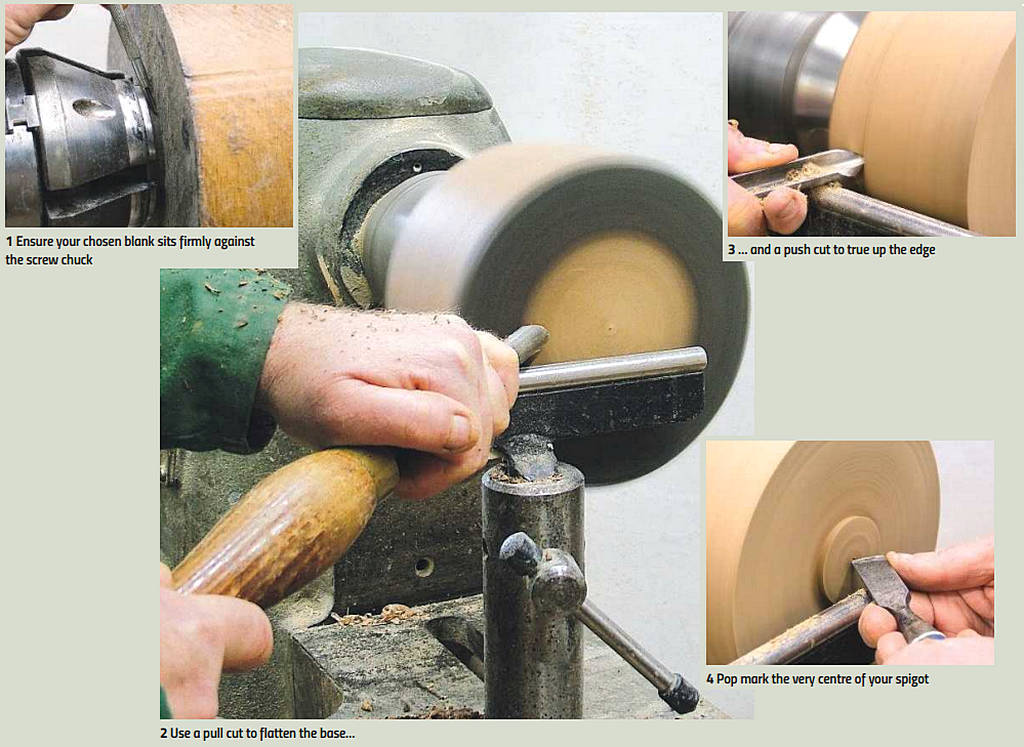
This project makes use of some reclaimed oak, in the form of a beam, which was removed from Beddington Church and contained a few splits – in fact this was one of the reasons why I chose to scorch and texture it. Owing to the 175mm diameter, I held it on a screw chuck, but a faceplate would be just as effective. Start by drilling an 8mm hole in the top of the blank and screw it onto your screw chuck, ensuring the blank sits firmly up against it, which will prevent the piece wobbling (photo 1).

Using a swept-back bowl gouge in pull-cutting mode (photo 2), flatten the base and true up the edge (photo 3). Next, cut a spigot to fit your chuck. When it comes to chucking points, I always cut a small pop mark in the very centre using the long point of a skew chisel (photo 4). This pop mark is used to align the bowl when it’s reverse chucked in order to turn away the spigot. Start at the bottom comer and begin to shape the bowl’s exterior (photo 5). With each cut, work back towards the spigot and further up the side wall. Aim to produce a continuous flowing cut. Photo 6 shows the starting point. Continue round the corner and swing the tool handle so that it remains in the cut until you reach the end (photo 7). I think it’s always more aesthetically pleasing if the widest part of the bowl isn’t halfway between the top and base. Try to get this about one-third from the top or bottom of the piece (photo 8). Here it’s about one-third of the way up the bowl, but the base is still too big, so the shape therefore requires a little refinement before making a few finishing cuts (photo 9). For these cuts, keep the handle down low and the cutting edge at about 45° to the wood’s surface. Here, you’re looking to make very fine spiral shavings. Once you’ve achieved a good surface finish, use a small gouge to shape the bowl’s rim; I cut mine to a gentle radius (photo 10).


Scorching
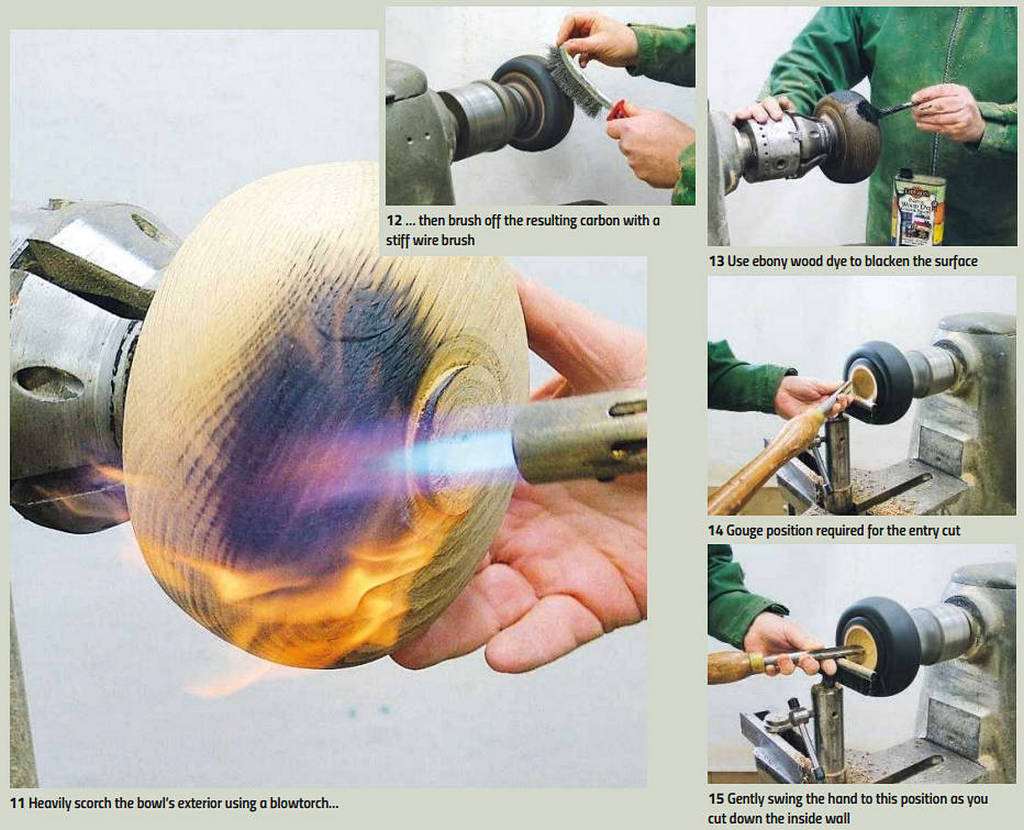
Clear the lathe bed and floor of shavings, turn off the dust extractor, then heavily scorch the bowl’s exterior using a blowtorch (photo 11).
For safety reasons, it’s best to do this outside, where you have more space and are less likely to run into any potential problems. Always have water to hand so you’re able to extinguish flames if necessary. Next dean off the excess carbon using a stiff wire brush (photo 12). This should create a nice textured surface but may leave the surface a brown colour rather than dark black.
This brown textured effect can look good when oiled, but for this piece, I wanted a black exterior, so applied a coat of Liberon ebony wood dye (photo 13). Once dry, give the piece a few coats of Danish oil.
Hollowing
Reverse the piece onto the spigot and begin the hollowing process. Start with the bowl gouge on its side with the flute pointing towards 3 o’clock and the handle over the bed bars (photo 14) . Use the tool’s tip to make an entry cut and as you progress down the inside wall, start to swing the handle towards you at the same time as rolling the flute up to around 1 o’clock (photo 15) . Continue with this cut, going a little wider and deeper each time until you reach the desired rim thickness. The next task is the undercutting.

Undercutting
Take a look at photo 16 and notice where the tool’s bevel is pointing. The direction of cut will follow that of the bevel, so here, I’m going straight down the inside wall until the transition between wall and bottom is reached. Photo 17 shows this cut with my front hand removed for photo clarity. This will remove a lot of waste wood to allow for the undercutting. To undercut the rim, make a similar cut but this time with the tool’s bevel pointing parallel with the outside wall (photo 18). To achieve this, the handle needs to be right the way over the bed bars. Use this method to cut down the inside wall until you reach the inside ‘corner’. In photo 19, I’ve marked this corner with green ink; it’s only about 6 or 7mm wide. When you reach this area, you need to swing the tool handle from the position shown in photo 18 to that shown in photo 15 – through an arc of around 100° while the cutting edge only moves about 6 or 7mm. You’re almost pivoting the tool on the cutting edge. If you do this correctly, you’ll most likely keep the bevel in contact with the wood and the cut will be controlled. However, there’ll be times when you’re not able to swing the handle far enough.

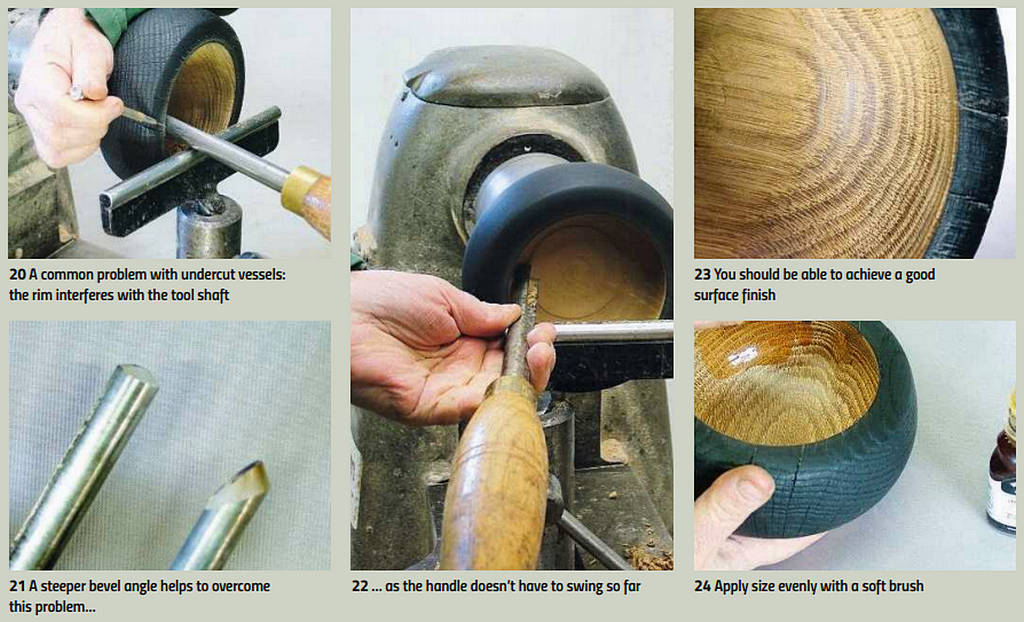
Photo 20 shows the tool shaft hitting the bowl rim’s interior. Here, I’m not able to swing the handle any further without coming off the bevel.
To solve this problem, the bevel needs to be changed. Photo 21 shows two of my bowl gouges: the tool on the left is the one used for this project, which has a bevel angle of around 45°; the tool on the right has a much steeper bevel angle – around 55° – and allows me to go round the inside corner, keeping the bevel rubbing without the shaft hitting the inside rim (photo 22); this is because I don’t have to swing the handle as far.
You can, of course, achieve the same inside shape using a round-nosed scraper, but it’s likely you’ll encounter tear-out, especially on end-grain. By contrast the bowl gouge’s cutting action should afford you a good, clean cut (photo 23).
Metal leaf
At this stage, you could simply sand and finish the bowl, but I decided to apply metal leaf to the bowl’s interior. I thought that this bright, smooth finish would contrast well with the exterior’s black texture.

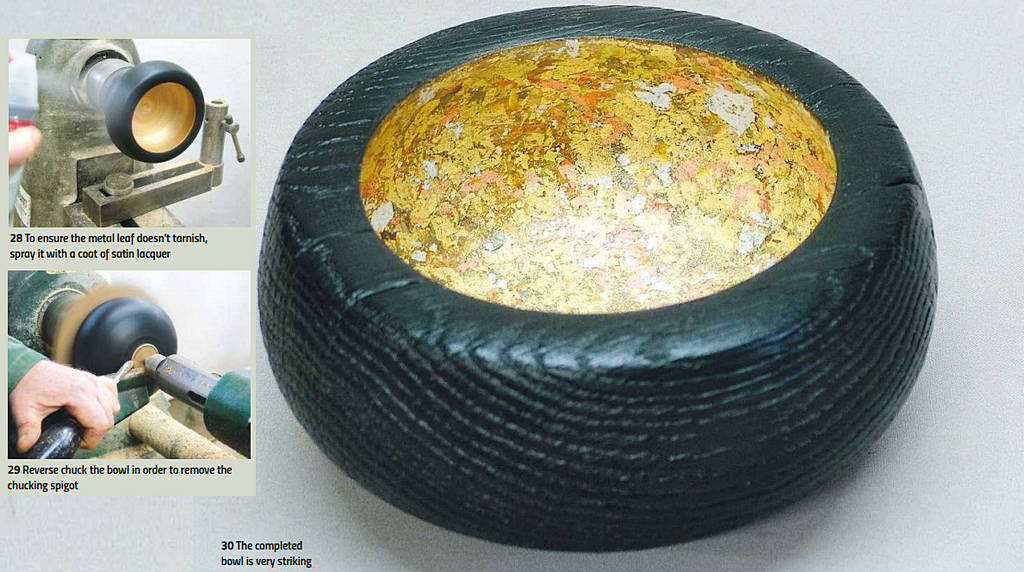
Sand the bowl interior to 400 grit and seal with sanding sealer. Remove the bowl from the lathe and apply gold leaf ‘size’ – the name given to the glue that sticks metal leaf – to the entire inside area (photo 24). Apply the size in an even coat and wait until it goes tacky. Mine was quick drying so I only had to wait about an hour, but some sizes have an open time of considerably longer. Photo 25 shows the metal leaf I chose to apply. Essentially, it consists of small flakes of different metals and is much easier to apply than conventional gold leaf. When the size is tacky, shake an amount of metal flakes into the bowl and using a very soft brush, gently brush it around until the entire interior is coated (photo 26). Leave it to dry completely -preferably overnight – and once the size is thoroughly dry, use a soft brush or cotton wool ball to rub over the metal leaf in an effort to remove the bits that don’t stick to the size and gently burnish the metal flakes (photo 27). Unlike 24 carat gold leaf, this metal leaf tarnishes over time, so seal with a coat of satin lacquer (photo 28). Finally, to remove the chucking spigot, reverse chuck the bowl onto a mushroom-shaped dolly (photo 29). Overall, I was quite pleased with the finished result.


