Francesco Cremonini’s plywood guitar rack combines function with style.
The most important thing for technical furniture is that it satisfies the function for which it was created; aesthetic concerns are therefore secondary. I’m well aware of this, yet when researching online to find out how a guitar rack should be set up, I couldn’t believe the contrast between the ugliness of the stands I saw for sale and the beauty of the instruments that filled them. Many of the cheapest models were a big eyesore!
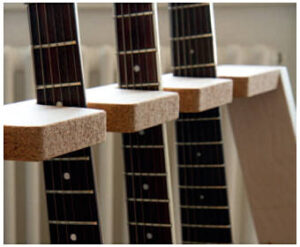 Having had enough, but having at least gained a clearer idea about the geometry of the stand and the space needed between one guitar and another, I closed the laptop and headed to the workshop with the absolute certainty that it would be difficult for my guitar rack to be worse than the ones I’d seen.
I assembled a hasty prototype and using this, with guitars I had on hand, I defined the width of the lower support and the angle of the upper one where the necks are inserted. With both electric and acoustic instruments at my disposal, I also confirmed the minimum separation to be given to the four guitars, so that the rack remained functional regardless of the combination in which the guitars could be placed side by side. I had already chosen which material to use for the structure, birch plywood, and for the soft parts that would protect the beautiful finishes of the instruments, I decided to use cork instead of the grey-black neoprene that I had seen on all the commercial models. After thinking for a moment about how to connect the components together, I started the project.
The design
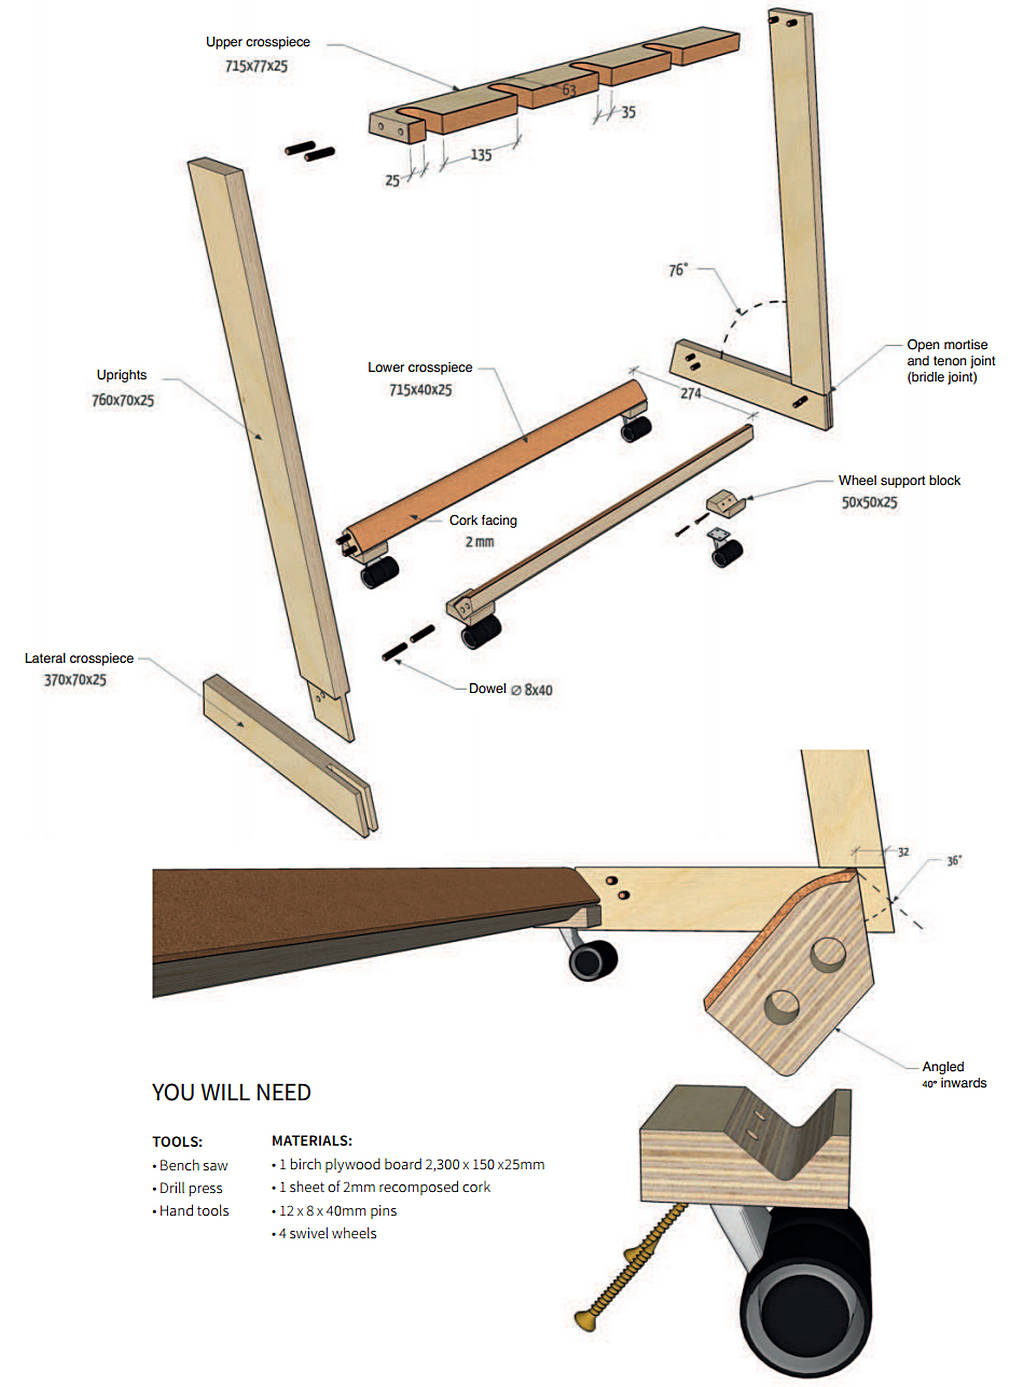
 The rack has a base formed by four crosspieces joined together with two pins at each connection point. The two front ones are inclined inwards by 40°, to offer a more ergonomic support to the curved body of the guitars, and the two lateral ones have their ends cut off at 14° to match the angle of the uprights. The joint that connects the uprights to the crosspieces is an open type of mortise and tenon called a bridle joint, the joint with the upper crosspiece is also joined with pins.
The cork face is applied to the face of the upper crosspiece, which softens the contact points on the guitar. The same coating is set in to the lower crosspieces where it is more likely, with the continuous movement of the instruments, to be torn from the support or damaged. Four blocks are used to fix the wheels to the lower crosspieces.
The joint of the base
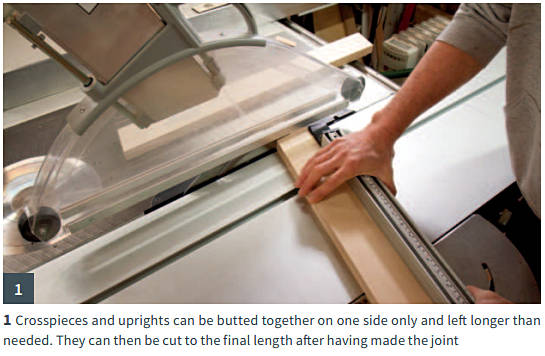
The most challenging part of this, seemingly simple, construction lies in the angled mortise and tenon joint (bridle joint) between the lateral components. For this reason, I needed to prepare the four pieces longer than needed and start work right from their junction: if the first cut was not in line with what was wanted. I just cut off the pieces again, corrected the settings and repeated the cut. Once the joint was obtained, it was then possible to proceed with the simpler and less risky connection of the two load-bearing structures with the remaining crosspieces.
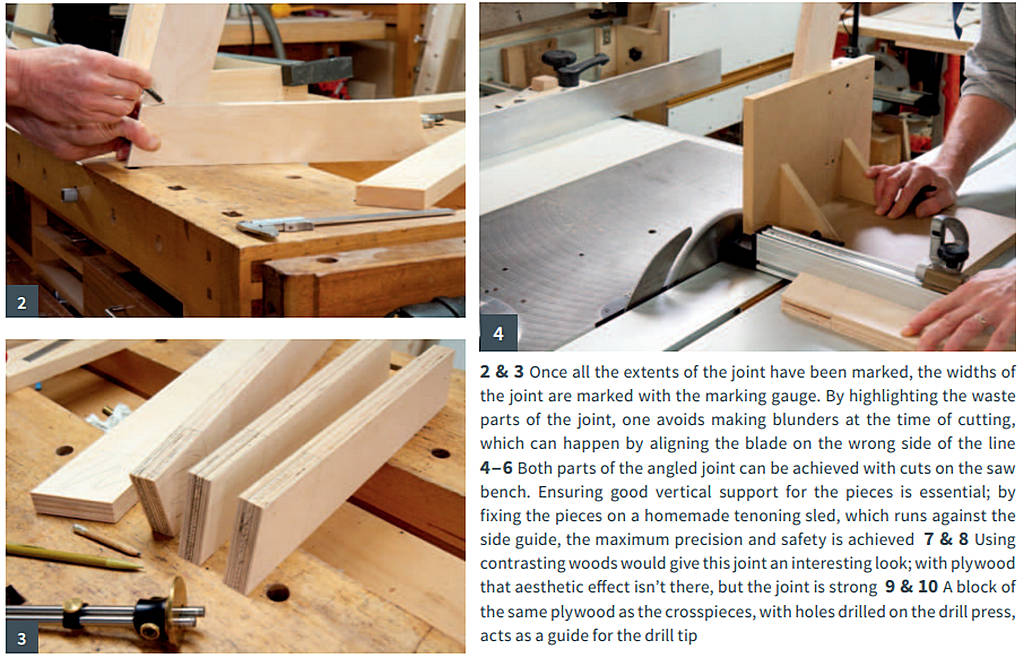
To make the angled joint on a difficult material to work such as birch plywood, given the width of the cuts, there are few alternatives: bandsaw or tablesaw. The tablesaw solution promises clean cuts and perfect fits between the parts of the joint, especially by using a tenon sled, which is the way I chose. However, the joint can also be cut with the aid of the side fence, extending its support; it will take some extra time to fine-tune the fit and carry out the various tests that are needed to achieve a good result.
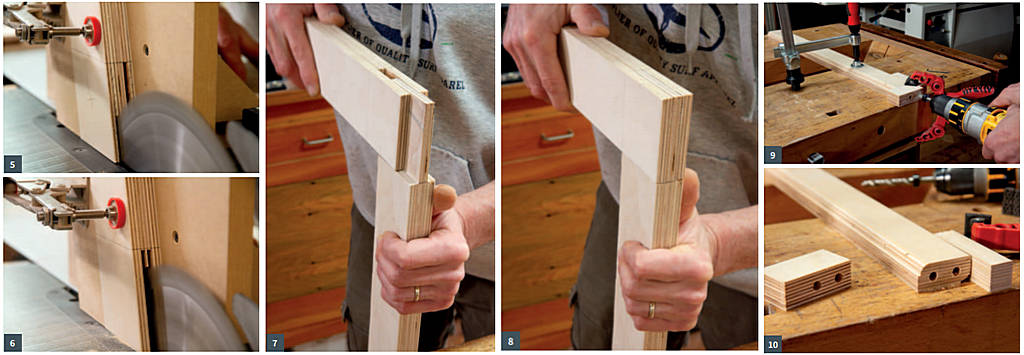
To perform the deep cuts, with the required precision and in a single pass, the choice of tool is critical; the optimum blade for rip cuts has 22 to 36 teeth based on the diameter that can be used in the saw.
After verifying the fit of the joints, the pieces were cut to the final length, then I moved on to their final assembly. Due to the depth of the joint, when the parts are fitted together the glue tended to scrape off, so for this reason I applied it sparingly on both parts.
The two lower crosspieces
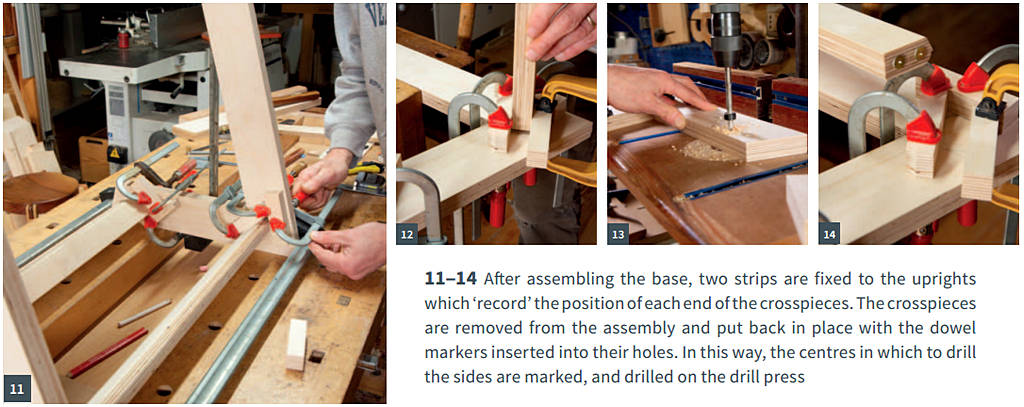
To join the front crosspieces to the two side uprights, I used simple 8mm dowels. The drilling work to be done for the dowels’ insertion was a little more complicated because of the inward angle of the crosspieces, this angle put power jointing tools out of the question. For this task I preferred to drill for the dowels by hand, using a less technological block of wood to guide the drill. First, I drilled this block with a drill press and then clamped it on the workbench at the head of the crosspieces; the preparation work on these pieces took just a few minutes.
To establish where to drill the sides, I assembled the base of the rack by joining the four components together with clamps. I kept the grip of the clamps a little loose to allow for adjustment. The crosspieces were squared at the pre-established point and at the angle required. Strips were then added around the ends of the crosspieces, fixing them on the sides with small clamps, so that the crosspieces themselves could be repositioned. Then I just disassembled the base and worked on one crosspiece at a time, inserting the dowel markers in the holes and repositioning the piece to mark where to drill the centres.
The upper crosspiece
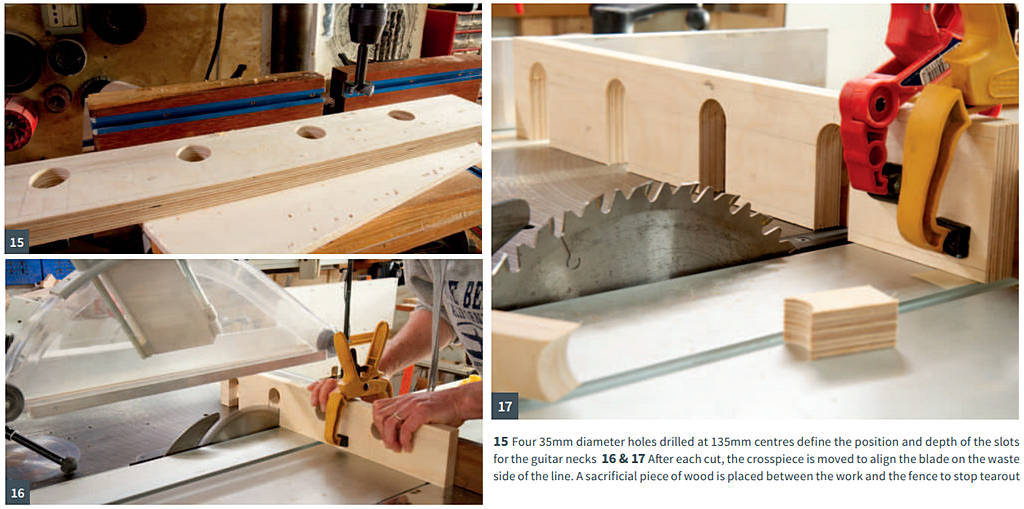
What distinguishes the upper crosspiece are the four deep slots into which the guitar necks will be inserted. In a production run I would prepare a template with which to cut the pieces, but since I was only making one item, I decided to cut the slots one by one.
I drilled four 35mm holes in a position that would define the 63mm depth of the slots.
The first hole was drilled 25mm from the left end and from this I set a 135mm space between the centres for the remaining three.
Then I took a square and marked lines to the holes perpendicular to the front edge of the crosspiece. I then cut them on the tablesaw with a mitre fence, with the blade set to depth and completed the job aligning the blade to the marks each time.
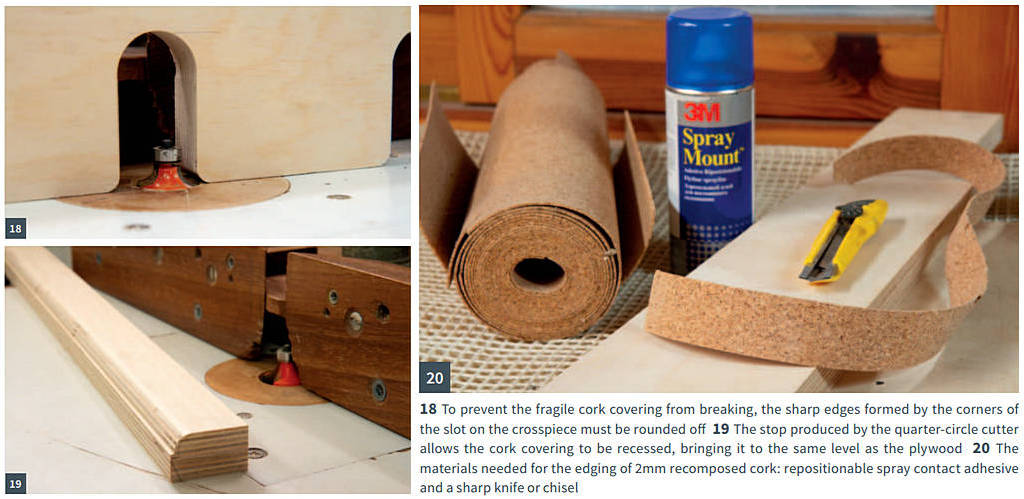
There are just a couple more things to say about making these slots: the first has to do with the birch plywood s tendency to chip when cut. The best thing to deal with this is to place a piece of sacrificial material between the crosspiece and the mitre fence, so that the blade chips the sacrificial material and not the crosspiece. The second thing concerns the rounding of the edges formed by the slots and the front edge of the crosspiece; if you don’t do that, it would be almost impossible not to fracture the cork strip while applying it.
The cork edging
When the guitars are moved around in the rack they could detach or damage the cork facing placed on the lower crosspieces, so I decided to create a stop on them that will shelter the cork s thickness. I created it with the same cutter with which I rounded the upper edges of the pieces.
Once the woodwork was completed. I sanded all the pieces of the rack and finished them with the same water-based varnishing cycle that I had used for the other furniture in the room. Two base coats and one clear matte finish. When this was dry, I took care of the cork.
Finishing
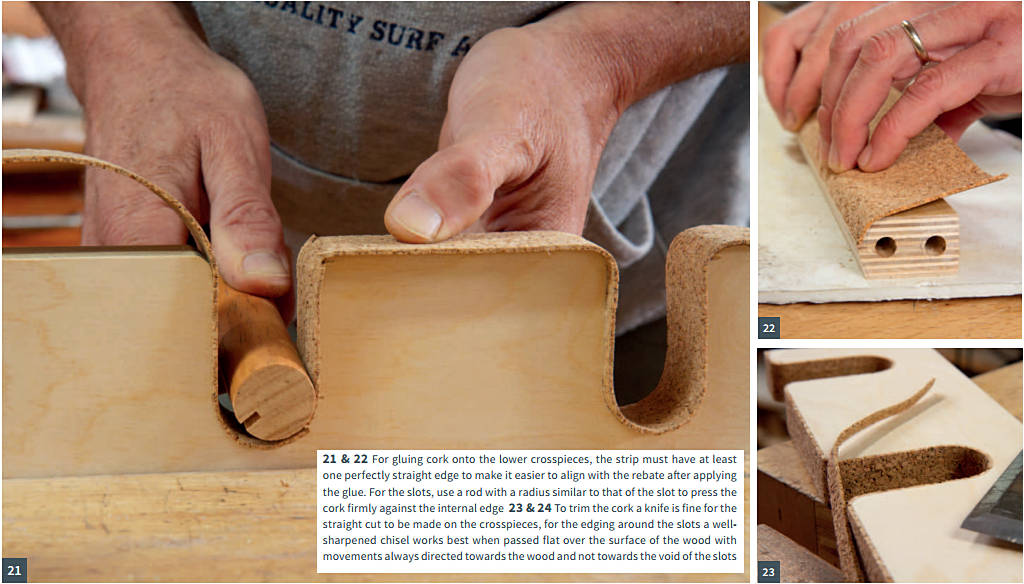
 To glue the sheets of cork, I used a contact glue. I sprayed the glue on as this made it easier to distribute it evenly inside the slots and on the cork itself. Once I had cut the strips of cork with a knife, I spread the glue on both surfaces and waited for the solvent to evaporate before applying the coating. On the lower crosspieces, the cork edge was aligned against the rebates, and then gradually wrapped around the profile. To apply the cork edge into the slots of the upper crosspiece, a rod was used to make sure it fit well.
Once I trimmed off the excess cork with a chisel and knife, and delicately removed little bits of adhesive on the finished surfaces, the last thing was to finally assemble the guitar rack. I used a little glue in the holes and on the heads of the crosspieces and, with a little caution and some soft pads, tightened everything with clamps.

