By WJ Staff
Here’s knock-down convenience for securing legs to rails or stretchers where maximum strength is required.
There’s no question that mortise-and-tenon construction creates rock-solid joints for attaching legs to other members of a framework or rails to stiles. But sometimes the trusty mortise-and-tenon isn’t ideal. Consider a bed frame, for instance. You may need the convenience of disassembling it just to get it out of the shop and into a bedroom once you’ve built it, not to mention each time the bed is moved from one room or house to another. Mortise-and-tenon joints aren’t typically “knock-down,” reversible options.
Or perhaps you need to connect a massive leg to a stretcher or rail, such as in the “Hybrid Workbench” project in this issue. For large frameworks of this sort, you might not want to bore and chop enormous, deep mortises into the leg or mill tenons on the ends of heavy, long rails or stretchers that are unwieldy to handle.
In situations like these, Rockler’s Heavy-Duty Cross Dowels and Bolts (item 36073; $27.99) can offer a solution with simpler machining and no appreciable compromise in strength. Even better, the steel hardware can be disassembled in less than a minute with a ratchet and socket whenever you need to break the joint down.
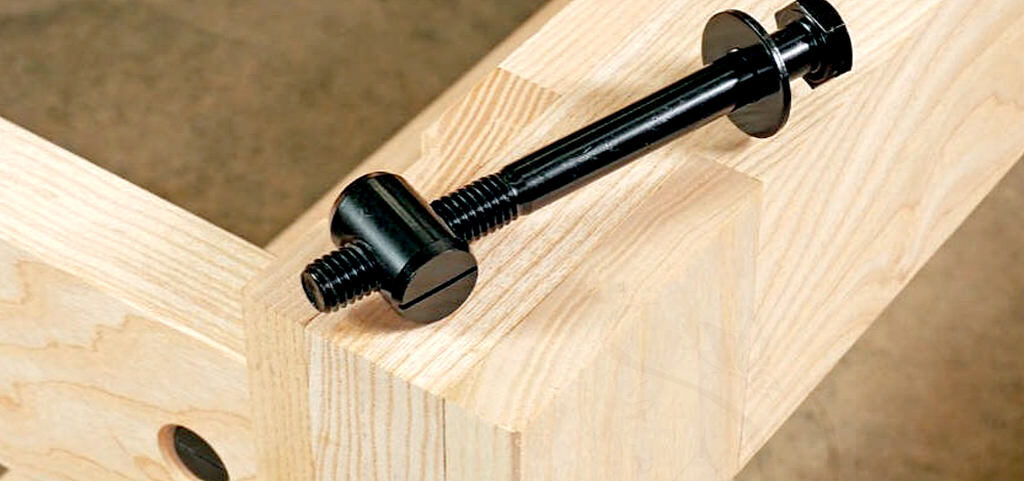
Just Three Parts

The system consists of a 1/2″ x 5½” hex bolt and washer that threads into a 7/8″-diameter, 1¼”-long cross dowel. The bolt passes through the leg and engages the cross dowel housed in a hole bored perpendicular to the rail’s or stretcher’s faces. Tightening the bolt draws the cross dowel toward it, pulling the joint together. Twelve threads per inch are coarse enough to tighten without fear of stripping the parts and make the bolt and dowel easy to start.
These Heavy-Duty Cross Dowels and Bolts offer some degree of joint variation, in terms of how thick the leg can be. But the farther the cross-dowel hole is from the end of the rail or stretcher, the stronger the joint becomes. Legs around 3″ thick, connecting to rails or stretchers in the 1″ to 1½” thickness range, are ideal.
Straight, Clean Drilling is Key to Cross-doweling Success
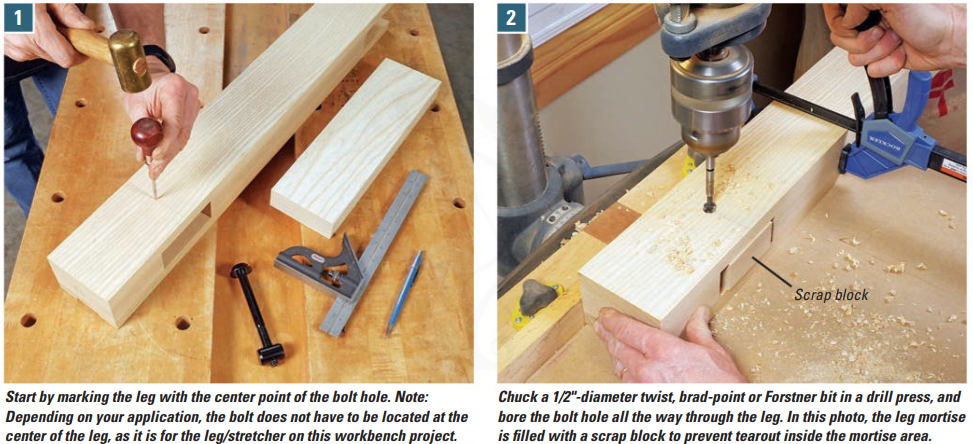
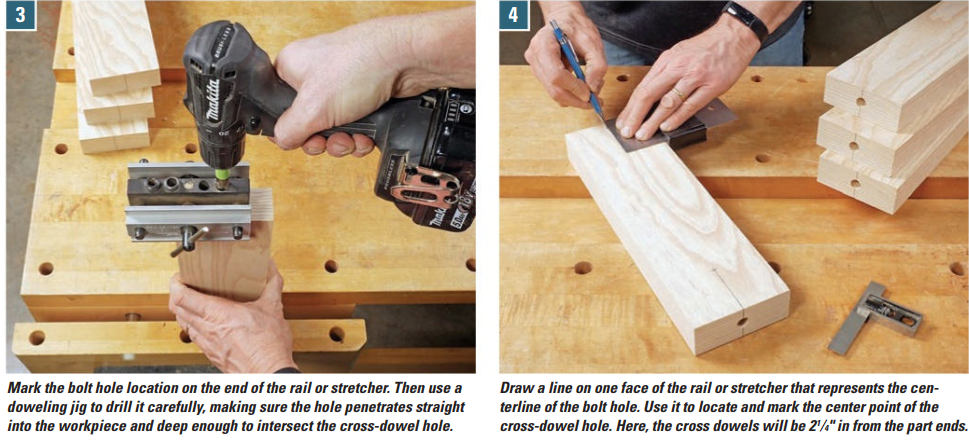
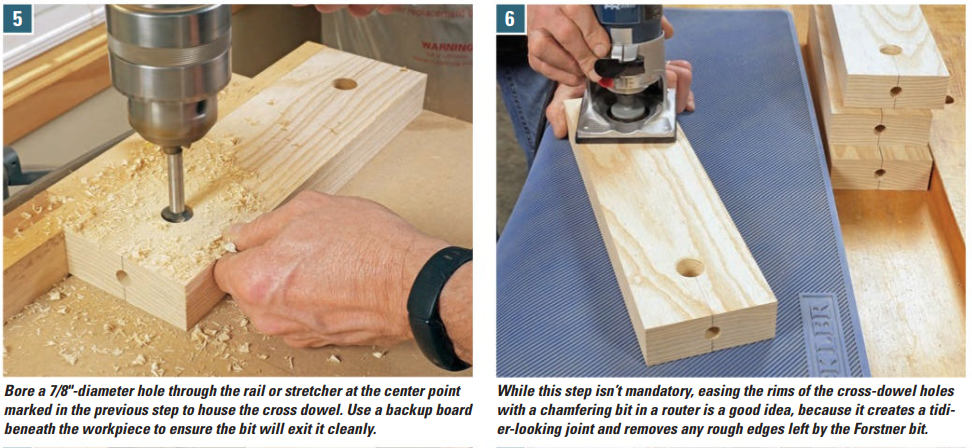
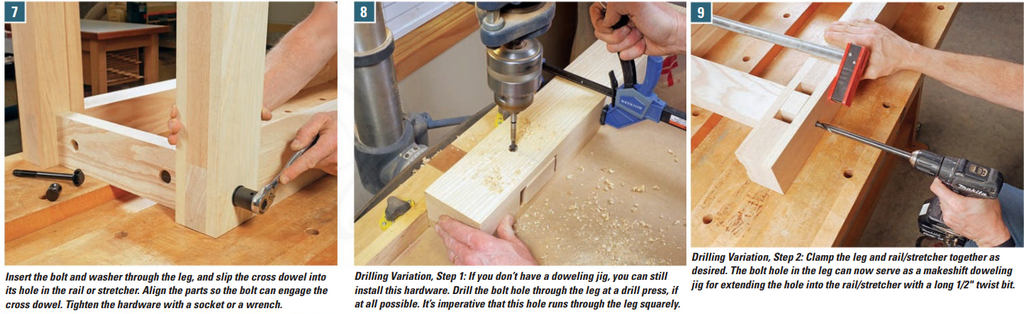
Cross-dowel joinery is about as simple to install successfully as driving screws into a butt joint. However, sloppiness here will likely lead to a bolt that won’t engage the cross-dowel threads correctly or a rail/stretcher that shifts out of registration when tightened up. Mark your joint parts carefully before machining them. Then use a drill press, if at all possible, or even a right-angle drilling guide to bore a bolt hole straight through the leg. A self-centering doweling jig, like the one shown at right, can ensure that the bolt hole also will extend straight into the end of the rail or stretcher and be centered on its thickness. Use a sharp bit for boring the bolt hole (a fresh twist bit or long brad-point bit are ideal). A 7/8″ Forstner bit is a better choice than a spade bit for drilling the cross-dowel hole, as it will produce much cleaner rims when entering and exiting the workpiece.
Drill, Insert, Tighten
Machining your project parts for this hardware isn’t difficult — if you can drill holes, you’ll have it made in the shade. But drilling the bolt hole straight through the leg is key, in order for the bolt to engage with the cross-dowel threads squarely. It’s also important that the portion of the bolt hole penetrating the end of the rail or stretcher is centered on the part’s thickness, or the end of the cross dowel may protrude beyond the part face (this wouldn’t weaken the joint much, but it will look like a mistake).
The order of operations for machining these joints is straightforward: Drill a hole through the leg and into the rail/stretcher for the bolt, then drill a hole through the thickness of the rail/stretch-er for the cross dowel. Locate the cross-dowel hole so the bolt will thread most of the way through it for maximum strength, but be sure to allow several full rotations for the bolt to tighten the joint.