The frame of this coping saw finds its strength in the layered combination of aluminum and ash.
Mention “shop-built hand tools” and a few images likely spring to mind. Maybe it’s a wood hand plane a la James Krenov, or wood layout tools, or even a simple shop knife.
Creative Director Chris Fitch aims for this coping saw to expand the concept into something a little more complex. At the same time, the project should be as accessible as possible to woodworkers.
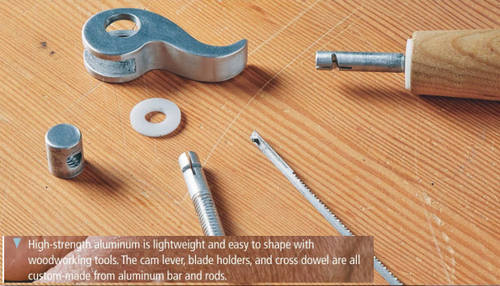
Metalworking can be a stumbling block for toolmaking. Chris’ solution is to use a high-strength aluminum alloy. This means that the hardware components you see in the photo at left can be made easily with tools you probably already have in your shop. Another benefit to the aluminum is its light weight. That made it ideal for the frame.
WORKSHOP SIDEKICK. Coping saws tend to be underappreciated, even by hand-tool woodworkers. And frankly, most commercial versions are average at best. I’ve found that a coping saw is an ideal sidekick to your other hand saws for creating curves or cutouts that other saws can’t handle.
A well-made, top-performing tool invites you to use it more often. So it’s time to build.
Laminating a RIGID FRAME
The defining element and most important part of the coping saw is the frame. It holds the blade in tension and allows it to cut deep into a workpiece.
The challenge is meeting this goal without making it heavy. The solution is a five-layer Dagwood-style sandwich, as shown in the drawing above. Three layers of wood veneer envelop two layers of thin aluminum.
VENEER. Your starting point is the veneer. I resawed veneer from a large blank of ash. There are a couple of things to note. The first is that the grain is oriented so it runs 45° across the frame. This adds resistance to twisting.
The other item of note is that you’re shooting for a final thickness of 1/16″. So I resawed the blanks a bit thicker and sanded them to final thickness.
Another veneer option to consider is laminating commercial veneer pieces to build up to the required thickness. Be sure to select a strong hardwood: maple, white oak, hickory.
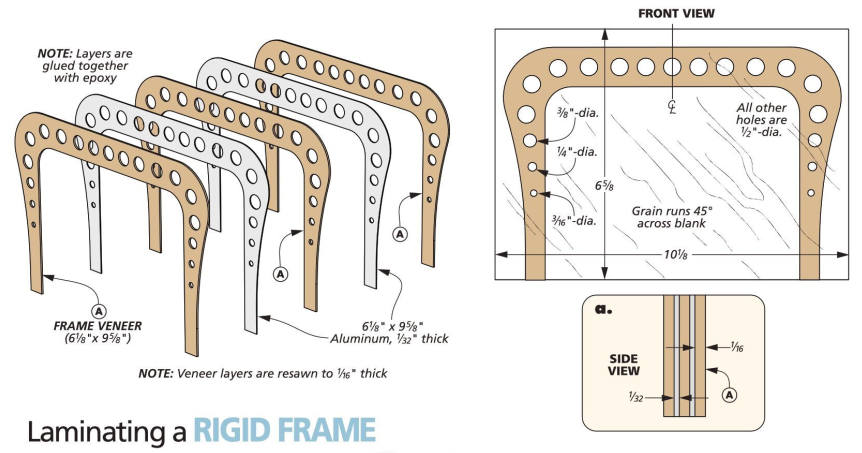
EPOXY GLUEUP. I glued up the veneer layers of the frame with two layers of aluminum, as shown in Figure 1 below. I used West Systems epoxy. The frame remains in clamps overnight while the epoxy cures. The longer epoxy takes to cure, the stronger it is. So this isn’t the place for the five-minute stuff.
SHAPING THE FRAME. The drawing above gives you the details for cutting the frame to size and drilling the holes. It’s a good idea to drill the holes in the frame first, as you can see in Figure 2. The larger blank resists twisting and lifting. Speaking of lifting, clamping a block to the drill press fence prevents the frame from climbing.
From there, it’s over to the band saw (Figure 3). And yes, your typical band saw blade will do just fine cutting the thin aluminum layers in your frame sandwich. Stay as close to the layout lines as you can to minimize the cleanup work.
Go easy at the disc sander while smoothing the frame, as in Figure 4. Epoxy is sensitive to heat and aluminum is a great heat conductor. You don’t want the frame to delaminate or to get a bum. Final smoothing can be done with files and sandpaper. These are also what I used to refine the inside of the frame.
BLADE HOLES
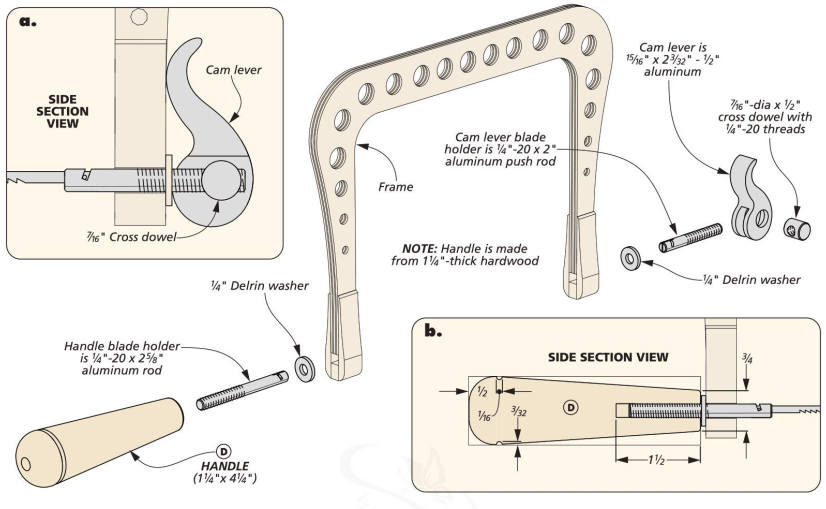
In order to accept a blade, you need to add the elements shown in the drawing above. This creates a hole for the hardware components you make later.
Glue a pair of hardwood sides to each leg of the frame, as you can see in Figure 5. The distance between the sides determines the size of a filler block that gets glued at the end of the sides (Side View above).
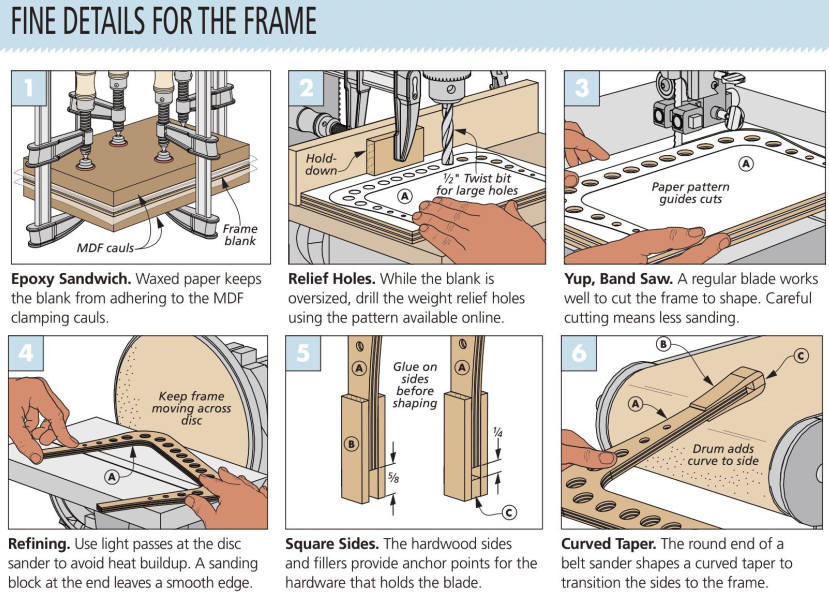
A LITTLE REFINEMENT. Take some time now to shape the sides and fillers to match the frame. The lower ends are rounded. The sides are tapered as they blend in with the frame. Figure 6 shows this step using the end of a belt sander. You could also use a sanding drum installed in the drill press.
Comfortable HANDLE & CUSTOM HARDWARE
There’s just a little woodworking left on this project — that’s the handle. From there, it’s on to some metalwork.
TAPERED HANDLE. Detail V above shows the fine points that you’ll need to turn the handle. I started with an extra-long square blank held in jaws on the lathe. A pilot hole is drilled in the end to house an aluminum rod, as shown in Figure 1 below. Then tap the hole for ¼”-20 threads.
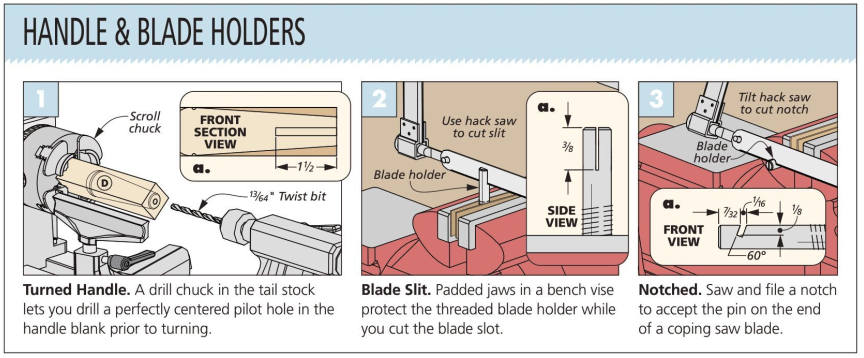
From there, turn the handle to shape and cut it free of the blank. I used carbide turning tools for this step, since they’re well suited for folk like me who don’t turn that often. Use whichever tools suit your preference.
METAL BITS. The metalwork begins with making a pair of blade holders, as shown in the drawing above. One threads into the handle. At the other end, a shop-made cam lever pulls the blade into tension.
The holders are made from connecting rods that have threads on one end. Details ‘a’ and ‘b’ show the overall lengths to cut the holders to.
On the other end you cut a slit with a hack saw to accept a coping saw blade (Figure 2).
Cut an angled slot to house the pins on the end of the coping saw blade. This is shown in Figure 3.1 used a thin warding file to refine the notch so the pin slips into place easily. At this point, you can carefully thread the longer blade holder into the saw’s handle.
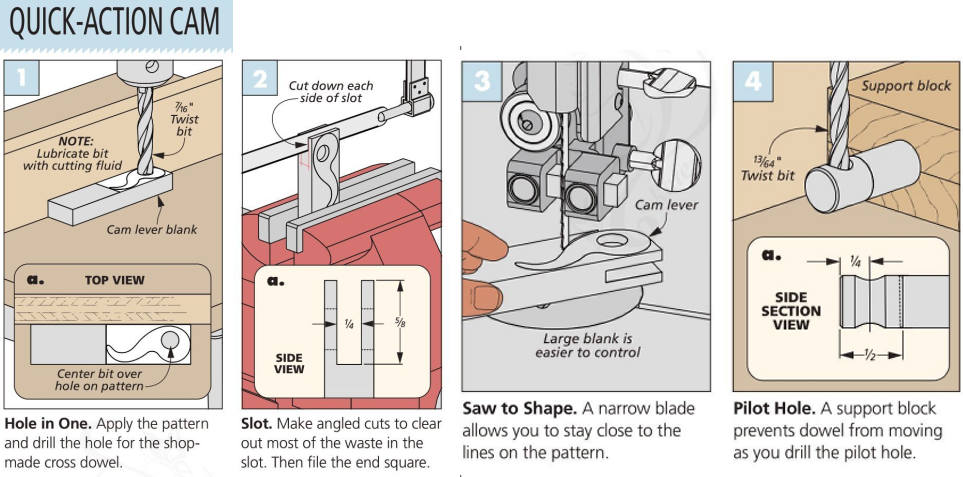
CAM LEVER. The other holder threads into a cross dowel and cam lever. The cam is made from a length of bar stock. The pattern for the lever is at www. Woodsmith.com/262. The box at right walks you through the primary steps. Clean up blade marks and ease the edges with files and sandpaper. This should be comfortable to operate.
Figure 4 shows making the cross dowel. It’s drilled, then tapped while part of an extra-long rod. After cutting it to length, fit the dowel into the cam. Then thread the blade holder in place.
FINE-TUNING. Install a blade into the holders and rotate the cam. If the blade isn’t taut, you can thread the holder farther into to the cross dowel. But there is only so much room to do this without affecting the function of the cam lever. You may have to cut the threaded section down a bit and test the blade again. The cam should have a satisfying snap as it applies tension.

Apply a coat of finish on the wood parts and a little dry lube to the cross dowel. Then you can put your new saw to work.

