Pour-on finishes use two pack epoxy which is mixed and poured onto a wooden surface to give a thick, tough and glossy finish in just one application. In AWR#84, I wrote about a rubbed-out polyurethane finish that can be used to create a similar finish through multiple thin coats. Pour-on finishes have the potential to produce a similar though tougher, high gloss finish in just one application.
Both finishes result in a ‘plastic-like’ coating and stand in sharp contrast to many traditional finishes. I certainly understand the preference many people have for the look and feel of older, proven finishes. However, I think there is a role for finishes that are really tough and can highlight features of timber grain. So recently I did some tests to see where pour-on finishes can be used to advantage.
In AWR#48 Robert Howard outlined his ‘philosophy’ of woodwork.
One of his key principles was that woodworkers should always try to ‘creep up’ on their target. With finishes, this usually means applying a number of coats, rubbing down the surface between coats and correcting imperfections as you go. The singlecoat approach of pour-on finishes can be a great advantage but doesn’t match the creep-up principle and has the downside that imperfections can be difficult to remove.
Pour-on products
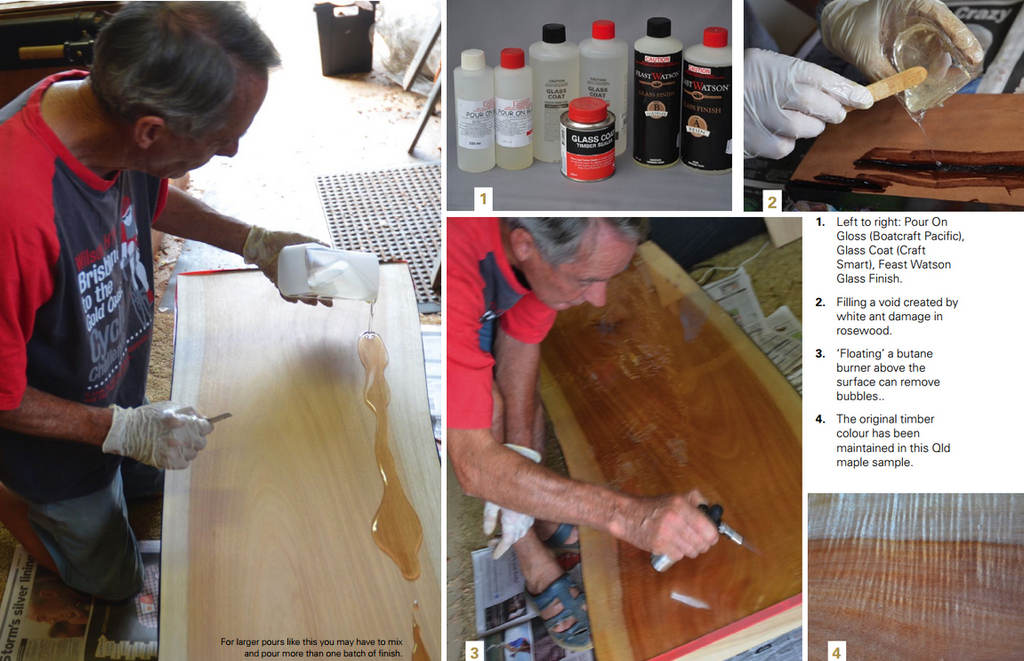
I chose the three products shown in photo 1 for the test: Glass Coat from Craftsmart, Glass Finish from Feast Watson and Pour On Gloss from Boatcraft Pacific.
Packaging varied a little, with timber sealer and measure included with Glass Coat, and gloves and measure with Pour On Gloss. The Feast Watson instructions were better presented than others whereas the Pour On Gloss instructions were more comprehensive.
Safety issues
It appears the main risks with pour-on finishes are irritation to eyes and skin and possibly allergic reactions. There are appropriate warnings against breathing vapours and avoiding skin and eye contact with each of the instructions, and there is good encouragement to wear gloves at all times. All of the bottles carried emergency instructions.
Measuring and mixing
Glass Goat and Pour On Gloss both require equal parts of resin and hardener whereas Glass Finish requires a 5:3 ratio of resin to hardener. For small batches, I found the equal mixes were simpler to measure though this wasn’t a problem with larger mixes. Limit mixes to 500ml as larger amounts can get hot and go off too quickly. This means it is a good idea to have a second person mixing when more than one batch is required.
Pour-on finishes depend on self levelling of the mixture to obtain a good finish. This won’t happen if the mixture is spread too thinly or if it is too cold. I planned on a 1mm spread and I think this was a little too thin in places – Feast Watson recommend 1.2mm. Pour On Gloss recommend a temperature range of 20-30°C.
Each of these finishes is quite transparent, so it is difficult to see when they are mixed. One recommendation was to use a broad flat stirrer to ensure good mixing and another was to mix for one minute in one container and then transfer the mix to a second tub. I think this is a good idea for larger mixes in particular. Bubbles can be an issue with pour-on finishes, so don’t stir too vigorously.
Filling voids
As pour-on finishes cure through the reaction of resin and hardener, they can be used to fill voids and in the process, can improve the strength of a piece. Photo 2 shows a board cut from a rosewood stump that had been attacked by white ants. The shape of the void was a feature of the board, so I decided to fill it.
I put tape over holes in the bottom and on the ends, to prevent leakage. It’s preferable to fill large voids in several steps so that bubbles captured by the pour have a chance to escape. There is a surprising amount of shrinkage as the finish cures, so voids need to be over-filled. Bubbles tend to escape from imperfections like cracks and bark enclosures, so these should be sealed before pouring the finish.
Flat surfaces
In some circumstances, you will want the finish to flow over the edge and down the sides. Where you want the finish to be flat up to an edge, you will need to make a ‘dam’ by running some stretchy electrical tape around the edge. If you fix the tape so the top edge is just below the thickness you are aiming for, you can get the meniscus to curve down to the tape which is quite neat.
For smaller pours, dribble it on until there is full coverage and keep pouring until the surface rises to an appropriate thickness. For a larger pour like the one shown in the main photo, calculate the amount you need for say, a 1.2mm cover, mix and pour (in more than one batch if necessary).
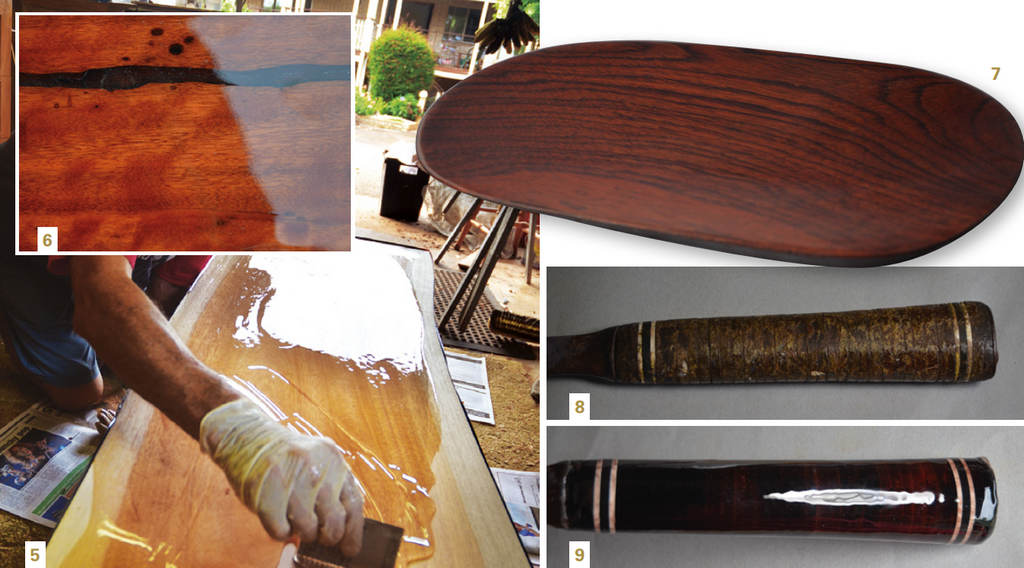
It’s a good idea to pour around the edges first and then fill in the middle. You only have something like 10 minutes to spread the mix. I used a notched spreader to get a reasonable coverage and then used a 100mm foam roller to get an even finish. It’s preferable to avoid working the surface a lot and if it is reasonably spread, it will even itself out and flow to a great finish.
Make sure that you have good ventilation for larger pours. I didn’t find the fumes from these surfaces were particularly noticeable, however the warnings should not be ignored.
Removing bubbles
Bubbles can be created when mixing the finish and can rise to the surface from cracks or voids. They can be removed by pricking then with a needle or by blowing at them through a straw.
A really effective way of removing bubbles is to float a butane burner a couple of centimetres above the surface (photo 3). I think the bubble burst through localised heating and from turbulence from the flame itself. You need to be really careful of course as you can easily heat the surface so much that the finish boils and catches fire. You may need to do this several times as bubbles seeping out of a crack can keep coming.
As soon as you are satisfied with the surface, you need to put a cover or tent over it to prevent airborne particles settling. The surface will be touch dry in 12 hours, reasonably hard in three days and fully cured in seven days.
Test results
Pour-on finishes certainly live up to the promise of quickly achieving a high gloss finish that is perhaps 50 times the thickness of a polyurethane coat. On small surfaces, it is relatively straightforward to achieve a flawless finish. On larger surfaces, it takes some practice.
I do like the clarity of these finishes. The Qld maple sample (photo 4) has maintained the original timber colour and the rosewood sample in photo 6 is only marginally darker.
Inevitably though, there will be blemishes from stray bubbles or dust particles and on larger surfaces, variations in the finish. I’ve found that after these finishes have cured (seven days at least), they can be rubbed out in the way I described in AWR#84.
Depending on the blemish, it may only be necessary to use 1200 and 1500 grit paper to remove the gloss and blemishes and then buff the surface with a cutting polish. You end up with a great finish that I prefer over the normal very glossy finish.
Curved surfaces
Recently, I made some platters like the one in photo 7 where I planed all of the surfaces (see AWR #85), and I felt that a pour-on finish could be a good all-purpose option. My first attempt was a disaster as I spread a 1mm thick cover and then it all flowed into the middle. This is my second attempt where I brushed three thinner coats and then rubbed out the finish – it worked really well. Brushing doesn’t give as good a finish as the normal pour-on approach and on a curved surface it is hard to avoid small runs.
Hammer handle rejuvenation
A common application of pour-on finishes is to paint it on (or pour it over) a surface where excess can run off. I have an old hammer with a leather handle that was very weathered (photo 8). I sanded it back and painted on two coats of a pour-on finish and suspended the hammer by the head as it dried. There was minimal run off as it happens and the finish was beyond expectation (photo 9).
Burl with bark inclusions
Pour-on finishes are a good option for the convoluted grain patterns and the rough surface of burl.
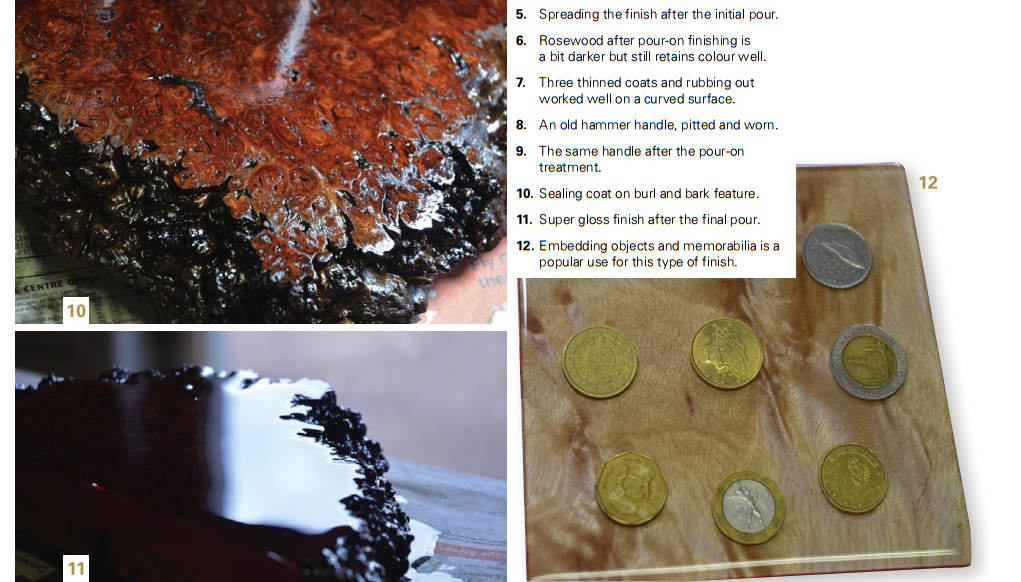
I found the bark inclusions across the top of this sample soaked up a lot of finish and gave off a lot of bubbles. So I put seal coat on first (photo 10). When this was dry, I brushed finish into the knobbly sides, put a tape barrier across the back and poured a reasonably thick finish on top (photo 11). I still got a few bubbles that I had to remove.
Embedding things
Pour-on finishes are often used as a robust finish over things like photos or coins (photo 12). The instructions suggest you should glue your items onto the surface and then apply the finish over them. In this sample, I just wet the back of the coins so there would be no air to escape and then applied the finish. I used one of the coins as a height gauge when I set the tape around the edge and then I poured the finish until I had an even cover over the coins and a curved meniscus down to the tape around the edges.
As with any other finish, it is unrealistic to expect a perfect result, first time. Trial runs and experimentation are important to build up confidence. Rubbing them out also gives you the ability to creep up’ on the result you want.


