Knife hinges are a subtle, sleek choice for cabinet doors. As you can see in the Intarsia Spice Cabinet, the hinge is nearly hidden when closed, and it remains largely out of sight when the door is open. This makes them an excellent choice when you want to emphasize the cabinet itself, with the hinge as a functional accent. However, precision is key with knife hinges, meaning they can be a bit tricky to install for the first time.
Knife hinges are composed of two halves (or “leaves”). As you can see above, one leaf is mortised into the door while the other is mortised into the cabinet. The door is suspended from the top and bottom, rather than off of the side.
Here I’ll be installing a set of offset hinges, as was done for the Intarsia Spice Cabinet. First, I’ll dry clamp the cabinet up, then I’ll size the door. Next comes the mortising. Either the door or the case can be mortised first, but I’ll be starting on the door here.
The first thing to determine when sizing the door for the case is the gap. The gap between the door and the cabinet is based on the thickness of the washer separating the two hinge leaves. You’ll need some shims for this, and my go-to is a set of old playing cards, too dinged up to be used in any honest game.
Start with a slightly oversized door, then shave off the edges so your shims just fit between the door and cabinet. An offset hinge will need the gap balanced on all four sides. A hand plane is my preferred tool here to avoid taking off too much at once.

DOOR MORTISES
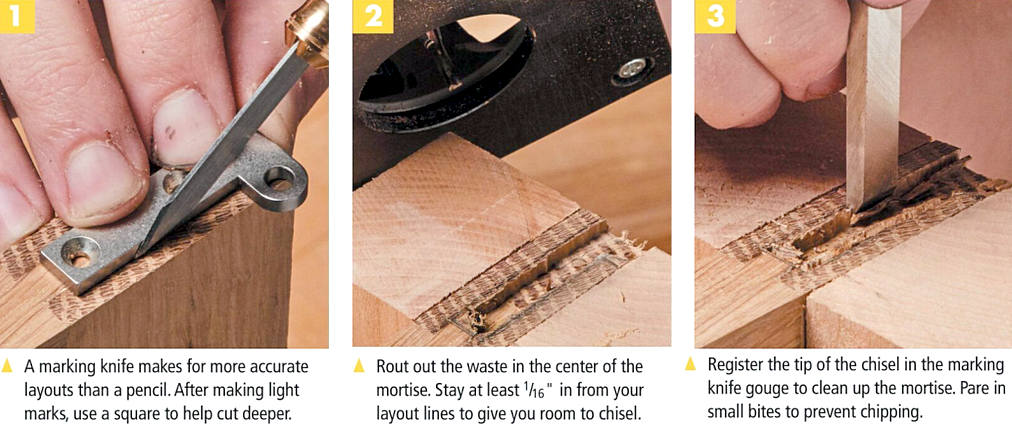
Now for some mortises, starting with the door. Set aside the pencil for now and go for a marking knife instead. The grooves from the knife will help your chisel register exactly on the mark.
LAYOUT. Clamp the door in a vise at a comfortable height and set the hinge on top. For an offset hinge, position the end of the hinge flush with the side of the door, and the pin hole centered halfway over the edge of the door, as in Photo 1 below.
Scribe shallow cuts around the leaf with the marking knife. To make sure your knife isn’t pushing the hinge around, use a square to make more defined lines with the knife. Remove the leaf and register the tip of the knife in one of the grooves, then butt a square up against it to make the mark. Once finished, use the square to help you trace these lines with a pencil, as you’ll want them very visible when you rout.
ROUTING & PARING. Speaking of the devil, it’s time to remove the waste. A palm router with a straight bit works best. First, set your router to the same depth as the thickness of the leaf. You’ll need to support the router base to keep it from wobbling so add a pair of scrap boards on either side of the door. Now rout the bulk of the waste out freehand.
After you’ve finished making dust, use a chisel to square up the mortise as in Figure 3. Register the tip of the chisel in the knife marks to finish the sides.
CABINET MORTISES
The door is done, and with the cabinet still dry clamped, it’s time to mark out the matching mortises on the top and bottom of the cabinet. First, you’ll want to mark out the distance from the side to the hinge. Here I used my shims (Photo 1 above), as I knew it would be enough to allow my door to swing open easily.
Now disassemble the cabinet. You’ll next need to figure out the distance the leaves will be from the front of the cabinet. This is easy, since it’s the same distance as the hinge you just mortised from the front of the door. Of course, if the top or bottom of the cabinet you’re working on extends out further than the door, you’ll need to account for that as well here.
LAYOUT. Place a hinge on the case top (or bottom), measuring from the front and lining the end up to the mark you scribed earlier. Once in place, lightly scribe around the hinge, as in Photo 2. As before, come back with a square to cut the layout lines deeper, then again to mark them with a pencil for routing.
ROUTING. With the mortises laid out, it’s time to rout. Clamp your piece to your workbench and follow the same process as before. Freehand rout to remove the majority of waste, leaving a small amount before the layout lines.
PARING. Follow your router work up with chiseling. Clean and square the mortises. Two things can make a big impact in the quality of your paring on these mortises: having a sharp chisel and having the right size.
Needless to say, a sharp chisel will make your job much easier, especially when paring into end grain. It will also help to prevent chipout. Taking some time to sharpen your chisel before getting to work pays off.

As for the right size chisel, I was lucky enough to have a sharp chisel on hand that was the same width as the hinges. This allowed me to run it straight down the length of the hinge after paring the sides, making sure there were no ridges or burrs that could cause the hinge to sit funny in the mortise.
Once you’ve finished the first piece, repeat the routing and chiseling process once more on the opposite side of the case. Then your mortises are done.
ASSEMBLY

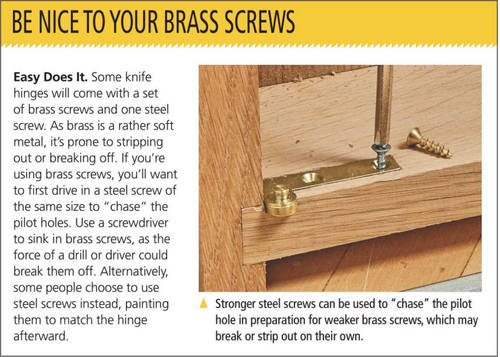
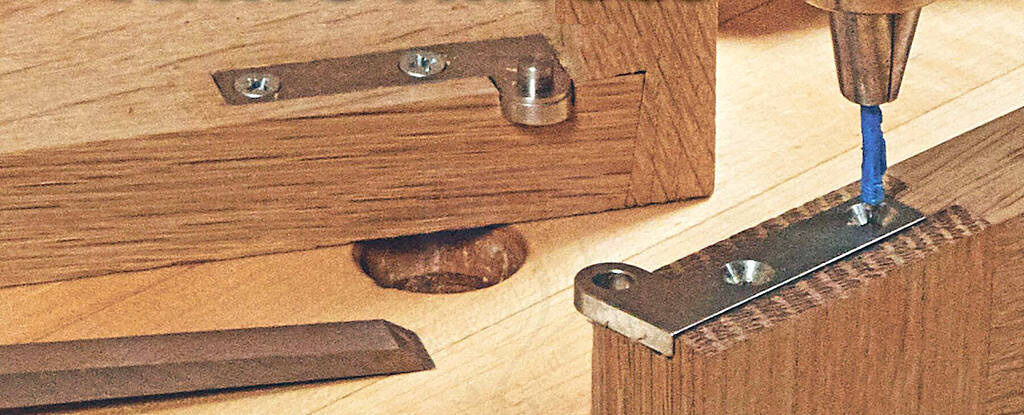
Everything’s cut on these hinge mortises, but there’s still the matter of assembling the cabinet. To begin with, put the hinges in their mortises and drill the pilot holes. A self-centering bit is a good idea here to keep the hinge from sliding out of place while you drill. Be sure to watch your bit depth when drilling out the pilot holes for the top and bottom pieces. After you’re done, screw the hinges onto the case pieces, but leave them out of the doors for now.
Now it’s time to glue up the case, but I recommend making one more dry fit, just to be sure everything’s situated correctly.
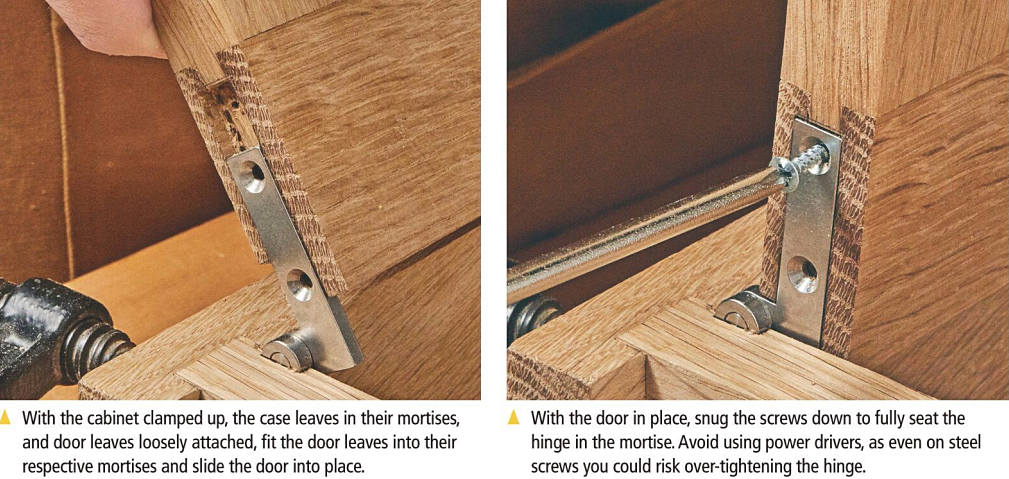
ATTACHING THE DOOR. Once the cabinet is clamped up again, snap the door leaves onto their cabinet counterparts, then lay the cabinet on its back. To attach the door, line up the door mortises with the door leaves and slowly slide it into place. Depending on how tight you made your mortises, you may need a helper for this task. Once in place, screw the hinges to the door.
FINAL ASSEMBLY. Once everything fits in place properly and the door swings easily, it’s time to glue up the cabinet. After the glue dries, simply slide the door back onto its hinges as you did before and screw it in.
Knife hinges are a good choice when you want the cabinet or door itself to shine. Whether it’s intarsia, a brilliant veneer, or some impressive joinery, a knife hinge makes for a subtle complement to a variety of different projects.
Although the learning curve is slightly steeper and the margin for error is less forgiving than other hinge types, fitting a knife hinge into a perfect, gapless mortise is particularly rewarding. Once you learn how to install them, they can be a fun piece of hardware to add to a project. With a little practice, these uncommon hinges could become a new favorite.


