For many years, buyers preferred expensive and luxurious items, but this trend is gradually fading. Today, the focus is not on price but on meaning: the more significance a piece of jewelry holds, the higher its chances of gaining popularity. Resin jewelry, though much more affordable compared to gold accessories, has its audience. These pieces perfectly complement ethnic and boho styles, suit casual everyday wear, and highlight the ecological preferences of their owners. Let’s explore what epoxy resin is and how to create jewelry from it, so you can make a unique handmade gift yourself.
What is Epoxy Resin
Epoxy resin, also known as “epoxy,” is a synthetic material. Success in working with it lies in choosing the right type. Modern thermosetting polymer resin is safe for people, easy to work with, and delivers satisfying results. However, before its development, artisans used epoxy glue to create jewelry. This material did not gain popularity due to its yellowing and the bubbles that formed during the process. With the advent of epoxy resin, handmade crafters finally received a high-quality material free from these drawbacks.
For a long time, epoxy resin products were considered something unusual and new. However, nowadays, they can be found in any craft store in a variety of options, from transparent to colored.
A Little Theory
Working with epoxy resin requires skills. The first attempts might not be successful, but this is no reason to give up. It’s an opportunity to develop your abilities. In the following, we will present a step-by-step guide for making jewelry, but for now, let’s discuss some important theoretical aspects.
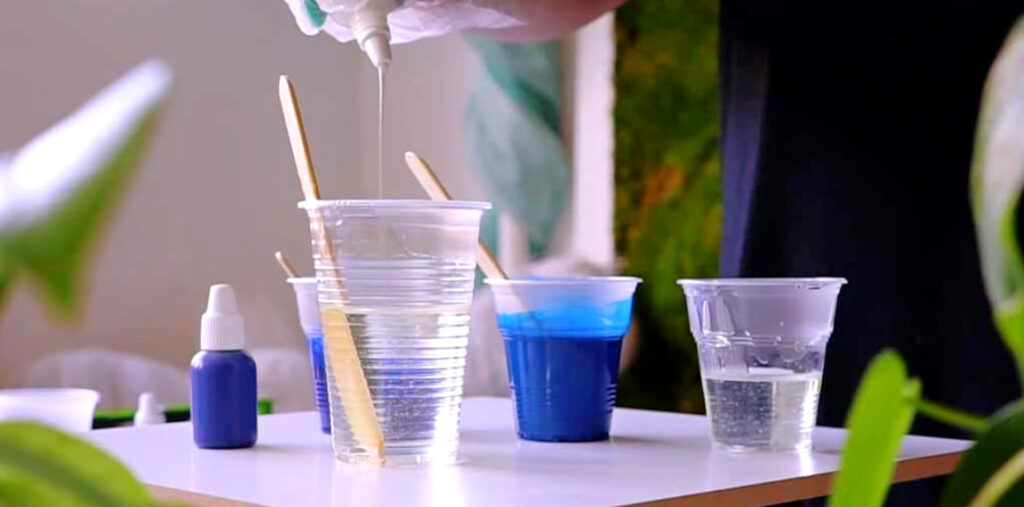
“Compound” is the term for the material suitable for creating jewelry at home. It consists of two components mixed in specific proportions. One bottle contains the base substance, while the other holds a hardener that makes it solid. Hardeners can be acids or amines. When combined, they form a polymer — in other words, resin.
There is no universal ratio for creating a compound. Before mixing the components, carefully read the instructions. They contain all the information needed for successfully working with epoxy resin and will help you quickly and accurately achieve the desired final material.
Cured epoxy resin resembles plastic. However, its properties make it far more valuable to artisans. In fact, this synthetic product outperforms both plastic and acrylic glass, which it also resembles.
Advantages of Epoxy Resin
Epoxy resin attracts artisans not only because of its appearance. Here are its key benefits, particularly relevant for epoxy resin jewelry:
- Durability: Epoxy resin is significantly stronger than both plastic and acrylic glass, with performance indicators far exceeding those materials.
- Transparency: Once cured, the resin remains fully transparent and does not become cloudy over time.
- UV Resistance: Epoxy resin is unaffected by sunlight. Even with constant exposure, ultraviolet light will not damage the piece.
- Wear Resistance: While epoxy resin jewelry isn’t indestructible, it is remarkably long-lasting.
These are undoubtedly major advantages of the material. However, the most significant benefit is worth saving for last. Artisans working with epoxy resin often consider its greatest strength to be its ability to retain its shape after polymerization — and it’s hard to disagree.
Criteria for Choosing Epoxy Resin
If you’ve always been fascinated by the unique look of resin jewelry but have never tried making it yourself, now might be the perfect time to experiment. However, when selecting materials for crafting, it’s important to pay close attention to specific criteria. While seasoned artisans may already be familiar with these, for beginners, they serve as fundamental guidelines.
- Instructions
It’s crucial that the packaging or the box containing the resin and hardener includes clear instructions. Experimenting with ratios will almost certainly ruin the material. Even experienced artisans rarely attempt to prepare polymer resin without precise guidance, and for beginners, it’s an even greater challenge. Before purchasing, make sure the product comes with detailed instructions. - Resin Pot Life
Pot life refers to the time it takes for the resin to fully cure after the components are mixed. This timeframe is critical depending on your project:
-
- For larger creations, you’ll need resin that cures slowly, giving you more time to work with the material.
- For jewelry-making, however, a shorter curing time is acceptable and often preferable. Resin used for small-scale accessories typically requires less material, so a compound with a short pot life is ideal.
When pouring the resin, exercise maximum caution. The way you pour it determines the number of air bubbles in the finished piece. To minimize bubbles, pour the compound very slowly and carefully. Bubbles are nearly impossible to remove once formed, so this step is vital for achieving a flawless result.
Don’t worry if your resin piece appears matte after curing. This is a common characteristic of resin from any manufacturer. The glossy, crystal-clear finish is achieved during the polishing stage, which comes near the end of the process.
Safety Guidelines

Working with epoxy resin can be a delightful experience, but ensuring your safety is essential to avoid any discomfort or risks. The safety rules are straightforward and intuitive, but when it comes to health, it’s always worth reiterating these well-known principles.
- Wear Protective Gear
Ideally, you should wear a dedicated lab coat, disposable rubber gloves, and either plastic goggles or a clear face shield as an alternative. This will protect your skin and mucous membranes from coming into contact with the resin. - Use Water in Case of Accidents
If, despite wearing protective clothing, resin comes into contact with your skin or mucous membranes, immediately rinse the affected area with plenty of running water. The sooner you act, the less severe the effects of unwanted contact with the polymer will be. - Epoxy Resin Is Not Suitable for Tableware
While we’re exploring epoxy resin as a unique material for making jewelry, it’s also commonly used to create decorative items, tableware, and other interior objects. However, keep in mind that resin-based tableware should only serve decorative purposes. Food must not come into contact with this material. - Ventilate the Workspace
Regardless of where you work with epoxy resin—on a balcony, in the kitchen, a home office, or a room—ensure the area is well-ventilated. Ideally, the window should remain open in ventilation mode throughout the time the resin is curing. Jewelry and other resin items stop emitting harmful substances only after they’ve fully hardened, so until then, fresh air circulation is vital. - Wear a Respirator When Sanding
Once your piece is complete and ready for sanding, prioritize your health by wearing a respirator. This will protect you from inhaling fine particles of polymer material, which could otherwise irritate your mucous membranes.
By following these safety measures, you can enjoy crafting with epoxy resin while safeguarding your health and well-being.
Top 5 Secrets for Working with Epoxy Resin
Many artisans who work with epoxy resin turn their passion into a business, creating and selling unique jewelry while sharing their expertise with beginners. Here are five tips to help you bring your ideas to life with epoxy resin. Who knows—this guide might inspire you to start your own resin jewelry business, especially given the popularity of exclusive handmade accessories.
- Platinum Silicone Molds
These molds shape your resin creations and are critical to achieving professional results. High-quality platinum silicone molds ensure better control over the process and make it easy to remove finished pieces. While they may be more expensive, their durability and precision make them worth the investment. - Eliminating Air Bubbles
Air bubbles can ruin the appearance of your jewelry. Experienced artisans recommend letting the resin sit for a few minutes after mixing. This allows bubbles to rise to the surface, where they can be easily removed. - Heat Resistance of Molds
Epoxy resin generates heat as it cures, with temperatures reaching up to 60°C (140°F). Non-heat-resistant molds can melt and ruin your project. Always check that your molds can withstand high temperatures before use. - Drying Natural Elements
Adding natural elements like pinecones or flowers gives your jewelry a unique charm. However, these elements need to be dried properly to prevent issues. As you did in school when making a herbarium, place them between the pages of a book and wait until they’re fully dried. - Correct Consistency for Placement
Resin remains liquid until fully cured, which means heavier decorative elements tend to sink to the bottom. Being mindful of this will help you strategically place your decorations so they become focal points of your design.
Finally, don’t overlook the importance of high-quality jewelry findings. Good components significantly enhance both the durability and aesthetic appeal of your accessories.
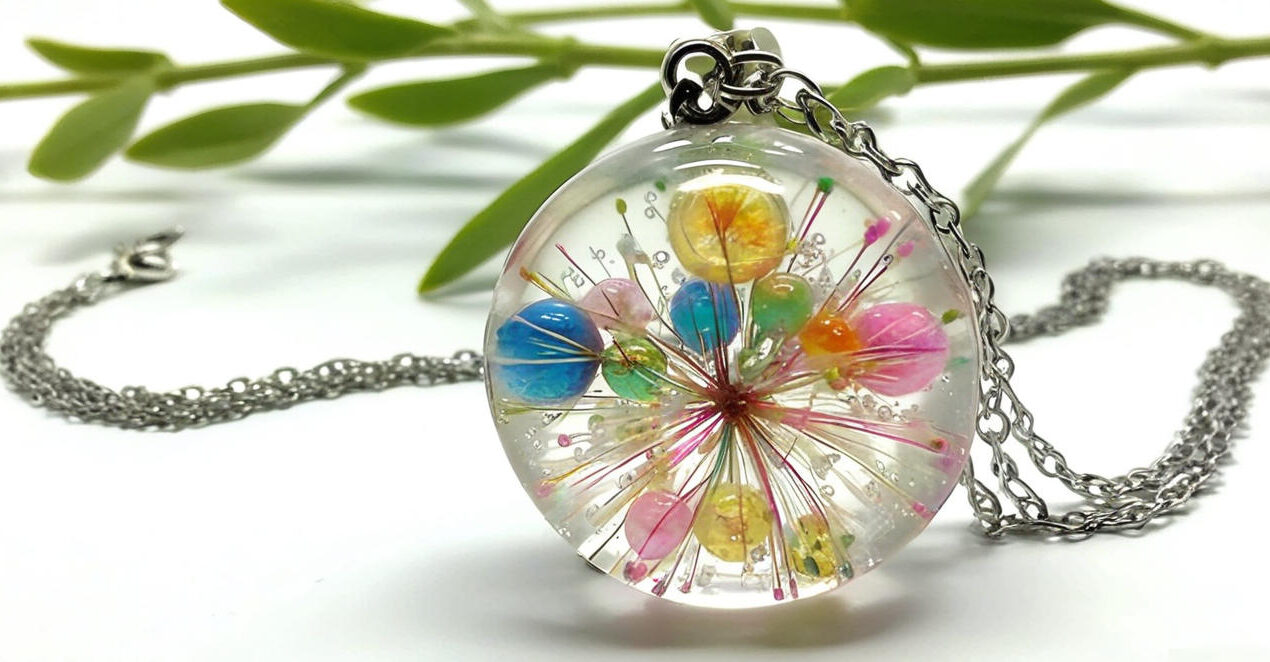
Making a Pendant

If you’ve never worked with epoxy resin before, start with a simple pendant in the shape of a hemisphere. It’s relatively large but perfect for incorporating natural decorations, such as a dandelion.
Steps to Create a Pendant
The process of making epoxy resin jewelry follows a general principle. Here, we’ll guide you through creating a hemisphere-shaped pendant. For other types of jewelry, only specific features may differ.
- Prepare the Molds
Wash the silicone molds thoroughly with soap and warm water, then dry them completely. This step is essential to prevent dust from ruining the finished piece. Clean molds ensure a glossy surface without the need for additional polishing. - Mix the Resin and Hardener
-
- Use one syringe to measure out the base component and pour it into a plastic cup.
- Use a separate syringe and cup for the hardener.
- Slowly add the hardener to the base and mix thoroughly to prevent air bubbles. Mixing usually takes around 10 minutes. Always follow the instructions provided with the resin for the correct ratios.
- Prepare the Decoration
Place the dandelion into the silicone mold and use tweezers to remove any excess fluff. Allow the resin mixture to rest for about 30 minutes to let the air bubbles rise and escape. - Pour the Resin
Pour the resin into the mold very slowly in a thin, steady stream. Cover the mold with a lid or cloth to protect it from dust while curing. - Curing and Finishing
After 24 hours, remove the cured hemisphere from the mold. Use sandpaper to smooth the edges and refine the surface. Attach the jewelry findings using a glue gun or adhesive.
Your pendant is now complete and ready to wear or gift!
Making Resin Rings
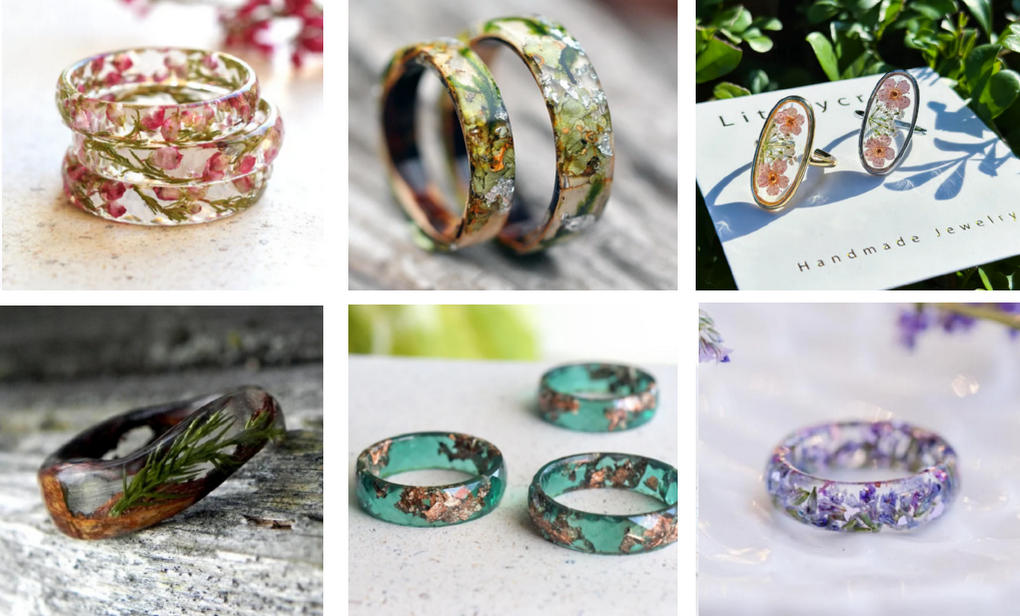
To create a resin ring or signet, you’ll need a specialized mold that fits the desired finger size. This ensures a perfect fit for the final piece. In addition to basic materials and tools, pigment paste is essential. A clear ring without any additions might look plain, but adding a pigment can transform it into a unique piece of jewelry. Pay attention to the following points during the process:
- Decorative elements: You can use colorful glass pieces, beads, small fragments of natural wood, or dried flowers as decorations.
- Adjusting proportions: The use of pigment alters the component ratios specified in the instructions. Keep in mind that the amount of pigment affects these proportions. If too much hardener is used, the ring may retain fingerprints. Conversely, if too little hardener is added, the ring may take an unusually long time to cure or fail to set completely.
- Alternative to pigments: If you prefer not to use pigment paste, you can opt for ordinary green antiseptic (brilliant green). Add a small amount to the resin mixture for a bright and unusual result.
The final steps in creating resin rings and signets involve sanding and polishing, if necessary. Modern molds made of platinum silicone often reduce the need for these finishing processes.
Working on a Bracelet
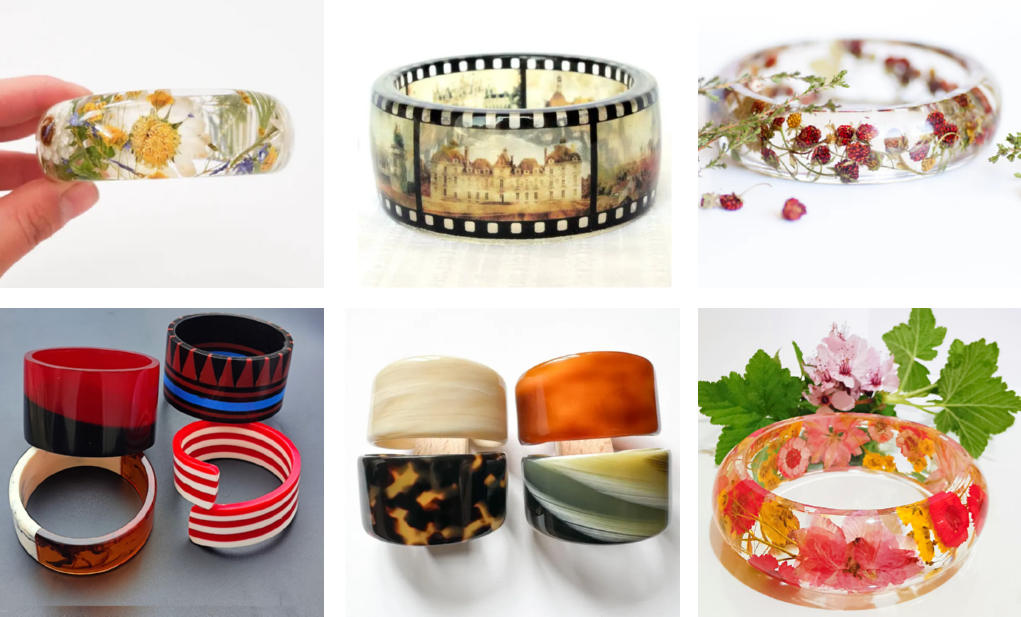
To create a resin bracelet, you will need a special mold. Choose a mold diameter that matches the circumference of the wrist. This is important to ensure that the finished piece fits comfortably on the wrist and can be easily removed. The bracelet will be rigid, so size matters.
Next, choose a filler material. A clear bracelet on its own might not look very interesting. However, by adding decorative elements inside, its appearance will be greatly enhanced. We recommend using small seashells and pebbles. This combination of resin and natural materials will create the perfect accessory for a summer look.
The main challenge lies in how to arrange the decorative elements inside the bracelet. Due to their weight, they often settle at the bottom of the mold, leaving one side of the bracelet without decoration. To prevent this, before pouring the resin, coat the mold’s walls with resin. This will make them sticky and help hold the shells and pebbles in place. It may take a little extra effort, but the result will be worth it. Once the decorative elements are secured, you can pour the resin into the mold and add the remaining shells and pebbles to the bottom.
How to fix common mistakes when making epoxy resin items
Conclusion
Creating unique jewelry and accessories from epoxy resin is both a rewarding hobby and a potential business opportunity. With the right tools, materials, and techniques, you can craft stunning pieces that reflect your creativity and attention to detail. From rings and pendants to bracelets, each project offers endless possibilities for customization using natural and decorative elements.
Remember to follow safety guidelines, experiment with designs, and take your time to perfect your craft. With patience and practice, your epoxy resin creations will become beautiful, durable, and one-of-a-kind accessories that stand out.