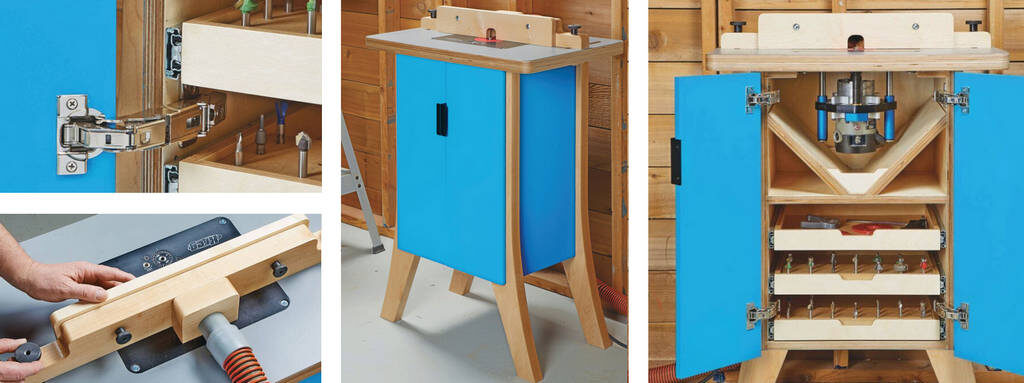
The siren call of professional-grade gear is tough to block out for home woodworking. Router tables offer a good example. In the past few years, the trend has followed the “bigger is better” line. Even with mobile bases, these continent-sized tools take up significant space in a small shop.
My build-it-yourself approach has several payoffs. In the case of this router table it’s to nestle into a sweet spot for size. The 18″ x 26″ top is sized for the kind of projects.
The Baltic birch plywood and plastic laminate that make up the top provide high performance. We used a Kreg plate and lift system that makes bit changes and adjustments easy and accurate.
CABINET BASE. Down below, the cabinet is a triple threat. Enclosing the router dampens the sound. It also contains dust and chips. Finally, the case offers storage for all the things that go with routing: wrenches, insert rings, bits, bearings, set-up gauges … the list goes on.
GOOD LOOKS. Shop projects, whether commercially made or shop-built, feature a pragmatic, utilitarian design aesthetic (read boxy and boring). I want my workshop to exhibit the same creativity that I like to express in my other projects. The flared legs amp up the visual appeal without clogging the construction process.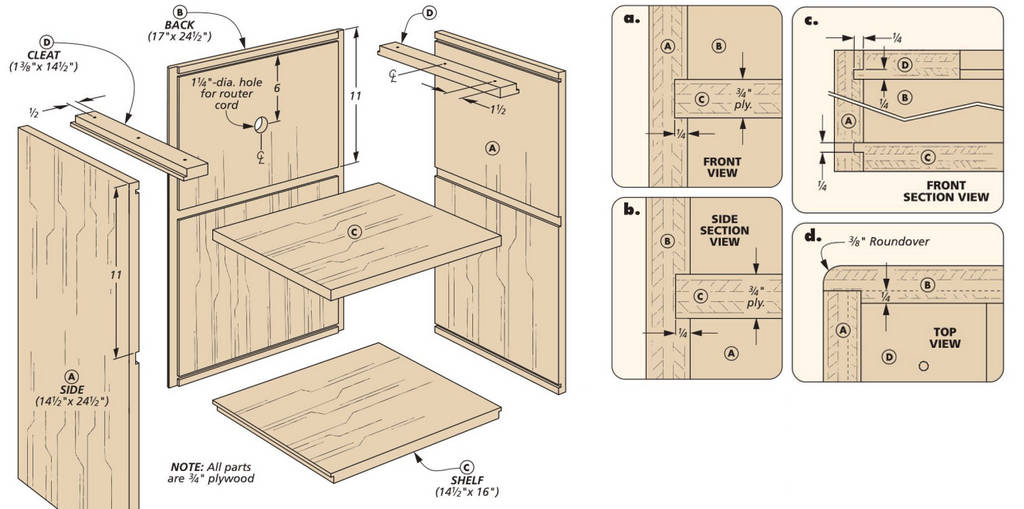
CABINET COMES FIRST
The center of gravity on this project is the plywood case. It supports the top and is the structure the legs are attached to. The “normal” approach to casework like this is to use thick plywood on the sides and a thin back panel. The drawing above shows a more robust method.
The sides and back are all 34″ plywood. Using a thick back panel allows you to cut joinery into the three pieces for a stronger connection, with the two shelves and the cleats up top.
JOINERY. Let’s take a closer look at the joinery. With plywood, simple solutions works best. At each end of the sides and back, a narrow dado holds the bottom shelf and the cleats. This is shown in detail ‘c.’ The location of the far end of the dadoes on the sides and back matches the thickness of the mating plywood pieces. So why narrow dadoes and not rabbets? Dadoes allow the shelf and cleats to lock into position positively.
The middle shelf is held in a dado that’s sized to match its thickness exactly, as in details ‘a’ and ‘b.’ The final bit of joinery is to cut a rabbet along each edge of the back to index the case sides. You can see that in detail’d.’ Then drill a hole for the router’s power cord.
ASSEMBLY. Take a moment here to glue up the case. The back, sides, and two shelves are best glued up in one go. The smaller cleats can be slipped into place once the clamps are on.
ROUNDOVER. Detail ‘d’ above shows the final step to take care of on the case. A sprinkling of roundovers on this project adds a little style, as well as softens the harsh edges. If you’ll be painting the case, as we did, now is a good time to start the priming and painting process.
LEGS & DUST CONTROL
A completed case forms the basis for the remaining parts of the project. Working out from the case, you can make the legs. Then work inward to create a very simple dust control system.
LEGS WITH FLARE. Chris Fitch grew tired of plain shop fixtures. His form of protest in this router table is to give the legs a furniture quality. It’s a small but effective statement.
The upper right drawing shows how the legs are cut from the blank. Shape the long notch that cradles the case first. I cut the bottom of the notch at the table saw. A band saw and rip fence handles the long side.
Stay at the band saw to cut the curves. I cut one leg then used that as a template to form the others. The outer edges of the legs have roundovers and are secured to the case with screws, as you can see in detail ‘a.’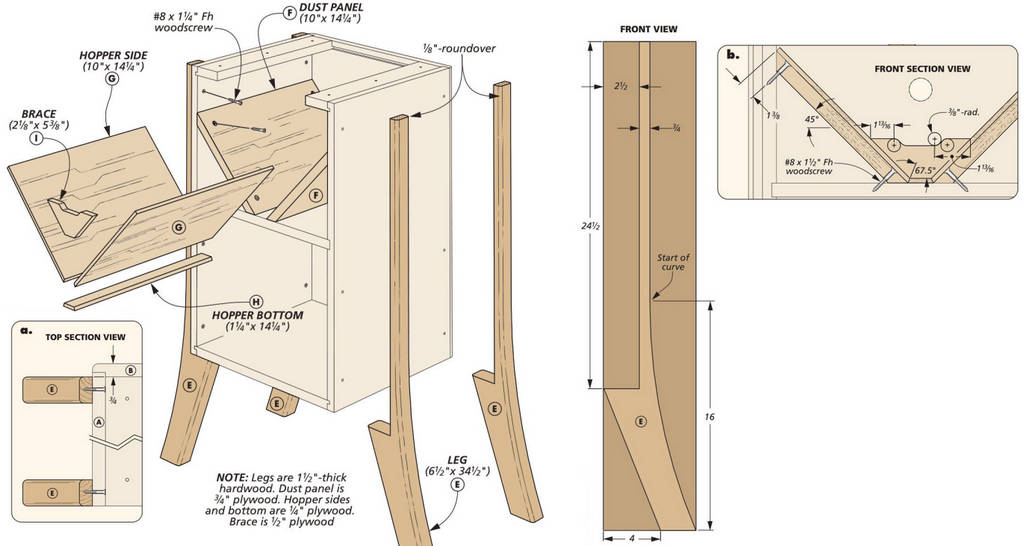
DUST HOPPER. A surprising pile of chips end up inside of a router table cabinet. To make cleanup easier, there’s a two-part system. The first part consists of a pair of angled panels that are screwed to the inside of the case (detail V). Beveled edges on the panels seat against the case sides and shelf.
On top of these rests a lightweight, removable hopper. The angled sides gather and funnel the dust and chips so you can dump them out.
Installing the dust panels allows you to accurately size the components for the hopper. Take a moment to study detail ‘b’ to pick out the various angles you need to cut along the hopper sides and bottom piece.
A pair of braces create a front and back for the hopper and provide added strength, since the other parts are thin plywood.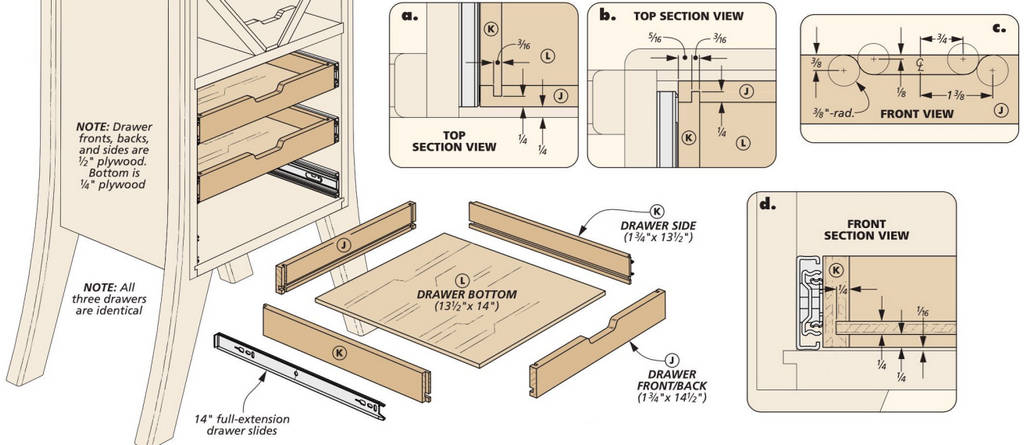
CORRALLING THE GEAR
The compartment below the dust hopper could easily be left as is. For me, that would be a huge problem. Unorganized space like that is a warehouse, spacious but easily descends into chaos. The drawers shown here transform that same space into a library — organized and serene.
For simplicity, all three drawers are the same size. And I kept them shallow. This eliminates deep, dark recesses where the bit you’re looking for likes to hide.
TONGUE & DADO. The drawer box pieces are made from Vi’ plywood. The parts and joinery are sized to leave a Vi’ gap on each side for the drawer slides. Speaking of, the joinery on the drawers is tongue and dado. The details are shown in details ‘a’ and ‘b’ above.
A dado is cut on the fronts and backs. An interlocking tongue is then formed to fit on the sides. This is easily done at the table saw. Check out detail ‘d’ for the location of the groove cut in all the parts that holds the bottom.
INTEGRATED PULL. The drawers are covered by doors we’ll get to in a bit. So I didn’t want pulls that protruded from the front. Instead, I opted for the subtle cutout you can see in detail ‘c.’ I like using a Forstner bit to create the inner radii. The connecting cuts can be taken care of at the band saw.
After assembly, the drawers can be installed using full-extension slides. These come in two parts: a cabinet part and a drawer part. The drawing above shows the drawers evenly spaced in their compartment. But that’s only one option. You can create any spacing to suit the items you plan on stashing inside.
The key to successful installation is making sure each side is level. The box on the bottom of the previous page highlights a trusted solution.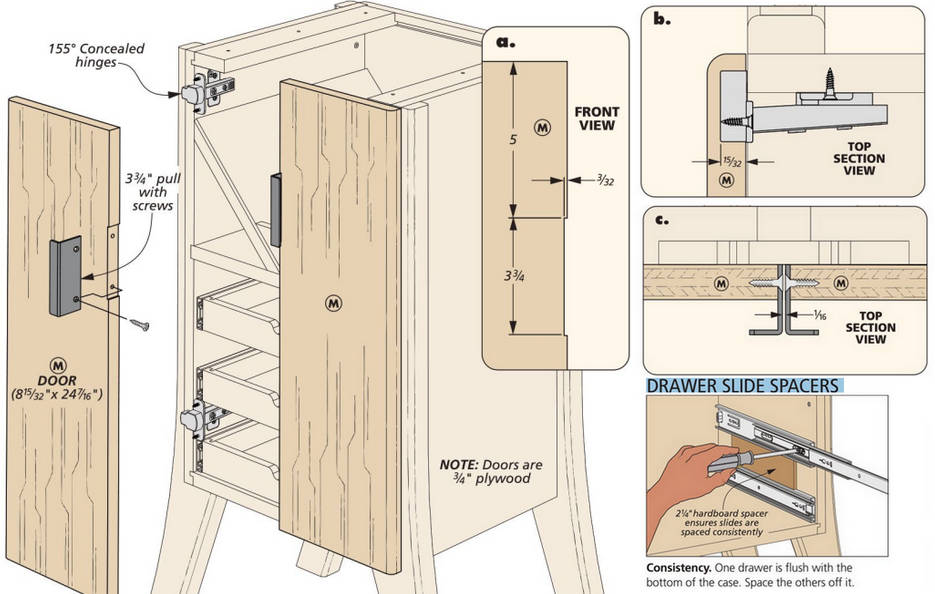
THE EASIEST DOORS
On a lot of projects, the doors can be mini-projects in themselves. But that doesn’t have to always be the case. Here, plain plywood slabs do the job nicely and fit in well with the overall design motif of the project.
Each door is cut a hair shorter than the overall height of the cabinet. This creates clearance so the door won’t bind against the top. Width-wise, size the doors for a small gap in the middle and the doors flush with the edges of the case. Check out details ‘b’ and ‘c’ at right.
DETAILS. Now for some finer details. The outside edge of each door gets a roundover to match the one at the back of the case. Along the inside edge, cut out a shallow mortise for a pair of trim edge pulls (detail ‘a’).
CONCEALED HINGES. The doors hang on concealed hinges that open wide enough to allow the drawer to open without scraping. Detail ‘b’ at right and the box below show you what you need to know. You’ll drill holes in the doors for the hinge cup and attach the case side of the hinge with screws.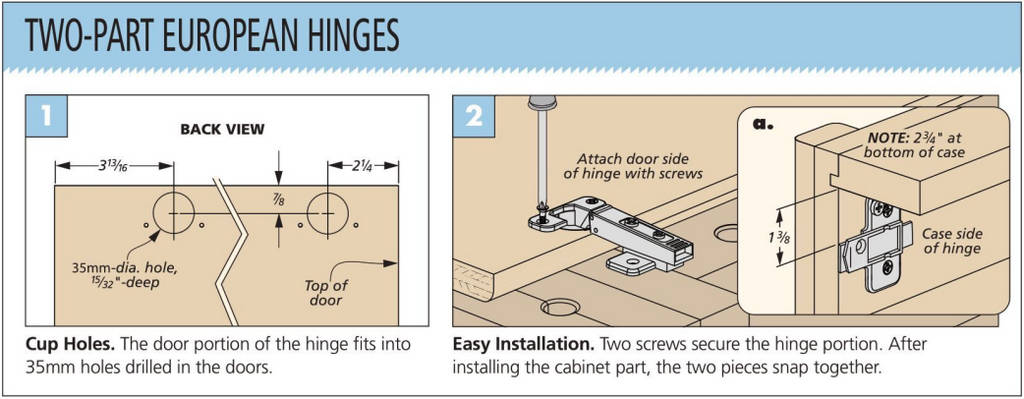
Where the MAGIC HAPPENS
All that’s come before are opening acts. At last we get to the main event — the top. The requirements here are short: big enough, flat, durable.
Let’s check some of these items off the list. As I mentioned at the outset, a lot of router tables are too big (personal preference). This one is sized to suit most project parts and get along well with the other tools in my shop.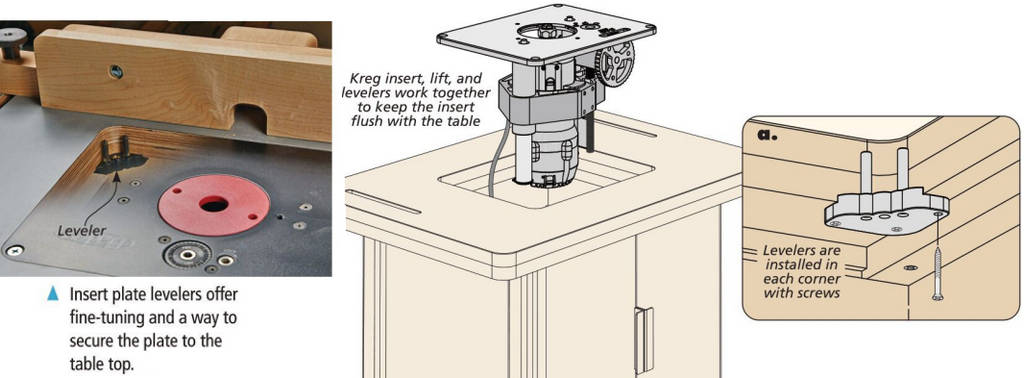
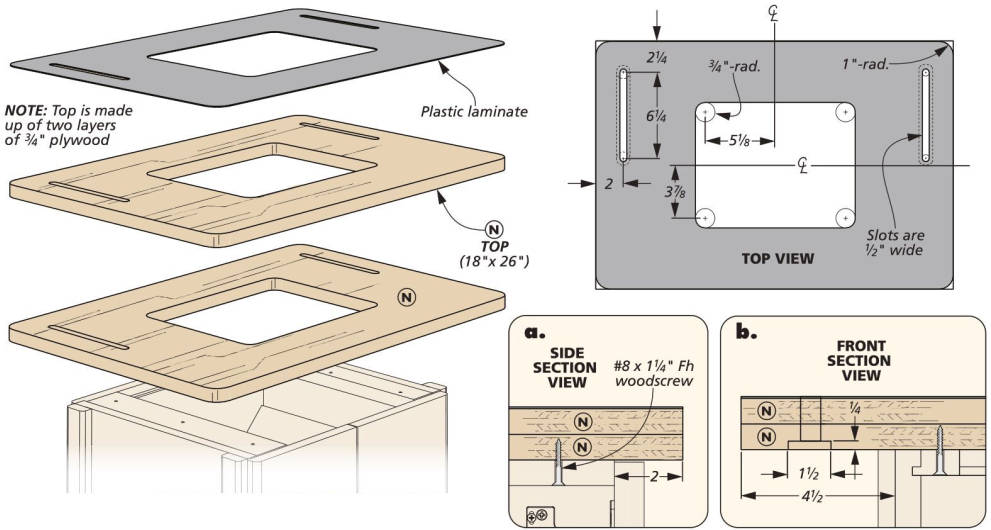
DOUBLE-STRENGTH. The top is glued up from two layers of plywood and cut to the size shown in the drawing above. I used Baltic birch plywood here, as it’s more reliably flat than other sheet materials as well as offering the strength required for a worksurface.
After rounding the corners, I capped the top with a piece of plastic laminate (pick your favorite color). Laminate is hard-wearing and offers a smooth, low-friction surface for moving a workpiece around.
FENCE SLOTS. Cut a slot along each end of the top, as shown in the “Top View” drawing. These slots accept the fence we’ll come to shortly. There’s a narrow through slot and a stepped portion on the bottom face (detail ‘b’. A plunge router with an edge guide is the approach I used to make these.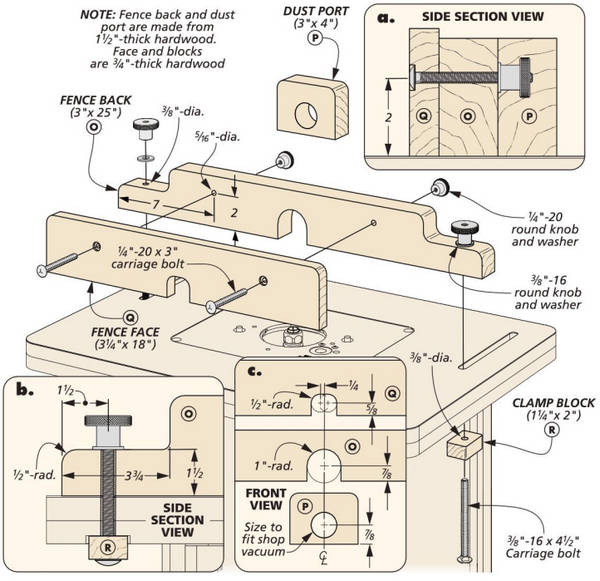
INSERT PLATE KIT. It’s time to add the router part of this router table. I used a kit from Kreg Tool that includes an insert plate, router lift, and levelers, as shown in the drawing and photo below.
All you need to do is make an opening in the table top that matches the size of the insert plate. An insert plate leveler is attached in each comer (detail ‘a’ below). It has two posts to help level the insert plate (which should be pretty obvious based on the name.) But it also has a threaded insert that allows you to secure the plate to the leveler.
This cuts down on vibration and noise that can occur on other insert plate setups.
Completing this work means you can attach the top to the case. Drive three screws up through the cleats into the top. Check out details ‘a’ and ‘b’ on the previous page for the overhang numbers.
A STEP UP FENCE
For years, Steve Johnson, one of the shop craftsmen at Woodsmith used a straight piece of hardwood with a bit cutout as his fence. The fence on this table riffs on that uncomplicated concept with a few convenience upgrades. The back is a thick block with stepped ends for the adjustment knobs. Do you notice the roundover theme in the main drawing and detail ‘b’. On the back is another thick block with a hole to connect your shop vacuum (detail ‘c’).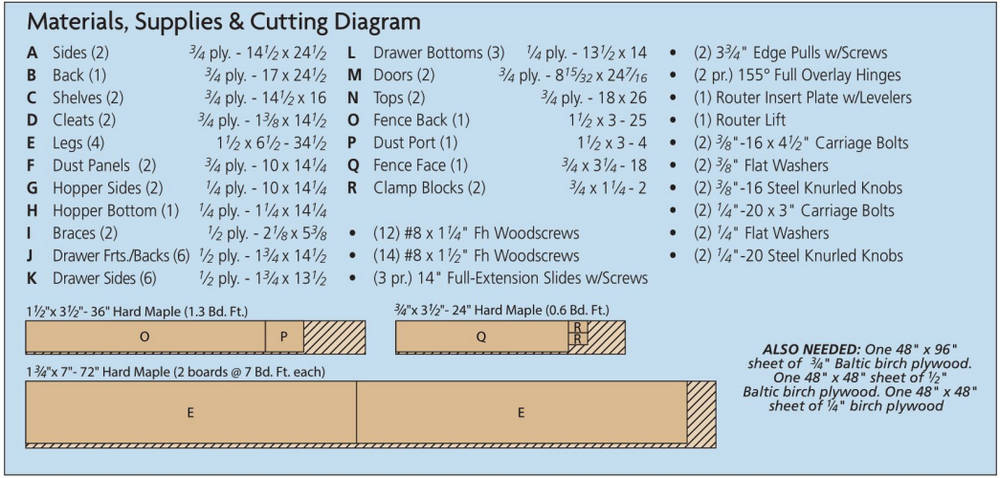
An interchangeable face is attached to the front. This lets you create a fence with custom openings to suit various bits.
What about a fence with sliding faces? I’m not a fan. The faces too often end up misaligned, resulting in poor cuts.
Finally, cut clamp blocks to anchor a pair of carriage bolts. These slide in the slots on the bottom face of the table, as shown in detail ‘b’ to adjust the fence.
Once this table takes its place in your shop, you’ll find a valuable and versatile member of the team. And one that’s easy on the eyes, too.

