My latest project was a small cabinet built in the Scandinavian modem style. Near the end of the construction, I reached a decision point about the hardware.
 The door pulls found themselves. I came across rectangular pulls that matched the proportions of the case. The hinges were harder to settle on.
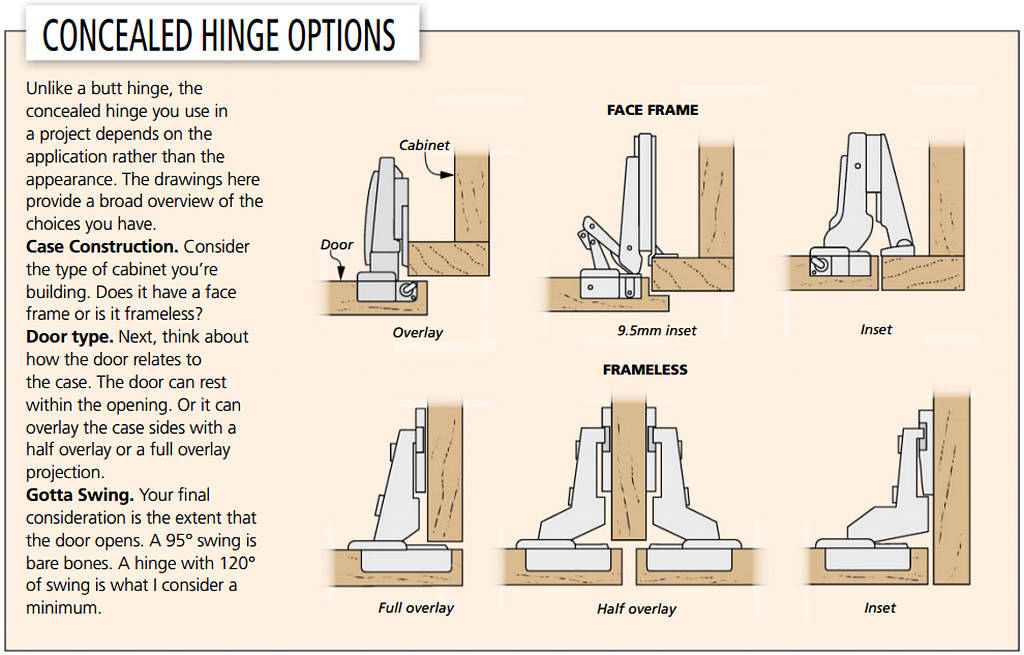
By nature, I lean more traditional than modern. So butt hinges
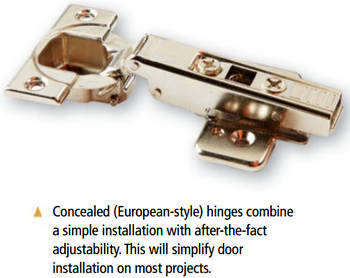
stayed near the top of the list. However, the sleek design of the cabinet seemed to ask for something less visible. John Doyle, one of our designers, fancies concealed or European hinges,
like the one shown at left. As you’d guess, the hardware is invisible from the outside. (They are somewhat bulky when the door is open.)
He also promised me that installing the hinges and fitting the doors is a simpler process than mortised-in butt hinges. I bit; he was right.
This style of hinge divides the process of hardware and fitting into separate processes. Build the doors to suit the opening (with appropriate gaps). Then install the hinges. Once in place, you can tweak the door position easily.
INSTALLING THE HINGE
When installing concealed hinges, I prefer to start with the door. This way, the hinges will serve as a gauge to help you locate the mounting plates in the cabinet. There’s no harm in working the other way around, though. Kind of like pins-first or tails-first dovetails.
DID YOU READ THE INSTRUCTIONS? Concealed hinges usually come with a set of installation instructions. If your experience with concealed hinges is limited, it’s a good idea to give them a quick read-through — I’ll wait.
Another good idea: check the manufacturer’s website for any updates. On a recent project, I found that the instructions had an error. I was able to print an update from the internet.
 UP & DOWN. The vertical location of the hinge is entirely up to you. My recommendation is to pick a nice round number and use that for the centrepoint of the hinge anytime you work with concealed hinges. For me, it’s 75mm. Keep in mind that the farther apart the hinges are, the more stable the assembly.
SETBACK REQUIREMENTS. The amount the hinge cup hole is inset from the edge of the door depends on the hinge and application. The dimension is listed either to the centrepoint of the hole or from the edge of the hole (again, instructions). Centrepoints just work better in my head, so I’ll do a little maths if necessary.
I set an adjustable square to the setback distance from the edge of the door and scribe a line parallel to the edge. Then, use an awl to mark the hole centres to help position the drill bit.
YOU NEED A BIT. Concealed hinges originated in Europe and are metric based. The size of the hole you drill is 35mm.
It’s best to purchase a 35mm Forstner bit to do the job, an imperial bit that is nearly right will not work. It’s likely you’ll be drilling a lot of holes with this bit, so the modest investment is worth it. I use a car-bide bit for longer life.
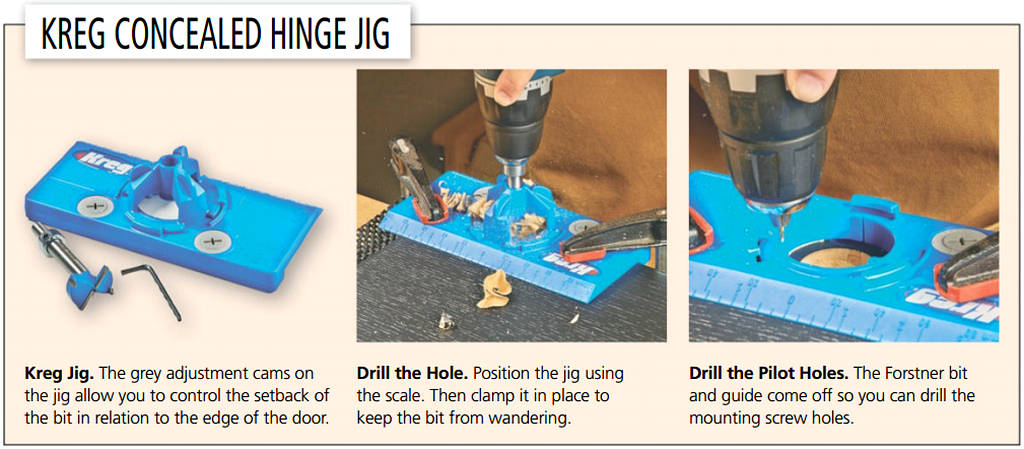
CHOOSE YOUR ADVENTURE. There are two ways to drill the hole: at the drill press or with a dedicated jig. While freehand drilling is technically possible, either the drill press or a jig improve the consistency of the process.
The set-up at the drill press is pretty simple. Use a fence to locate the bit using the dimple you made earlier. Just align the spur of the drill bit with the centrepoint and then lock the fence in position.
When drilling the hole, you’re aiming for a depth of 13mm. Setting the drill depth stop adds reliability.
The box below shows the Kreg version of a concealed hinge jig. No matter which jig you have, be sure to read those instructions, as well. Then make a test in some scrap to get the feel of the jig.
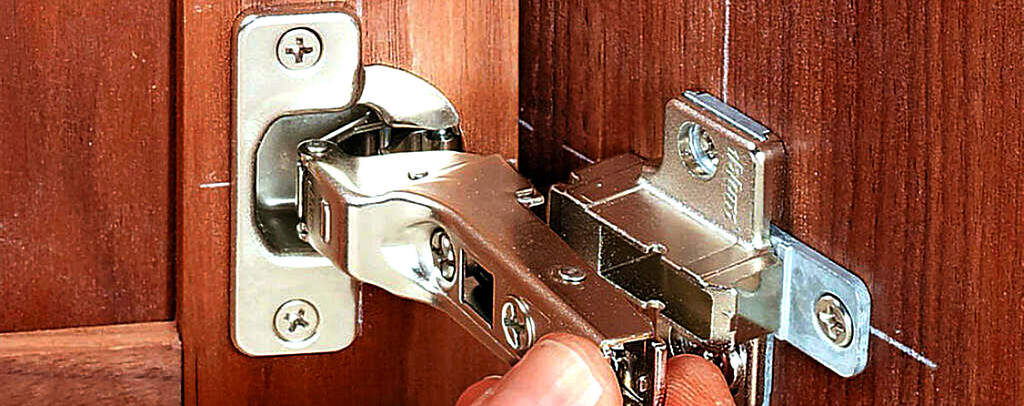
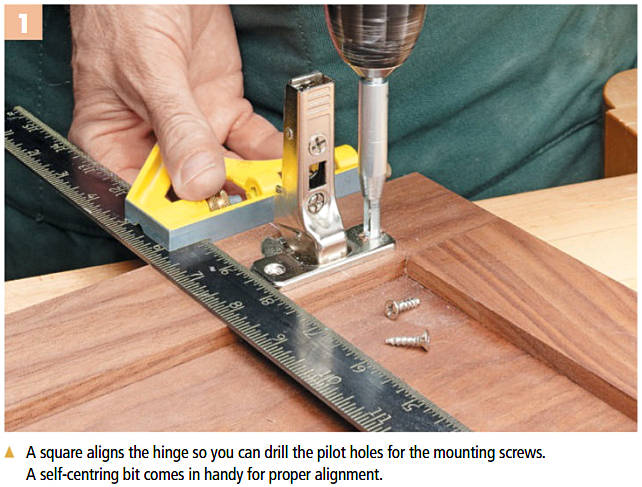
INSTALLING THE HINGE. In addition to the cup hole, you need to drill pilot holes for the hinge’s mounting screws. The key here is to install this hinge component so it’s perpendicular to the edge of the door.
If possible, I like to use my square to align the hinge plate when installing the hinge in the door, as shown in step 1 below. Just keep in mind that the shape of the hinge may not allow you to use a square this way. A self-centring drill bit makes it easy to drill the pilot holes for the mounting screws.
INSTALLING THE PLATE
Now you can turn your attention to installing the mounting plate inside the cabinet. As before, taking the time for careful measuring and layout really pays off.
 VERTICAL POSITION. When it comes to locating the mounting plates on the side of the cabinet, the goal is for the plates to line up perfectly with the hinges you just installed on the door.
The trouble is, you can’t simply use the same offset dimension that you used on the door. That’s due to the gap at the top and bottom of the door.
A straightforward approach is to simply factor the gap in when locating the mounting plate.
Rather than measure from the top and bottom of the cabinet opening to position the mounting plates, another option is to measure from the centrepoint out. This guarantees that the door will be centred in the opening and leaves an even overlay (or gap) when the door is installed on the cabinet.
THE SETBACK. Unlike no-mortise hinges, or butt hinges, a concealed hinge sits back from the edge of the cabinet. (It’s called a concealed hinge for a reason.)
For overlay doors, the setback distance from the front edge of the cabinet is already determined — 38mm. This distance is a standard for a lot of contemporary cabinet work based on the 32mm system. That alone is worth an article or two. For the purposes of this subject, it’s helpful to note that with exceptions, the setback is fixed from hinge to hinge.
The biggest exception is when your design includes inset doors. For an inset door, the setback distance is 38mm plus the thickness of your door. This means that for a 19mm-thick door, the total setback distance is 57mm. The combination square is the tool of choice once again for laying out these centrelines.
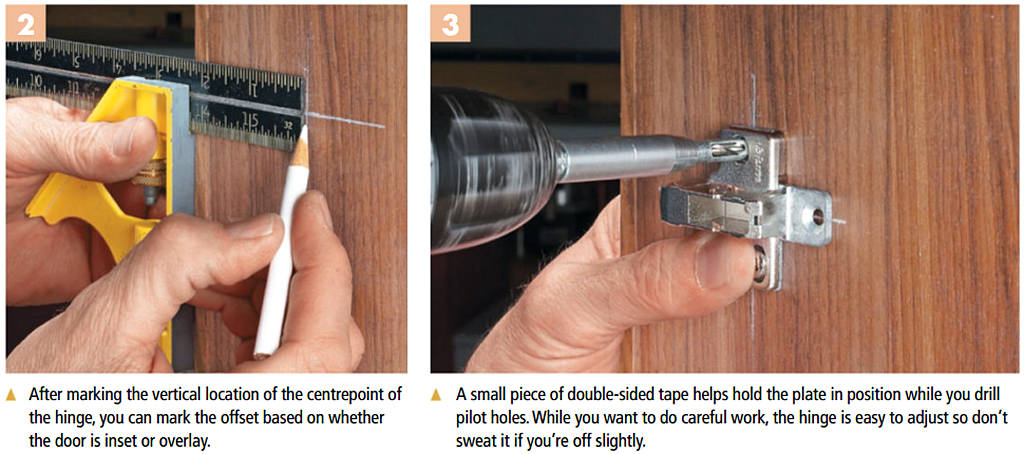
NO-FUSS INSTALLATION. To install the mounting plate in the case, centre the screw holes over your layout lines. Then drill the pilot holes with the self-centring bit and install the screws.
When I have several doors to install, I like to make a Masonite template. The template has a fence to establish the setback and it’s sized to locate the hinge vertically in the cabinet.
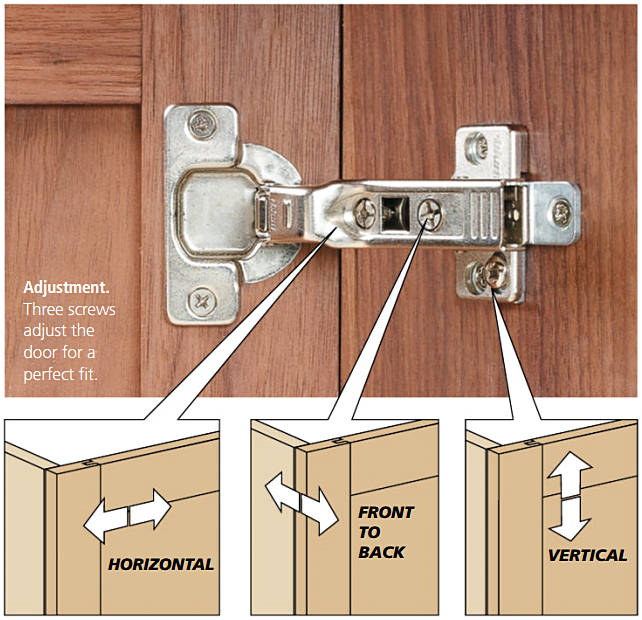 EASY ADJUSTMENT. The two parts of the hinge clip together. At which point, you can make some adjustments to the fit. And this is where concealed hinges can really shine.
The photos and drawings at right show three screws located on the plate that allow you to finetune the door’s position in three directions. A screw near the front of the hinge allows for side-to-side adjustments.
Slightly farther back is another screw. This one controls the projection of the door in its opening or (in the case of an overlay door) its distance from the case itself.
A screw near the mounting screws shifts the hinge up or down. On some hinges, you may need to loosen the mounting screws to adjust the vertical position. With a few minor tweaks, you can align the door perfectly for a professional look.