Kumiko patterns are delightfully geometric and rely on tight joinery for strength. Accurate marking out is the key to successful Kumiko.
 In issue 171 we built the Kumiko blocks required to craft a traditional asanoha (hemp leaf) grid pattern in 6mm-thick stock.
It was while building the Kumiko blocks, I realised I could use some of the leftover 12mm marine ply and some strips of Kumiko stock to make a Kumiko mitre box. This would allow me to make hexagonal Kumiko and in so doing, open another window into this delightful craft.
Way back in Issue 111 we used a dado blade on a table saw to cut the trivets opposite. We could have used a 6mm dado blade to create the same designs in 6mm stock, however that underminesthe craft aspect of traditional Kumiko.
There is a real joy in making things by hand with only hand tools. You get a deeper sense of the grain of the timber you are working with when you plane it, cut it and chisel away the waste without the noise and dust of a power tool.
The tools you are using become extensions of your hands. The pile of plane shavings on the bench gives off a pleasant scent and the weight of the week dissolves and is replaced by a sense of contentment and relaxation. As long as your marking out is correct and all the planets align, your day ends in triumph and you have a trivet or two as the fruit of your labour.
1.ln Issue 111 we took our readers step-by-step through the process of building trivets in 13mm-thick stock using a dado blade on a table saw. This rewarding challenge takes a steady hand and access to a table saw fitted with a dado blade. The art of Kumiko has been around for more than 1300 years and is fundamentally a craft wrought by hand and not with the aid of machines. Crafting Kumiko can be a meditative task. It takes concentration and deft hand skills, using a noisy machine breaks the code of silence required for meditation.
2. The Kumiko mitre box has just four components: two 6 x 20mm Kumiko core strips, a 520 x 85mm base plate and a narrower cap plate that is 520 x 65mm (made from 12mm marine ply). The way I went about making the mitre box was to place a Kumiko strip flush against the edge and run a pencil line down the inside edge. This line was then used as the datum for the next strip of Kumiko stock to rest against while it was glued and clamped in position. The process was repeated for the opposite edge. When the glue was dry the cap plate was centred, glued and clamped in place.
3. The Kumiko mitre box has a lip on the top and the bottom that is half the depth of the Kumiko stock. The lip has two functions, the top lip acts as a mitre box, while the bottom lip locks tight in a vice. The design is symmetrical so you can invert the jig and effectively have two mitre boxes in one. As you can see, I used a bull dog clip and some Kumiko stock as a stop and machined up sets of six 203 x 20 x 6mm Kumiko sticks.
4. The jig is designed around 6mm Kumiko stock. It is important that all the stock is the same thickness and length. The trivets on these pages were made from celery top pine, red cedar and Huon pine.

5. The Kumiko stock needs to be straight grained and defect free. I bundled the sticks together in groups of six with masking tape and shot the end grain with a shooting plane. Each bundle of snowflake Kumiko sticks was planed to exactly 203mm.
6. After the snowflake Kumiko pieces were planed to length it was time to dress the edges. This was done by placing each piece in the mitre box and dressing the edge with a block plane.
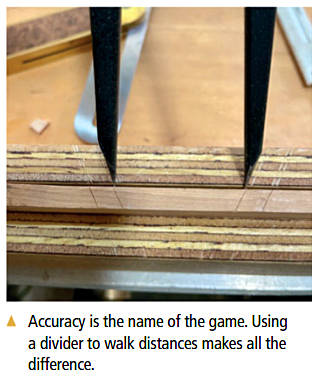
7. The geometry of the snowflake trivet is very exact. If D is set at 35mm then the length of the snowflake section needs to be 5D + 4J (where J is the width of the face of the joint). The first step was to set a pair of dividers to 35mm and walk them in from the end. A 30° line was then drawn with a fine mechanical pencil. The Kumiko stock is 6mm wide, however because each piece intersects at an angle, the opening of the slot will be wider than 6mm. This is where your calculator and some trigonometry come in. Cos30°= 6/H, making the gap 6.9mm. I rounded this up to 7mm and drew another 30° line 7mm to the right of the first line. The dividers were then “walked” 35mm along the outside edge and another set of parallel lines drawn 7mm apart. The process was repeated on the inside edge to create three joints.
8. After the lines were drawn it was time to define them with a marking knife and then chisel out a bed for the saw blade to register against.

9. With the joints marked and beds cut, I then went about carefully sawing each joint, allowing the blade to cut into the lip of the jig and effectively creating a mitre box for mass production.
10. After carefully cutting down to the cap plate it was an easy process to chisel out the waste. The cap plate itself became the datum for the centre of the halving joint. As you can see, three acute halving joints are cut on the top of the Kumiko stick. It is then inverted and registered against the stop so a single acute halving joint can be cut on the underside.
11. The hard work is getting the geometry right. Once the mitre box angles have been cut it is a simple process to mass produce more trivet sections. No need to mark them out, just register them against the stop and cut to the line. Then assemble.
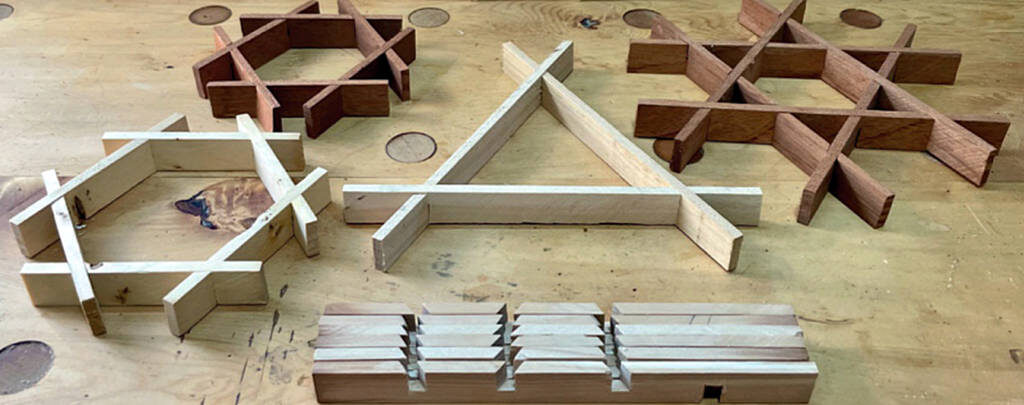
12. The Kumiko jig can be used I to cut simple three-piece trivets. All you do is cut one acute joint on the end of the stick, invert it and then cut another on the reverse side. Trivets make great presents and can be used to support pot plants or protect a table from the heat of a hot pan.

13. Another way to make the I ^0 snowflake trivet is to craft two three-piece trivets and then place one on top of the other. Tweak them until all the triangles look like they are the same size and then carefully mark and number the joints. The trivets can then be dismantled (one at a time so you don’t mix them up) and the joints cut in the mitre box. The advantage of this system is that it is foolproof. Each joint is bespoke.
14. A variation on the theme of LI i? 30° acute angled trivets is to assemble them at 60° and create obtuse angles. To do this I cut the stock into 100mm-long sections, set the stop so it was 20mm from the mitre slot and popped the stock in place so I could cut the first joint. I then inverted the 100mm-long section and cut the matching joint on the reverse side.
15. Assembling the six sections I together is a bit of a challenge. They need to be gently coaxed into each other so they can slot together without snapping along the grain.
16. The mitre box worked better than expected. It took an hour to mark out and craft the first snowflake trivet. When I got into the groove, I was producing a snowflake trivet at a rate of three an hour. If you look carefully at the right end of the mitre box you will see I ended up cutting a docking slot so that I could skip setting up and using the shooting plane. As Christmas looms on the horizon, I know that I will be processing offcuts into 6mm Kumiko stock and crafting a drift of snowflake trivets for gifts.


