More than just a place to sit, this attractive chair pulls double duty as an all-in-one launching pad for your day.
I’ve been looking forward to this project for a long time.
 You can be forgiven if you’ve never heard of a valet chair before — especially if you work outside the suit and tie world. The idea is to provide a place to stage your next day’s clothes and safeguard the items you carry around in your pockets. Sort of a combination coat rack and night stand.
A number of years back, I came across a (the) valet chair designed by Hans Wegner. It oozes Danish modem cool. And I really wanted to build one.
What sets Wegner’s design apart (along with our version) is its transforming nature. At first glance you see an ordinary chair. However, the back is shaped to cradle a shirt, jacket, or suit coat. The seat flips up to be a pants hanger. It also reveals a storage tray for essentials.
Photos showing the chair draped with dressy clothing came across as out of place in an “office-casual” world — even more so now when a lot of folk work from anywhere. So the idea got shot down in previous design meetings. Personally, I feel the idea works for just about anyone who could use a little help on a busy morning.
Persistence pays off. Dillon took up the idea and ran with it. I’m happy to present his design here.
In addition to its practicality, this project offers some solid woodworking fun in creating joinery that’s strong and adds a great look to the completed piece. Many chairs feature angles for comfort and stability, and this one is no exception. The angles here give you an opportunity to improve your skills without making your head spin. It’s time to build.
Strong, bold CHAIR BASE
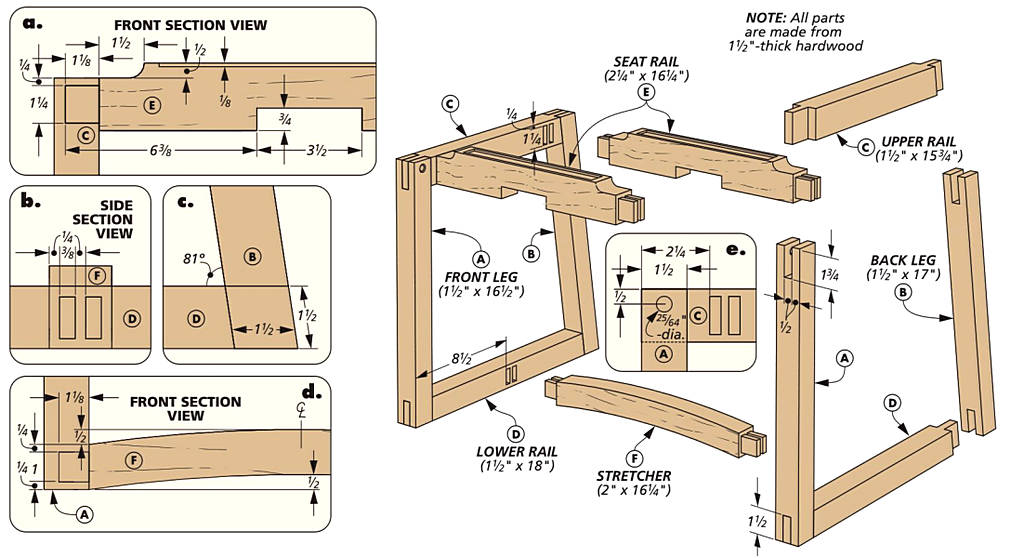 A stable structure is a necessity for any chair. So that’s the starting point for this project. The drawing above is your road map for the journey. The main parts are joined with bridle joints. These offer both high strength and a visual punctuation with the ends of the rails visible. The effect is almost like box joints.
The article on page 62 takes a deeper dive into forming the joints on the table saw.
MATERIAL CONSIDERATIONS. The design of the chair opens up a lot of freedom for choosing materials. This version uses ash for the structural components. The parts are cut from boards with the straightest grain on all
the faces. To find this, the end grain of the boards should run around 45°.
 The seat and back are made from mahogany. The darker color and grain patterns offer a good counterpoint to the ash.
LEGS. Begin the construction by cutting the legs to size. Take note that the back legs are mitered on the ends to lean towards the front, as in detail ‘c.’ These four parts have an open mortise centered on each end.
RAILS. An upper and lower rail joins each pair of legs together. The back edges of these pieces are mitered to complement the tilt of the back leg.
In addition to the tenon formed on the end, you’ll add some mortises to accept the seat rails and stretcher that run crosswise on the chair’s structure. Refer to the drawings on the previous page for the locations and sizes of these mortise pairs.
SIDE ASSEMBLY. Hit pause on the joinery for a moment to glue up the leg/rail components. Then drill a hole on the inside face of each to house a threaded insert for the tilting seat (detail ‘e’).
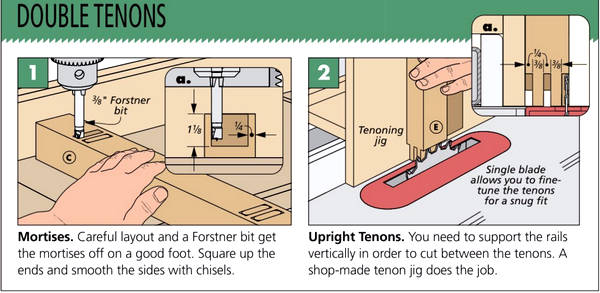
 DOUBLE TENONS. It’s back to the table saw to cut double tenons on the two seat rails and stretcher. Figure 2 on the previous page shows the setup using a tenoning jig.
These parts also have some shaping, but do that after the joinery is cut. Otherwise you lose the reference surfaces that are necessary for accurate work.
Detail ‘a’ shows one other item you need to address. A centered notch on the bottom side of the seat rails holds the support system for the seat back you’ll make later. Wrap up the work by routing a recess in the seat rails.
These shallow depressions hold strips of leather used to cushion the hinged seat.
With joinery checked off the list, you can turn the stretcher into an arch and form the curves on the seat rails. Then use these pieces to bring the side assemblies into a single structure.
SEAT SUPPORT & TRAY
Moving along up the chair, it’s time to work on the a two-part system that supports the seat back. You can see what’s going on in the drawing below.
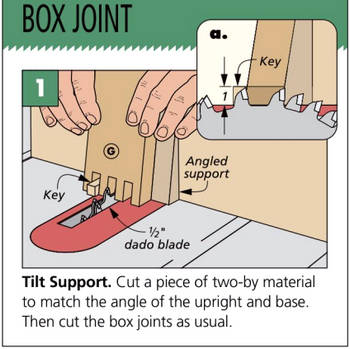
Box joints connect the upright and base. Detail ‘c’ shows the slight angle cut on the ends that makes the upright lean back. Don’t get spooked, this angle doesn’t effect cutting the box joints. All you need to is add an angled support to a box joint jig, as shown in the upper right box.
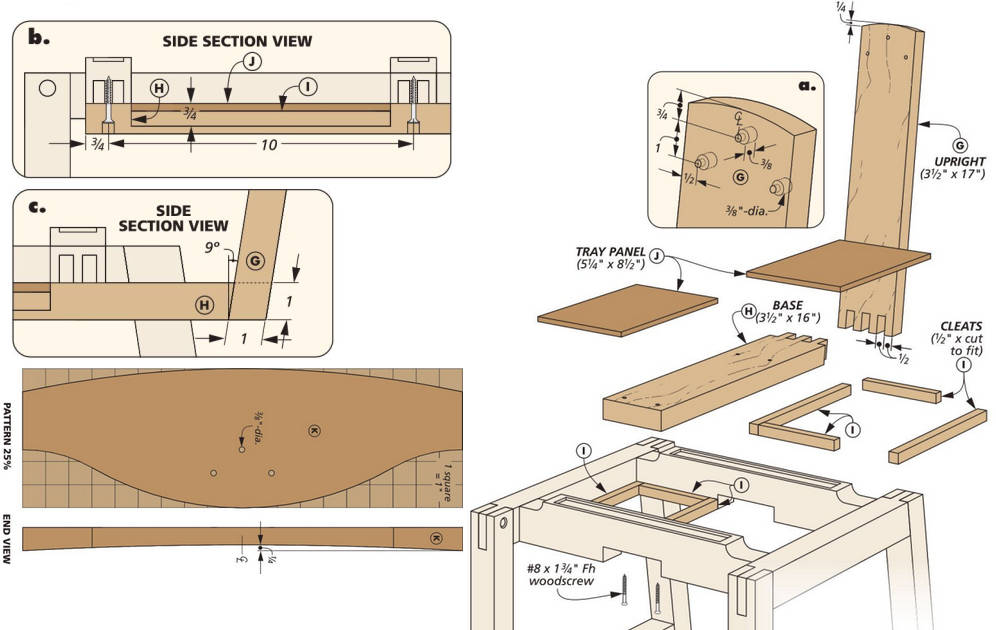 A slight arc and a few pilot holes round out the other details you need to address. Then glue the parts together and attach the assembly to the set rails, as shown below.
The base is the starting point for creating a tray between the seat rails. To fill in the gaps on either side, cut some thin cleats that frame the openings.
Install the cleats so that a couple of small hardboard panels will end up flush with the base, as you can see in detail ‘b.’ Later on, you can line the tray with leather, cork, or felt.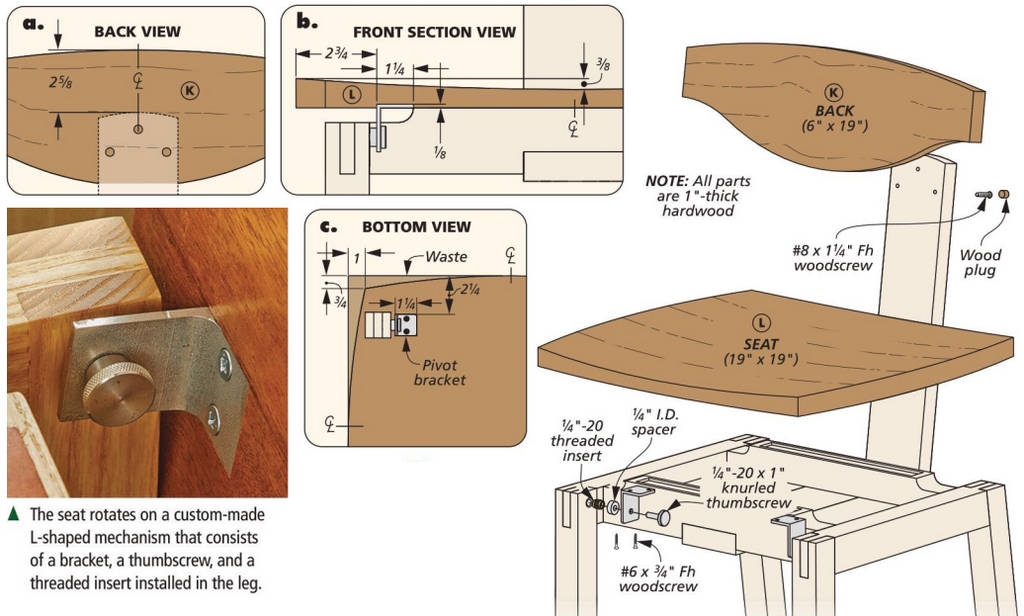
Comfortable BACK & SEAT
To be fair, this isn’t the kind of chair that’s meant for kicking back and relaxing. However, I still wanted it to be comfortable. The remaining two parts of the chair share that task. Due to the transforming nature of this chair, these parts also have a second job. The back works as a coat hanger, while the seat offers a place to hang your pants.
COMPLIMENTARY MATERIALS. Here’s a good place to add another material in to complement the wood species used in the base assembly. I chose mahogany for its warm reddish color and more uniform grain patterns. I think it plays nicely with the straight lines of the ash.
 GLUED UP PANELS. The two parts shown in the drawing above are the most visible pieces of the project. That’s code for take your time in selecting the boards for grain and color when gluing up the panels. You may be able to get the seat back from a single piece.
BACK REST. The pattern at left will guide you for cutting the back to shape at the
band saw. Besides the appearance, the curve along the upper edge mimics the shape of a hanger for gentle support of coats and sweaters.
DISHING. But that’s not the only shaping you’ll do. The forward face of the back is curved (dished) for comfort. It’s possible to do this with a band saw — and a lot of sanding.
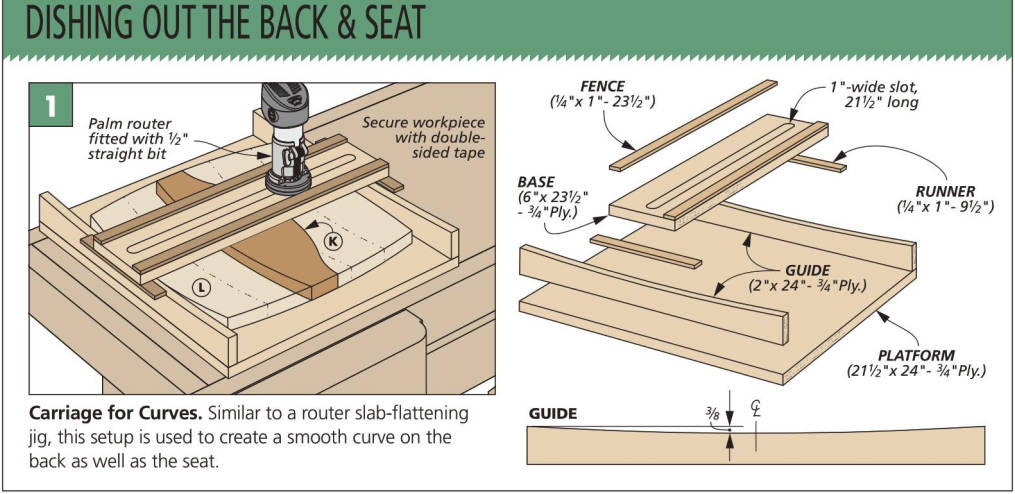
Another option is to use the router jig shown at the top of the next page. A router runs back and forth in a carriage across the workpiece. The carriage moves along a pair of curved guides that form the hollow. Even though the back and seat are slightly dished, I did this with light passes to prevent the router from bogging down or burning. The result is an even curve on the workpiece.
The router bit leaves only minor bit marks to scrape and sand away. From there, you can soften the edges and attach the back to the upright, as shown in detail ‘a’ above. I covered the screws with mahogany plugs.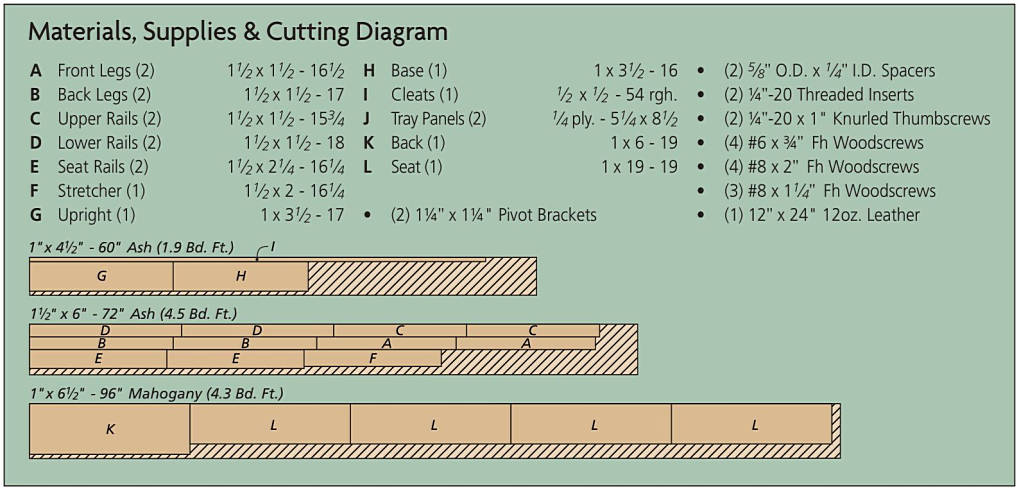
TAKE A SEAT. Making the seat takes a similar route as making the back. Start with the blank cut to its overall size. The next step is to cut two shallow mortises in the bottom face to accept the pivoting mechanism. You can see this in the photo and details ‘b’ and ‘c’ on the previous page. Measuring and cutting this mortise is easier to do with the seat in its straight, flat, and square shape. Test fit the hardware to make sure the pivoting mechanism works the way you like. (Make adjustments as necessary.)
Then cut the seat to shape by curving the edges, as shown in detail ‘c’ on the previous page. The seat can take its turn in the dishing jig (Figure 1 above).
Oil-based finish brings out the color of the mahogany and warms up the look of the ash. Then I sprayed a couple coats of lacquer for protection.
The final steps are to glue in the leather in the seat rails and cut another piece to line the tray (photo at right). Then this valet chair can take its place as a quiet sentinel of sartorial service.

