Understanding Vacuum Bags for Pressing Veneer

Vacuum bags are essential tools for woodworkers engaged in veneering, allowing for efficient and uniform pressure application during the lamination process. This article explores the benefits, types, and DIY options for vacuum bags used in pressing veneer.

What is a Vacuum Bag?

A vacuum bag is a sealed enclosure that removes air to create a vacuum, applying atmospheric pressure uniformly across the surface of the material inside. This process is crucial for veneering, as it ensures that the veneer adheres properly to the substrate without bubbles or gaps, resulting in a smooth finish.

Benefits of Using Vacuum Bags

Uniform Pressure Distribution: The vacuum creates consistent pressure across the entire surface area, which is essential for even glue distribution and strong adhesion.

Versatility: Vacuum bags can accommodate various shapes and sizes of projects, including curved surfaces and large panels.

Efficiency: The vacuum process significantly reduces clamping time compared to traditional methods, allowing for quicker project turnaround.

Reduced Risk of Damage: The gentle yet firm pressure minimizes the risk of damaging delicate veneers during the pressing process.

Types of Vacuum Bags

Vinyl Bags: These are commonly used for DIY projects due to their affordability and ease of use. They are available in various thicknesses (20 mil to 30 mil) and can be sourced from fabric stores or specialized suppliers.

Polyurethane Bags: Known for their durability and flexibility, polyurethane bags are ideal for more demanding applications, especially when working with curved surfaces. They tend to be more expensive but offer longer-lasting performance.

Custom Bags: For specific project needs, custom vacuum bags can be made using a build-a-bag system that allows woodworkers to create bags tailored to their project dimensions.

The Benefits of Vacuum Veneer Bags

  • Consistent and even pressure distribution.
  • Elimination of bubbles and uneven glue application.
  • A clean, flat surface with professional results.

Vacuum bags for wood veneer and vacuum press systems are must-haves for efficient veneering press operations. From hobbyists to professional woodworkers, these tools simplify woodworking tasks, whether you’re working with a veneer vacuum bag or a full vacuum press system.

Streamline your veneering projects today by investing in a woodworking vacuum bag or a vacuum veneer press tailored to your requirements.
VENEERING2

BAG IT UP TO GLUE IT DOWN: A Step-by-Step Guide to Perfect Veneering

Veneering is a time-honored technique that adds sophistication and durability to your woodworking projects. To achieve a flawless finish, the veneer must be properly prepared, adhered, and clamped. This guide will walk you through the process of flattening your veneer and using a vacuum-bag clamping system to create professional-grade veneered panels.

Before veneering, the piece needs to be sanded properly. Learn how to make a wood sanding station.

Prepare and Flatten Your VeneerBefore applying glue, ensure the veneer is perfectly flat. Some types, such as burls and crotch veneers, often have ripples or puckered areas. Here’s how to flatten them:

  1. Apply Veneer Softener: Spray the veneer with a softening solution to make it pliable.
  2. Sandwich the Veneer: Place it between paper towels or kraft paper, then clamp it between two plywood or MDF platens (Photo A).
  3. Allow to Dry: Leave it clamped overnight or until completely dry.

Flattening ensures smooth adhesion and prevents unsightly bubbles or loose edges in the finished panel.

Reinforce Cracks and TearsOnce flattened, inspect the veneer for cracks or tears. Use blue painter’s tape to hold these areas together during the veneering process (Photo B). The tape stabilizes the veneer and prevents damage during clamping.

Prepare Your Vacuum-Bag Clamping SystemTime is critical when working with glue. Ensure your vacuum system and materials are ready before you begin:

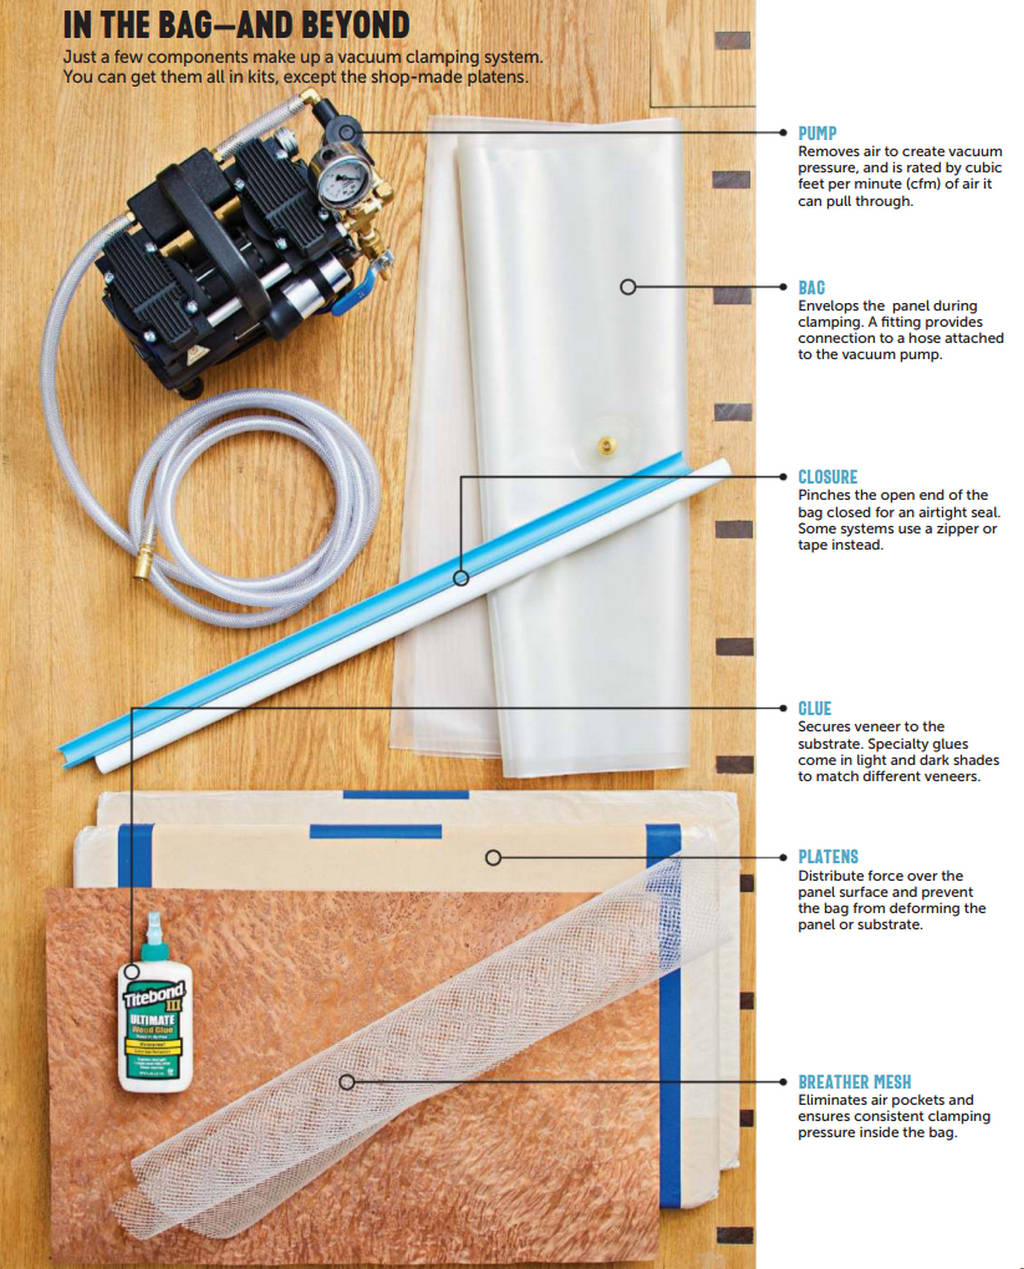
  1. Prepare the Platens: Wrap the platens in wax paper to prevent glue from sticking (Photo C). Round off their outside edges to allow the vacuum bag to fit snugly without causing damage.
  2. Gather Supplies: Have your substrate, veneer, glue, and tools within easy reach to speed up the process.

Step-by-Step Veneering Process

  1. Spread the Glue:
    • Place the substrate on a platen.
    • Use a roller to evenly spread glue over the surface (Photo D).
  2. Position the Veneer:
    • Lay the veneer on the substrate.
    • Press it lightly into place, ensuring proper alignment (Photo E).
  3. Veneer Both Faces (Optional):
    • For double-sided veneering, flip the substrate, spread glue, and apply the second veneer layer.
  4. Create a Sandwich:
    • Place the second platen over the veneered panel to form a sandwich.
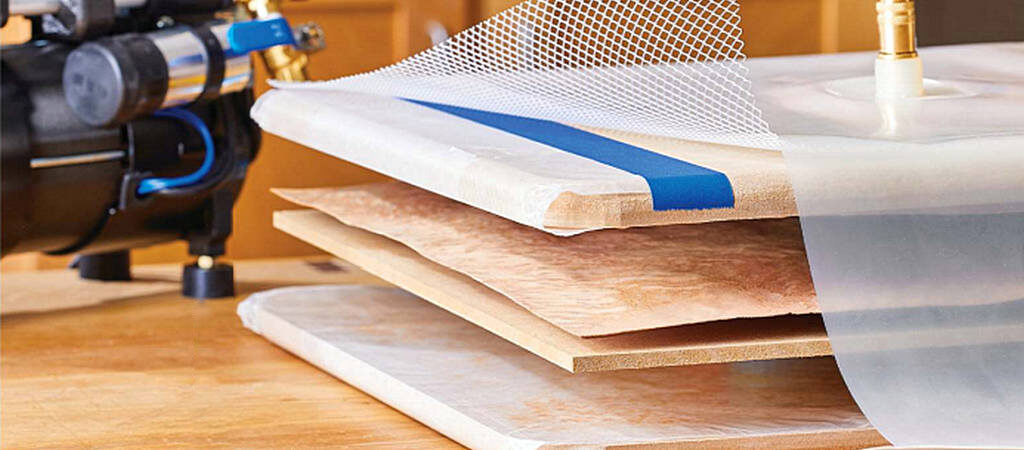
    • Slide the sandwich into the vacuum bag (Photo F).
  5. Seal the Vacuum Bag:
    • Secure the bag using its closure system, typically a PVC tube with a C-channel clip.
  6. Activate the Vacuum:
    • Connect the pump to the bag fitting and turn it on. The pump removes air, ensuring uniform pressure across the panel.
  7. Allow Glue to Dry:
    • Keep the panel under vacuum pressure for 45–60 minutes, or until the glue is fully set.

VENEERING1

VENEERING3


Finishing Touches

After removing the panel from the vacuum bag:

  • Peel Off Tape: Carefully remove painter’s tape, as it may adhere to any excess glue.
  • Trim to Size: Cut your veneered panel to the desired dimensions for your project.

Expand Your Clamping Capabilities

A vacuum-bag system isn’t limited to flat panels. It also allows you to:

  • Veneer Curved Surfaces: Achieve unique designs with precision.
  • Create Bent Laminations: Perfect for custom furniture and décor.
  • Vacuum-Activated Holding: Enhance your workbench and shop fixtures for advanced woodworking tasks.

By following these steps and referencing the photos (A–F) for visual guidance, you’ll ensure strong adhesion, a smooth surface, and a professional finish that stands the test of time