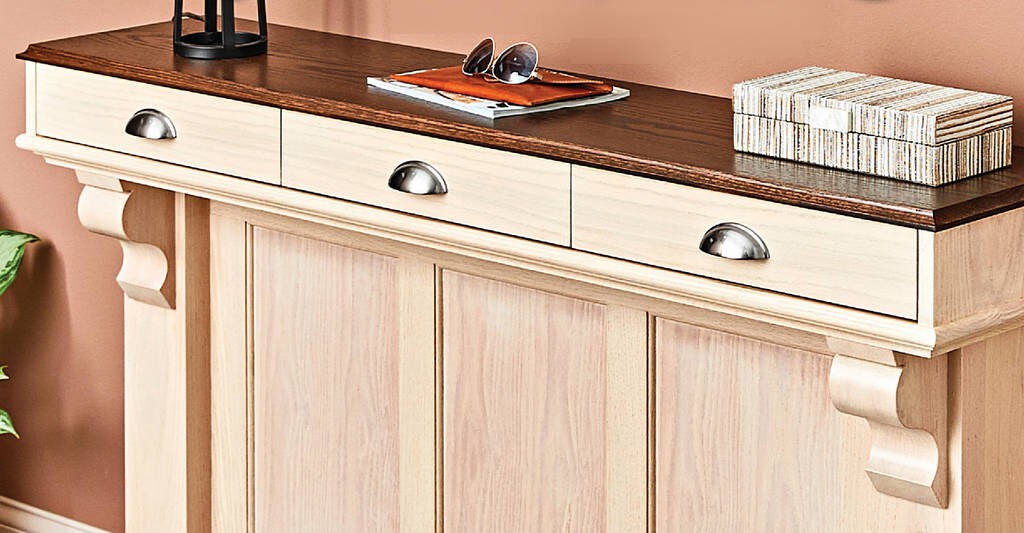
Inspired by the radiator covers common to upper-class homes a century ago, this cabinet-meets-catchall provides an elegant collection point for keys, gloves, scarves, and more. Its built-in design and cantilevered top occupy a minimal footprint in your entryway.
Build a box, basically
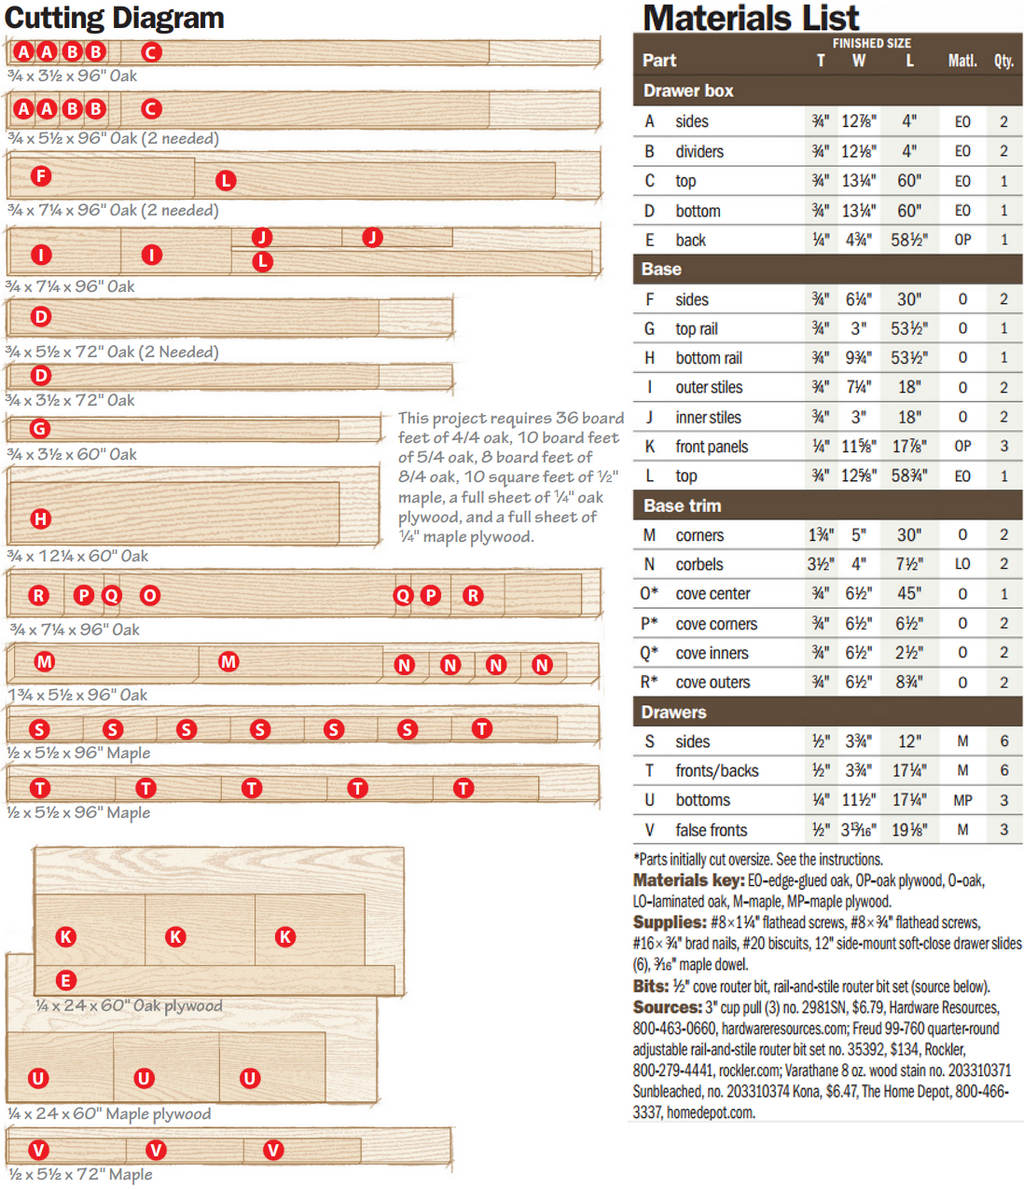
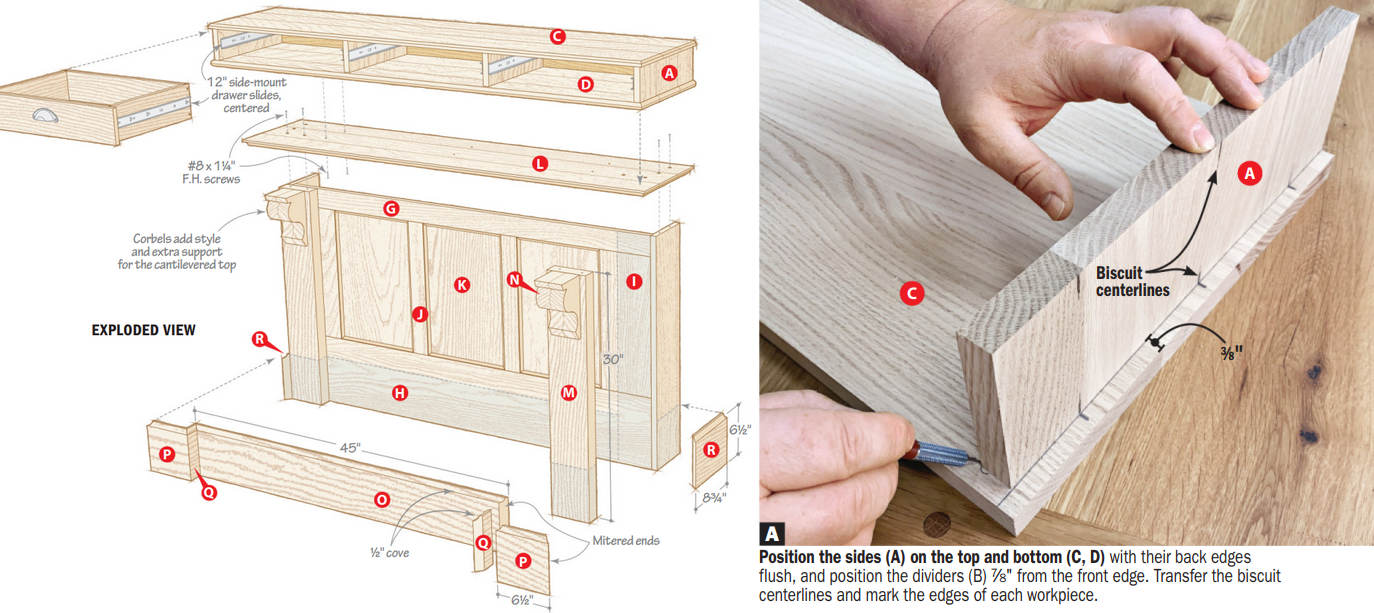
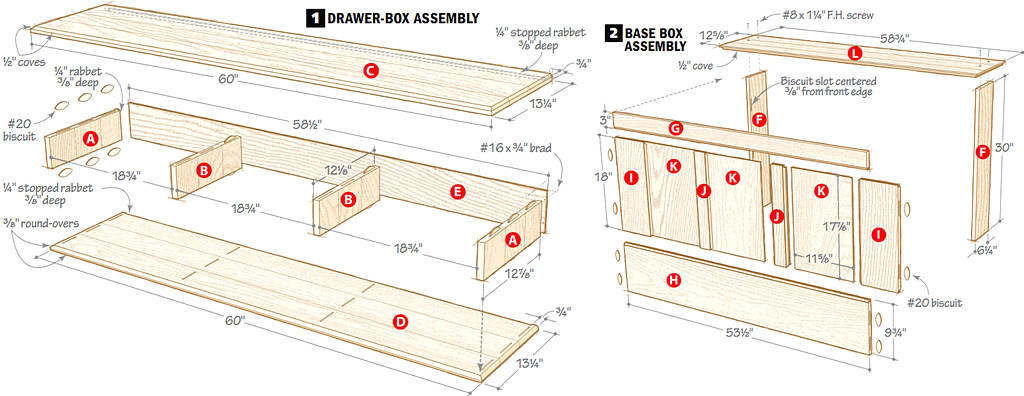
1. Glue up a 3/4 x 13 1/2 x 18″ blank for the drawer-box sides and dividers (A, B), and individual panels for the top (C) and bottom (D) [Drawing 1, Materials List]. When the glue dries, cut these parts to size.
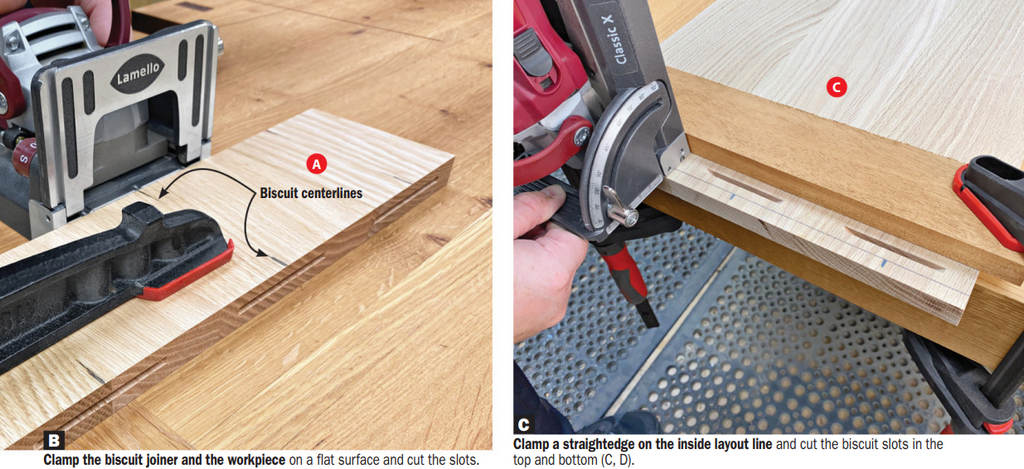
2. Mark the center of each biscuit slot in the sides and dividers, then transfer the layout to the top and bottom [Drawing 1, Photo А].
Cut the biscuit slots in the sides, dividers, top, and bottom (А-D) [Photos В, С].
3. Rabbet the sides, top, and bottom (A, C, D), then rout the cove on the top (C) and round-overs on the bottom (D) [Drawing 1]. Square up the ends of the stopped rabbets in the top and bottom with a chisel.
4. Finish-sand all parts, then glue and clamp together the drawer-box assembly.
5. Measure between the rabbets on the drawer-box assembly and cut the back (E) to fit. Set it aside for now.
SKILL BUILDER
Set up for offset rail-and-stile joinery
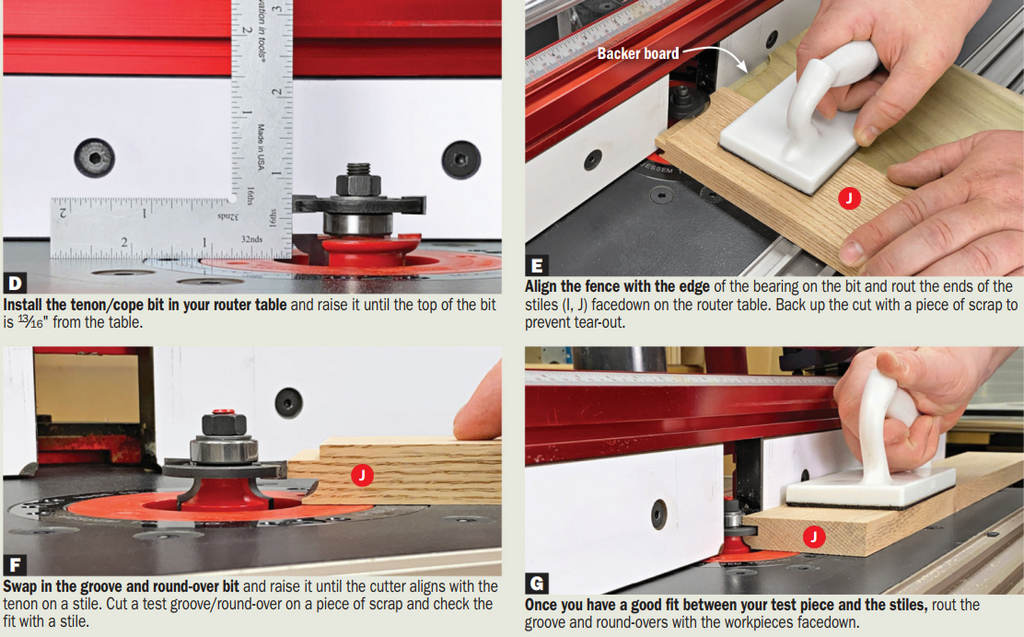
Cut crisp, strong rail-and-stile joinery with router bits [Sources]. One bit simultaneously cuts a groove for a panel and a handsome profile along the rail and stile edges. The other bit machines a tenon on the rail ends while coping them to mate with the stiles. Instead of centering the grooves and tenons, we raised the router bit slightly, producing a back-of-center tenon and a small fillet on the front face.
This looks like a frame job
1. Cut to size the base sides, rails, and stiles (F-J) [Drawing 2]. Cut a few extra pieces of this stock for router setup.
2. Machine the tenons and grooves in the rails and stiles [Drawing 2, Skill Builder].
3. Cut to size the front panels (K). Glue and clamp the base front assembly (G-K), checking for square [Drawing 2].
4. Lay out the biscuit slots in the ends of the base front assembly, then transfer the layout to the base sides (F) [Drawing 2]. Cut the biscuit slots, then glue and clamp the base sides to the base front assembly.
5. Glue up and cut to size the base top (L) [Drawing 2]. Rout the cove profile on the front edge and ends. Glue and screw the base top to the base assembly, flush at the back and centered side-to-side.
Trim out the base
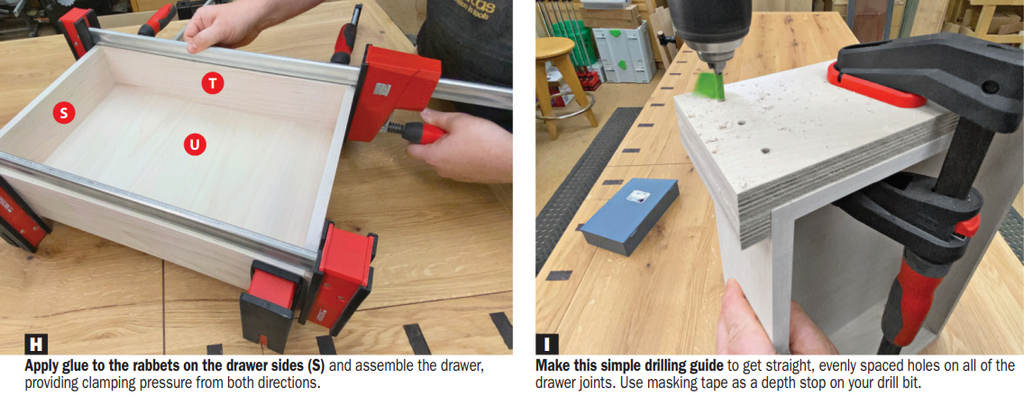
1. Cut to size the base corners (M) [Exploded View], then laminate blanks for the corbels (N). Transfer the corbel pattern [Drawing 3] to the blanks.
2. Bandsaw the corbels, then sand them smooth. Glue each one to a base corner (M), flush with the top and centered side-to-side [Exploded View],
3. Glue and clamp the base corners to the base assembly, flush with the ends [Exploded View], Screw the base top (L) in place. 3/4″ stock, cut а 6 1\2 x 96″ blank for the cove trim (O-R), then rout the cove [Exploded View], Miter-cut each piece of trim to length, then glue and brad-nail them to the base.
More boxes, basically
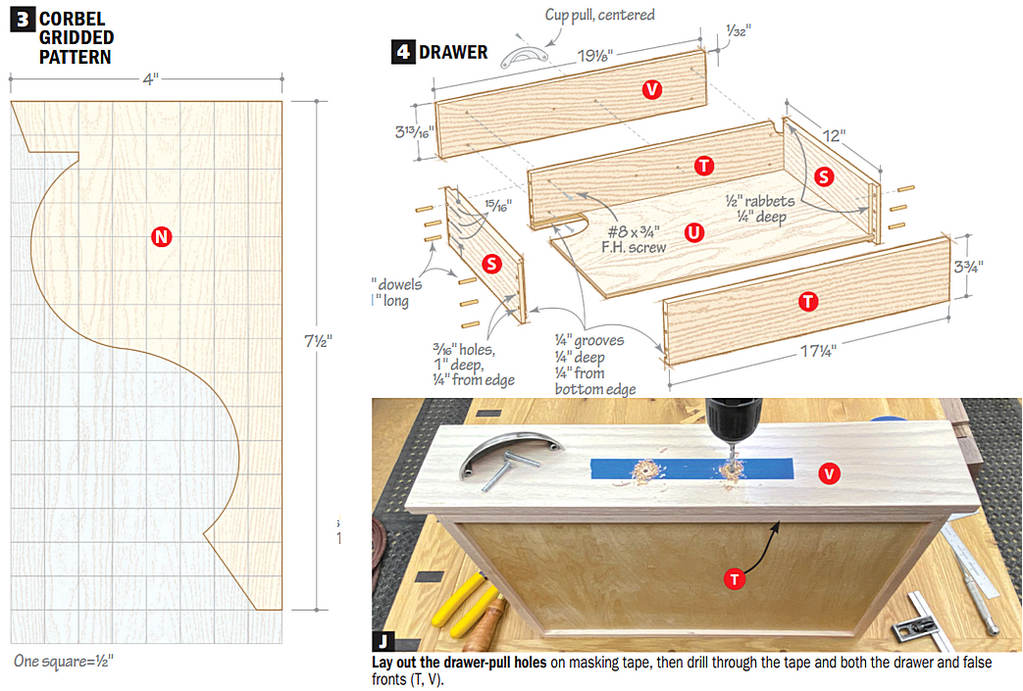
1. Cut to size the drawer sides, fronts, and backs (S, T). Rabbet the sides [Drawing 4], then rout the grooves in the sides, fronts, and backs.
2. Cut to size the drawer bottoms (U), then glue and clamp together each drawer [Drawing 4, Photo Н].
3. After the glue dries, drill the dowel holes in the sides (S) [Drawing 4, Photo I]. Glue a dowel into each hole, cut them flush, then finish-sand each drawer.
4. Cut to size the drawer false fronts (V) and set them aside for now.
A contrasting finish
1. Touch up any remaining finish-sanding. Mask off the drawer-box top (C) and apply a stain to the lower portion of the drawer box, base, and drawer false fronts [Opening photo]. We wiped on Varathane Sun-bleached.
2. Once this stain dries, apply a contrasting stain to the drawer-box top, masking off below the top as required. We used Varathane Kona.
3. Apply a clear finish to all of the project parts. We sprayed on three coats of satin lacquer, lightly sanding between each coat. 4 Once the finish dries, mount the drawer slides to the drawers and drawer box (А-D) [Exploded View], Slide the drawers in place, then attach the false fronts (V) to each drawer with double-faced tape. Remove the drawers, screw the false fronts to the drawer fronts (T), and attach the drawer pulls [Drawing 4, Photo J].
5. Glue and screw the drawer box (А-D) to the base [Exploded View], then attach the back(E) [Drawing 1].
6. Remove the baseboard molding from the wall and install the unit, screwing through the back into studs. Cut the baseboard to fit tight against the sides of the cove molding.
