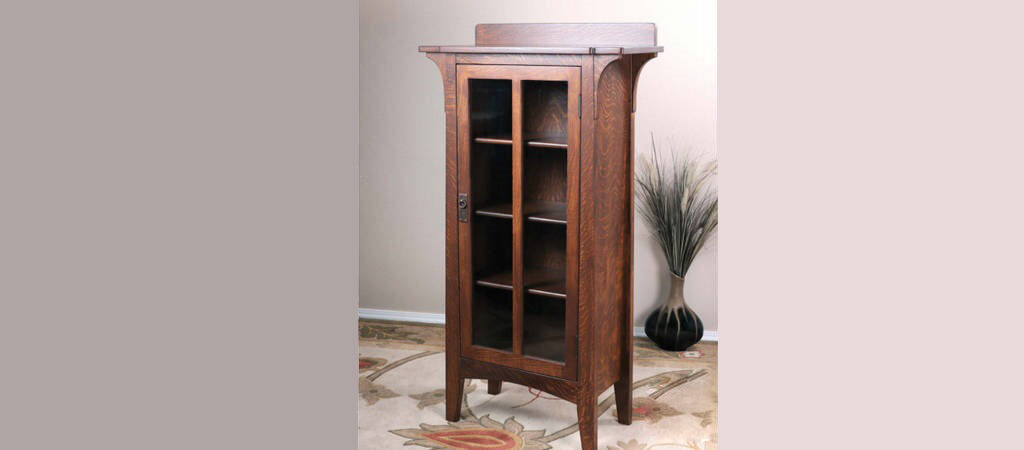
Traditional construction techniques make this mediumsized bookcase a real gem.
Original Limbert case pieces are really something to behold. Black and white catalog pictures rarely do them justice, but if you get the chance to see one in person, you instantly understand why people are drawn to them. I first realized this when bidding on a small Charles P. Limbert bookcase at an auction in Oregon. The fit and finish of his surviving cabinet work is truly remarkable. Unfortunately, I lost my bid on the antique, but I have owned two double-door Limbert #358 cases since then. The project at hand is the #357 single-door version and is a wonderful introduction to building glass door bookcases.
The form of this bookcase is perhaps more feminine that other square Limbert cabinets due to the long, tapered legs and decorative comer cutouts. Many woodworkers shy away from glass door bookcase projects, fearing the perceived complexity. I’ve built several glass door cases of varying complexity, including ten-pane leaded glass doors, and can say the #357 is surprisingly manageable to build. Since there are no horizontal glass dividers, building the glass door is greatly simplified. Table saw joinery techniques will be presented here, allowing construction of the door without chiseling any comers. Once you bring the door parts together, the glass recesses are formed automatically.
Start with the Panels
Like many antique style cases, this one uses mostly solid wood panels. You’ll need a top panel, two side panels, and four shelves. Three of the shelves are adjustable, while the bottom shelf is fixed.
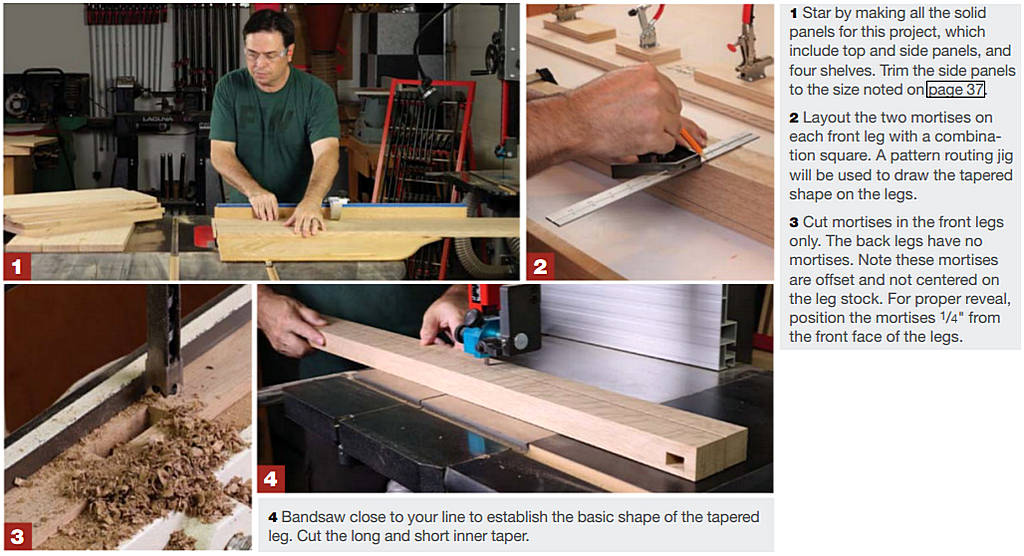
Get your project out of the gates by building all the panels at once. Leave the shelves a little oversize for now but go ahead and trim the side panels to final size.
Make Leg Blanks
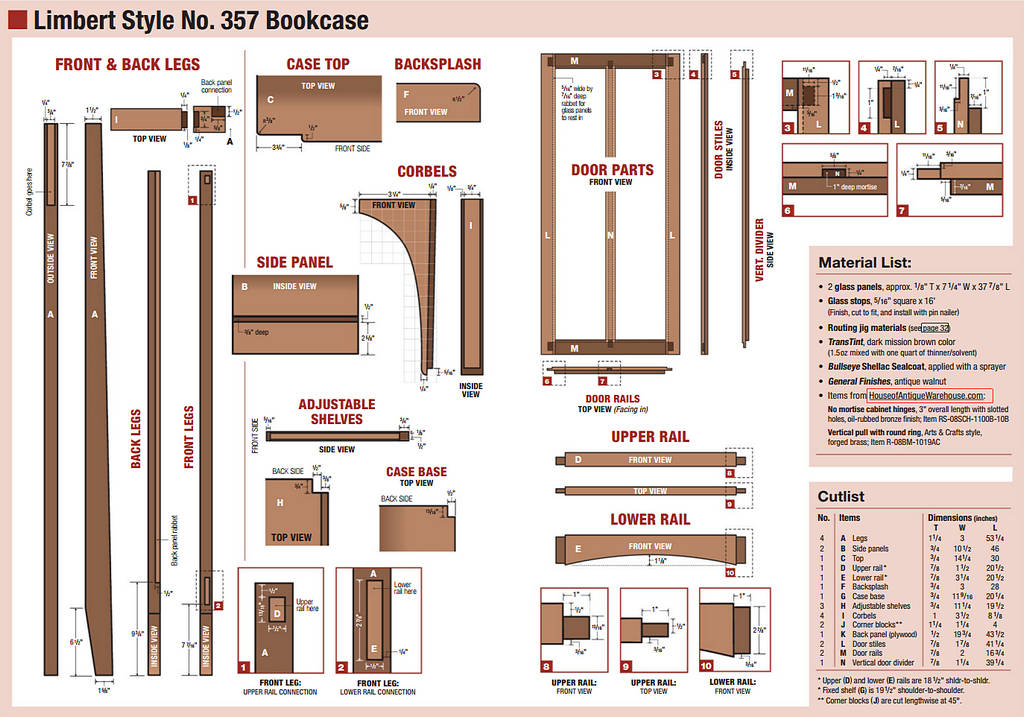
The impressive 1¼” thick legs are next and feature a long, graceful taper from top-to-bottom. There’s also a short taper on the lower inside edge, so it makes sense to rout the shaped leg with a jig and large pattern routing bit. “Joinery before curves” as the saying goes, so we’ll need to knock out the pair of mortises in the front legs, before routing them to shape. These mortises are ½” wide and it’s important to note that they’re offset towards the front of the leg. Layout the mortises ¼” from the front face of the leg and sized according to the detailed rendering.
Shape the Legs
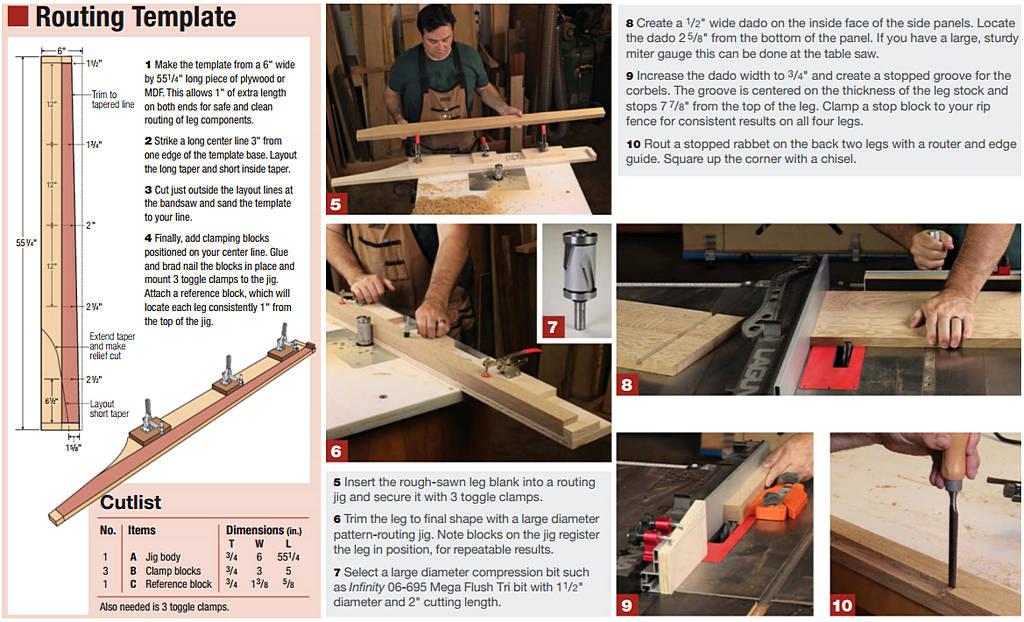
Once the mortises in the front legs are complete, it’s time to shape the four legs of the bookcase. Start by making a routing jig to handle both the long outsider taper and short inside taper. Once the jig is constructed, use it to draw cut lines on each leg and head over to the bandsaw. With a ½” wide bandsaw blade, trim just outside your pencil lines to remove most of the waste.
Next toggle-clamp the leg blank into the jig and rout it to shape with a large diameter bearing-guided bit. Since the grain is continually changing, it’s particularly important to choose the right router bit for the job. Ideally, select a bit with compression style geometry for clean cuts on both the top and bottom edge.
Side Assemblies
The next order of business is joinery for the side assemblies. Start by making a ½” wide dado in the side panels to receive the fixed shelf. This is a simple through dado and can either be made at the table saw or with a router and straightedge. Make sure to locate the lower extent of the dado exactly 2⅝” from the bottom of the side panels, so the fixed shelf will sit flush with the lower rail.
There are a couple additional leg details to take care of at this point. Mill a stopped groove in the top of each leg to receive the slender corbels. This groove can easily be made at the table saw with a ¾” wide dado in a single pass. Set blade height to ¼” and mount a stop block to your rip fence to control length of the cut. The rear legs also need a stopped rabbet for the back panel, which I cut with a router and edge guide. These rabbets are 43½” long and ⅝” wide, with the depth set to match your ½” plywood. Square the comer of the rabbet with a chisel.
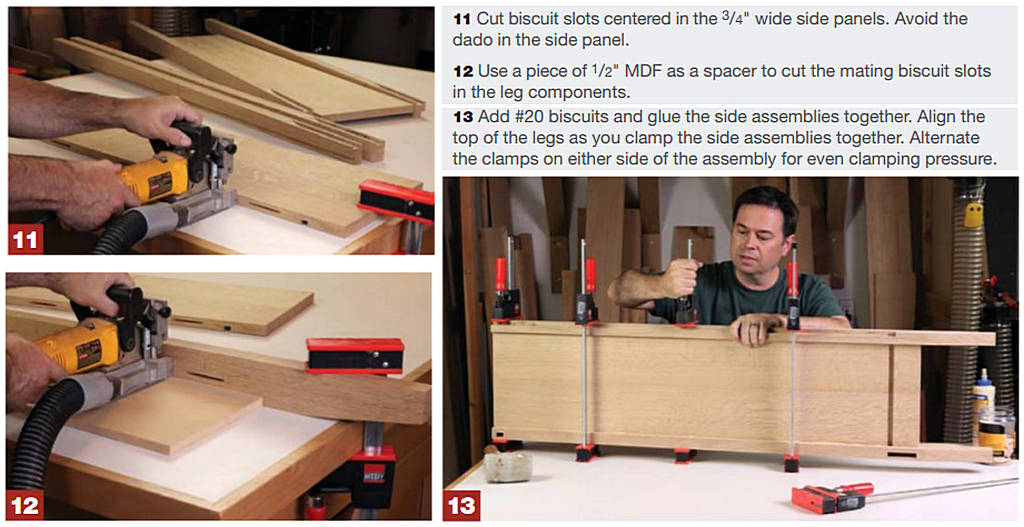
When it comes to the joinery connecting the legs to the side panels, you have several good options. Limbert likely used hide glue and perhaps splines to align the parts. Because this is a long grain joint, modem glue alone is sufficient for strength. However, biscuits or lose tenons are great help with aligning the parts. Plunge biscuit slots centered on the thickness of the side panels but offset on the legs.
Connect the Sides
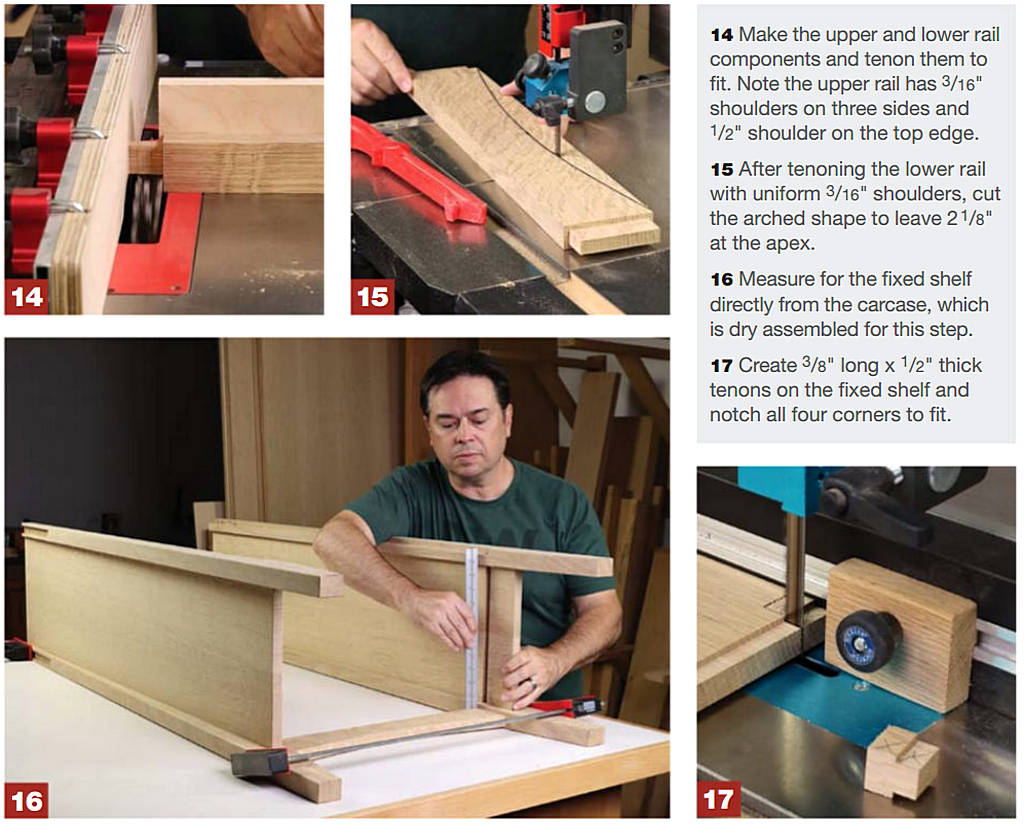
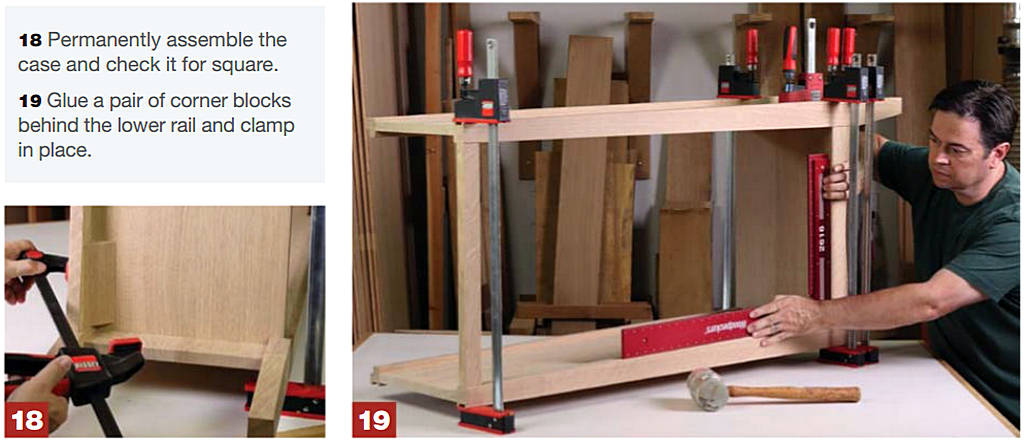
You’ll feel momentum building at this point as you make the upper and lower rail parts. Create 1″ long tenons on these rails and confirm a snug fit in their mortises. Likewise, use a dado blade setup at the table saw to form stub tenons on the fixed shelf. Finally, notch the comers of the shelf to fit the carcase and give the parts a good sanding before gluing them together. One interesting detail is apparent when inspecting this antique case piece. There are no rear rails, and the back of the bookcase is simply held together by the back and top panels. I think it’s a smart design that requires fewer parts yet doesn’t compromise strength.
Glass Doors Made Easy
My favorite way to build glass doors is to create the rabbet before assembling the door. It’s an easy process to learn and saves you from chiseling all the comers square. Start by sizing the rails and stiles, as well as a vertical glass divider. Then use a dado blade to cut a 5/16″ wide rabbet in all the parts. It’s important to set the blade height to exactly half the thickness of your stock or 7/16″ in this case. All the door parts receive a rabbet on one edge, except the vertical divider which needs a rabbet on both edges.
Next, set the rip fence for 1″ long tenon and position a rail show-face down on the table saw. With the same “half-lap” blade height from the previous setup, cut the rails and vertical divider in this manner. In fact, every tenoning step that’s done to the rails will be done to the vertical divider as well.

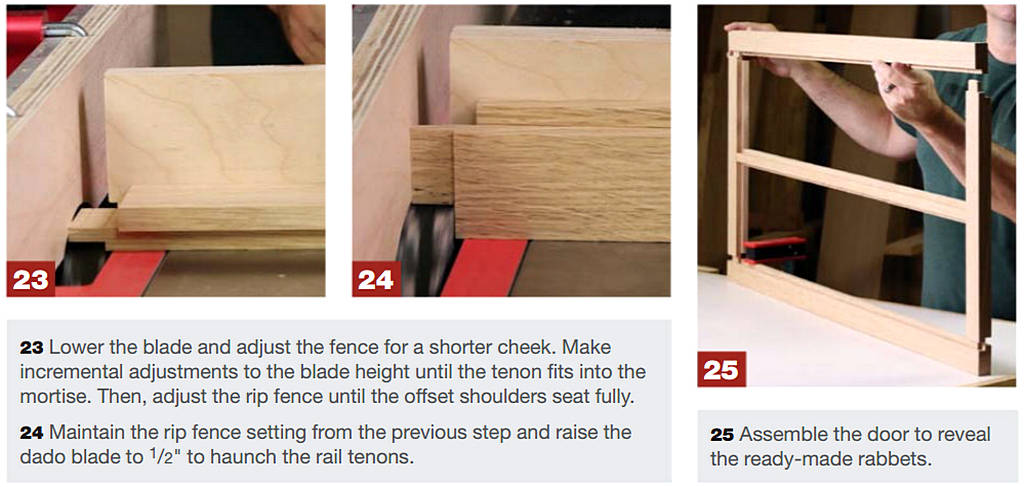
Layout the two mortises in each stile and one mortise in each rail. Cut them with a 1/4″ hollow chisel. The mortises all need to be 11/16″ deep. Now take the pans back to the table saw and begin to form tenons. Lower the dado blade and adjust the rip fence so the cut length is slightly less than 11/16″. Gradually raise the blade until the tenon slides into the mortise. Then adjust the rip fence and make multiple passes until the offset shoulders fit perfectly with their mate.
Maintain the rip fence setting from the previous step and raise the dado blade to 1/2″ and haunch the rail tenons. The vertical divider doesn’t require this step. This entire process works best if you make each cut on some scrap boards as you work. That way, you can proceed confidently with each new blade or fence setting.
Distinctive Double Corner
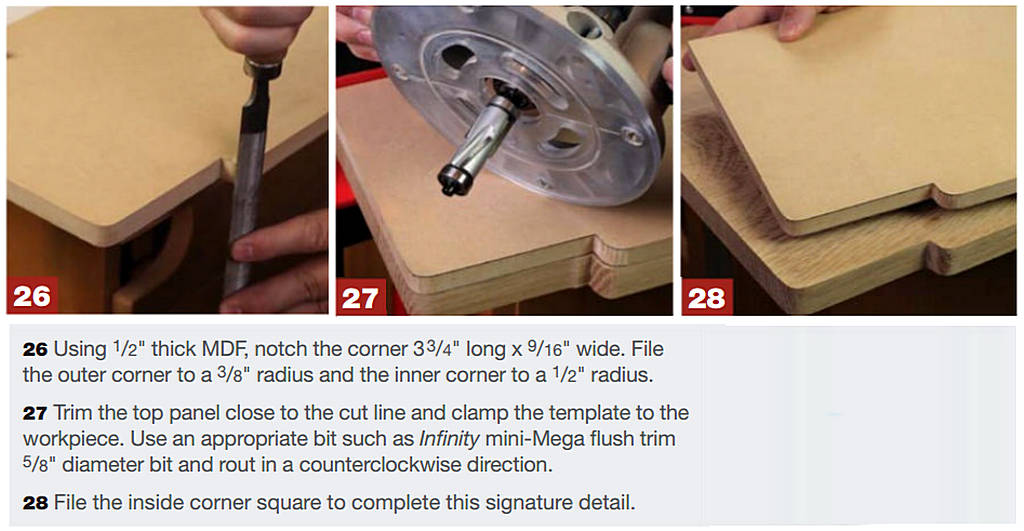
Small details such as the double comer treatment on the top panel can’t be appreciated with the small black and white pictures in Limbert catalogs. Just like Gustav Stickley or Greene and Greene designs, it’s the details that make the difference. Use a scrap of ½” MDf to make a double comer template and sand or file it to shape. Note that the inner corner has a larger radius than the outside comer. Bandsaw the rough shape on the top panel and clamp the template in place. A good flush trimming bit makes quick work completing this shaped detail. Finish the look by squaring the inside corner with a file to match the antique.
Wrapping Things Up
I only altered two details from the antique bookcase. I changed the back panel from ¼” to a more robust ½” thick plywood panel. The second change was to improve a common failure on antiques like this. The corbels were typically nailed in place with a dab or two of hide glue. To improve the integrity of the corbels, I use stub tenons that fit into the grooves in the legs. This interlocking joinery, along with the improvements in modem glue should yield better results over time. Plus, the extra depth of the stub tenon gives the slender corbel a little more substance.
Ease the edges of the corbels with a ⅛” radius router bit at the router table and see how they fit. You’ll notice that the top of the corbels need to be marked and cut flat with the top of the bookcase. Mark this line with a straightedge in situ and trim the corbel to final size.
Once the corbels are glued in place, it’s time to apply the finish.
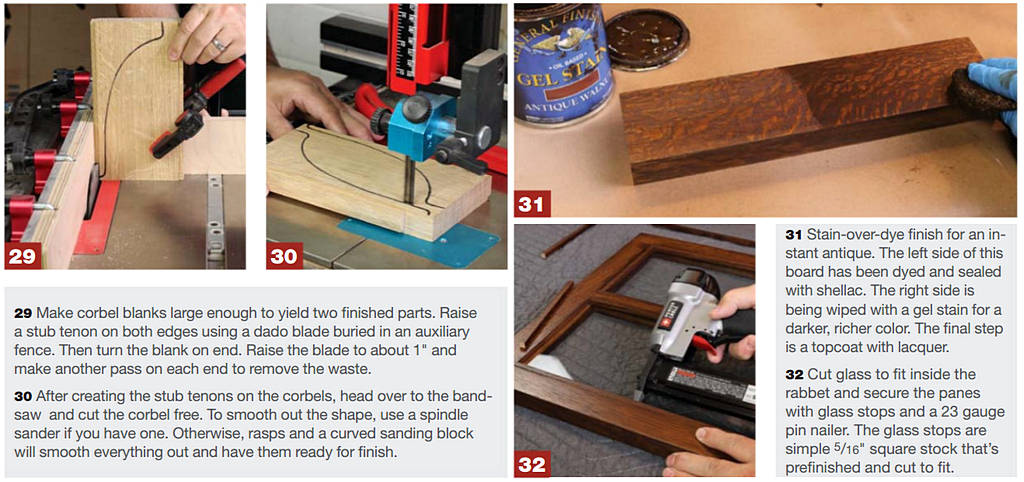
I used a TransTint Dark Mission Brown dye, mixed 1.5oz per quart of non-grain-raising (NGR) thinner. The NGR thinner is simply a 50/50 mixture of lacquer thinner and denatured alcohol. Wipe the dye with a staining sponge and apply it sparingly. Then seal in the dye with a light coat of Bullseye Shellac Sealcoat, which must be sprayed on. I don’t recommend wiping or brushing shellac over an alcohol-based dye. Doing so will reactivate the dye and can lead to streaking. Scuff sand the shellac and stain with a layer of gel stain. The one I used on this is the General Finishes Antique Walnut. Let the stain dry overnight and spray two coats of satin lacquer for the topcoat. Although this finishing schedule is a bit labor intensive, it produces a rich finish that instantly looks antique. For spraying and finishing techniques, check out Willie’s YouTube channel, The Thoughtful Woodworker.
The hardware for this project includes a pair of non-mortise hinges to hang the door and a period-appropriate ring pull. Because the door is set back 1/16″ from the legs, the knuckle of the hinges needs to be oriented towards the door on this particular bookcase. Otherwise, non-mortises hinges are pretty easy to install, especially if you buy the type with slotted holes. After installing these type of hinges, you can move the door a bit in almost every direction. Finish up by installing a 7/16″ brass ball catch to hold the door shut.

