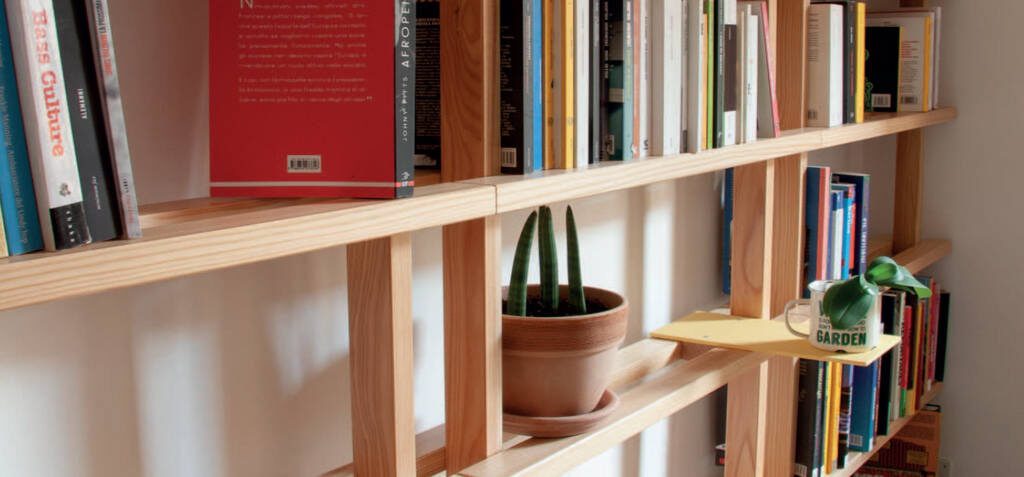
Mattia Migliorati’s simple project can furnish a wall in a minimal way
Solid wood by its nature hat limits that do not always allow us to proportion the dimensions to our liking If we reduce the measurement of the pieces, unfortunately, the rigidity of what we build is also reduced: a frame can twist, a top can flex under the wight of the ooe it supports or bend due to the nature of the wood. Ihe problem is more pronounced when the piece of furniture has to give a slender, light appearance and at the same time support a considerable weight, books for example!
This bookcase has been reduced to a minimum, but instead of cutting away on the pieces to lighten it. I have limited the size of the surfaces. The piece is composed of linear elements crossed with each other, alternately with solids and voids that give the bookcase a larger imagined site of a classic box-shaped bookcase. It is a simple project that can be enhanced by adding small shelves made from leftover timber: they can be made in countless variations of shapes and colours to add a personal touch to the construction.
The project
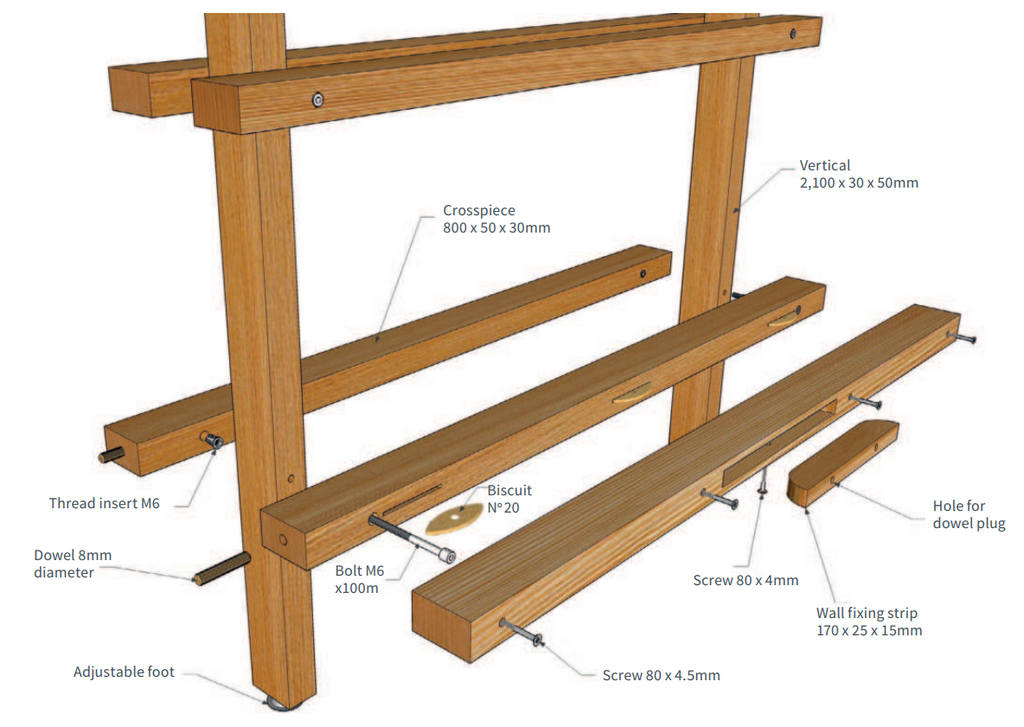
The bookcase is made from 40mm lurch. Its designed to stand against a 3.200mm-long m ull and is made up of lour modules measuring 800mm wide by 2.100mm high. Ihe strips that it is made from haw a section of 50 x 30mm. The structure is simply formed from the repetition of a cross between a vertical element and two horizontal elements that make up the support surfaces. A bolt placed at each intersection holds the three elements together while remaining invisible from the outside. The first, middle and last shelves have an extra crosspiece, positioned at the rear, which distances the bookcase and acts as an intermediary for taxing to the wall. On these pieces there is a cavity in which some strips taxed to the wall with expansion plugs are inserted; a screw then makes the two components integral, allowing a solid anchoring to the wall.
Preparing the wood
One of the great advantages of lattice or slat structures is that of being able to work solid wood with the same confidence that one has with panels: even if the sections are long, the intertwining of the pieces and the wall fixing neutralise the tendency tit the solid wood moring oe warping, which must be accounted foe in other projects.
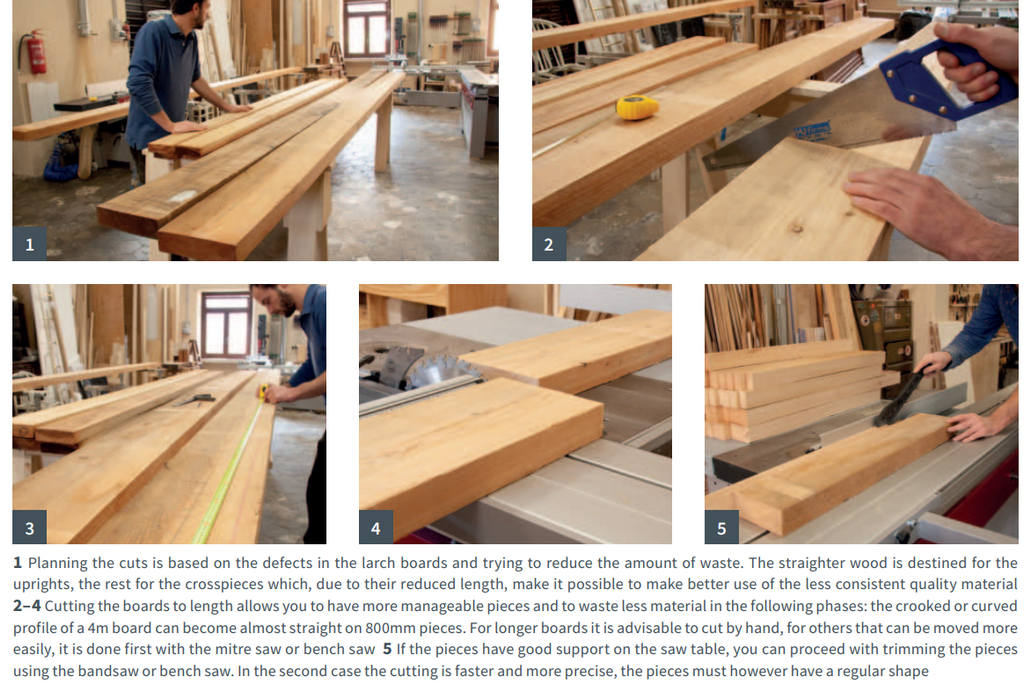
The modular structure of this bookcase, thanks to the small size of its elements, also allows you to optimise the material even when the boards are not really top quality. In fact, the most defective ooes can be assigned to the 800mm crosspieces and the best and straighter ones to the 2.100mm uprights. Ihe first thing to do is to section the material into pieces tit those lengths.
If at this point the wood is regular enough, you can trim it directly with the bandsaw or tublesaw, leaving a few millimetres of margin to allow for any movement that the wood might make when it is dimensioned, so as not to go under the required sire with subsequent planing.
How much margin to take depends mostly on the length of the pieces and the potential warping of the wood, that is, its tendency to more when it is cut. It is advisable to do some trimming with a generous margin, even 5 or 6mm for the 2.100mm strips, and observe the reactions of the wood; if the pieces remain stable, you can halve the excess.
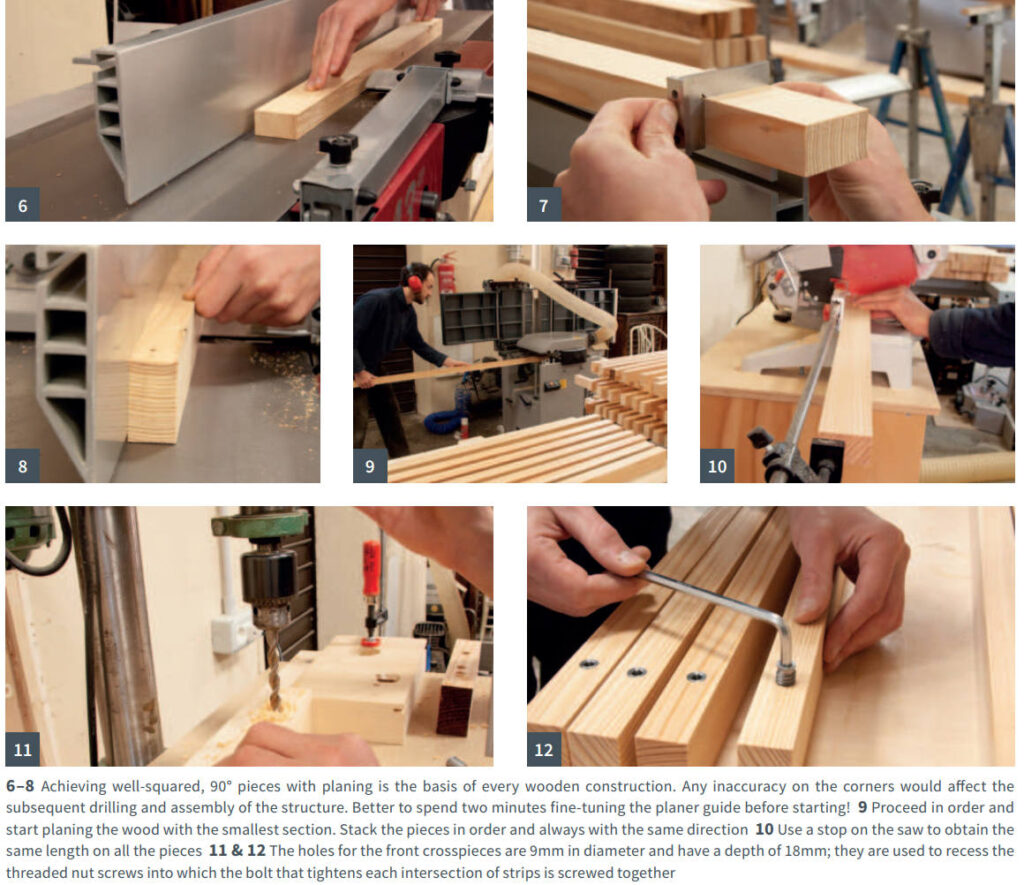
After haring straightened and squared two contiguous sides of each strip with the planer you can bring the section of the pieces to the final dimensions. To do this efficiently, work first on the piece with the smallest section, that is, the one that required the most steps to be smoothed with the surface planer. In this way, by setting the planer to a thickness slightly less than that of the piece, or its width, you will be able to bring all the others to the same siae. It may seem like an exaggerated process, but when there are so many pieces and the infamous Murphys law gets in the way, it happens that the last one piece fails, and you have to plane all the others too.
The last phase of the preparation is to bring the strips to their final measurements. There ate only two lengths and by placing a stop on the mitte saw the work can be completed rapidly. The only precaution concerns any tear-out that the blade may produce when exiting the wood. The strips will have two exposed sides on the heads, three in the case of the uprights, and you must try not to damage them. If you do have a problem with tear-out. you can place a sacrificial strip against the stop that reduces or eliminates tear-out on the good side of the strip.

Assembling the modules
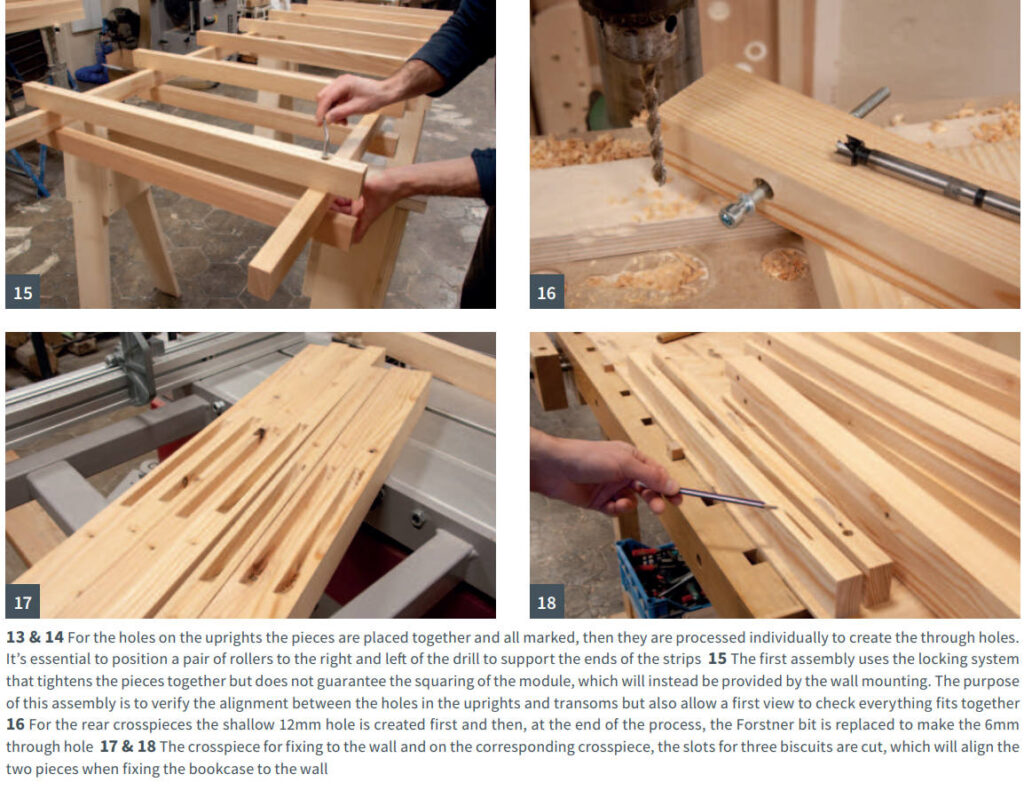
In order to assemble the strips, you now hive a long drilling session she id on the drill press. Adjust the fence of the drill so thit the holes are precisely in the centre of the thickness of the crosspieces; the holes are mirrored and are 65mm from the ends so you can just turn the piece round to switch from one to the ocher. For the front pieces you’ll hare to drill a 9mm hole for the insertion of the threaded nuts, while on the rear ones you’ll make a double coocentric drilling: a recess to embed the bolt head, 12mm, and a 6mm diameter through hole. Being able to set a stop, you can proceed in sequence, hrsc making all the shallow depths and then the through holes.
The uprights are a bit more laborious because you have to drill them every 300mm and there are no simple systems to index the placement under the drill bit. It is therefore necessary to mark them out well and align the pieces by eye. To ensure that at the end of the work, the holes are well levelled between all the uprights, group the pieces and mark them together. You can then proceed to individually create the series of 6mm through holes and at the end try out the assembly of the modules.
The wall fixing system
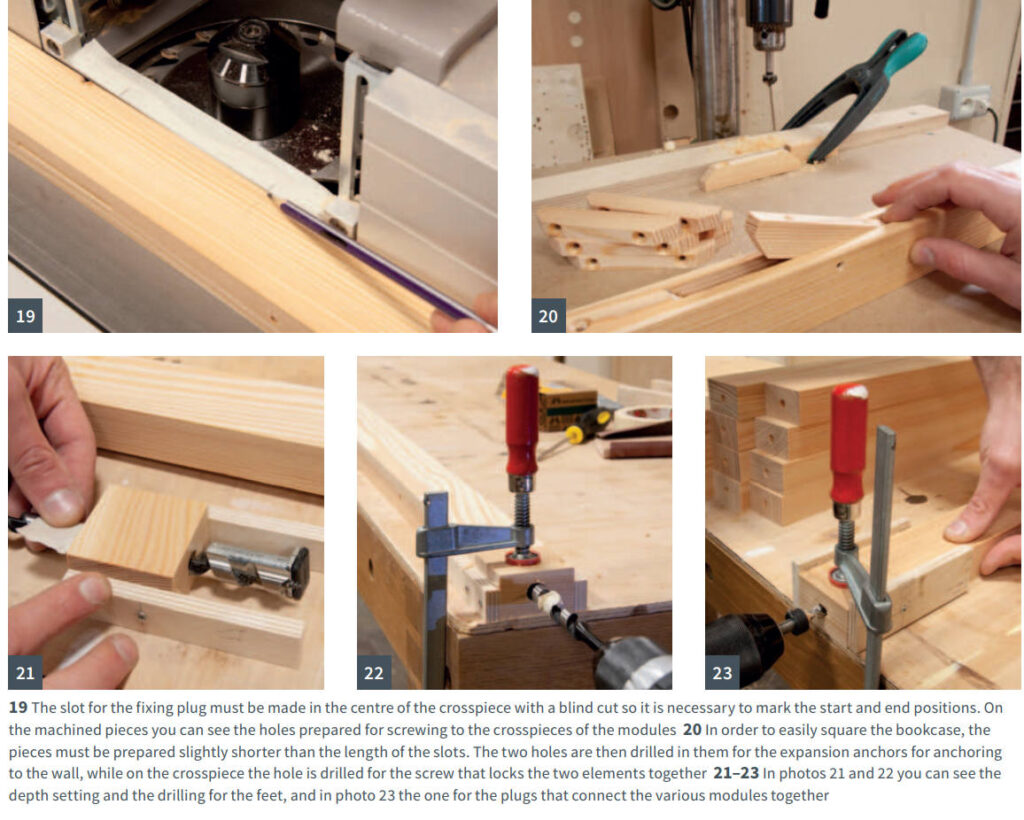
The wall fixing system is used to ensure the squiring of the modules, and therefore of the entire bookcase. It’s created using a strip identical to the crosspieces, which is added to the rear of the first, fourth and seventh pieces. There are then three additional strips foe each module, each of which reaches the crosspiece facing it with three No.20 biscuits. The purpose of these biscuits is only to keep the two pieces aligned during assembly. The biscuits can possibly be glued during installation, floweret, to make the two elements integral. I’ve come up with a more practical four-screw system: so, to prepare it on the fixing crosspiece you need to make the holes it needs.
The fixing crosspiece is anchored to the wall by a dowel that goes inside a groove. It is a rather large and deep hole to be made in the rear edge of the crosspiece itself: the most practical tool to use to make it is the spindle moulder, but in its absence and with a tew more steps, even the router table can do the task well. In both cases it is a question of making stopped cuts and you’ll hare to set start and end stops or visual references.

The connection between the modules and the ground levelling
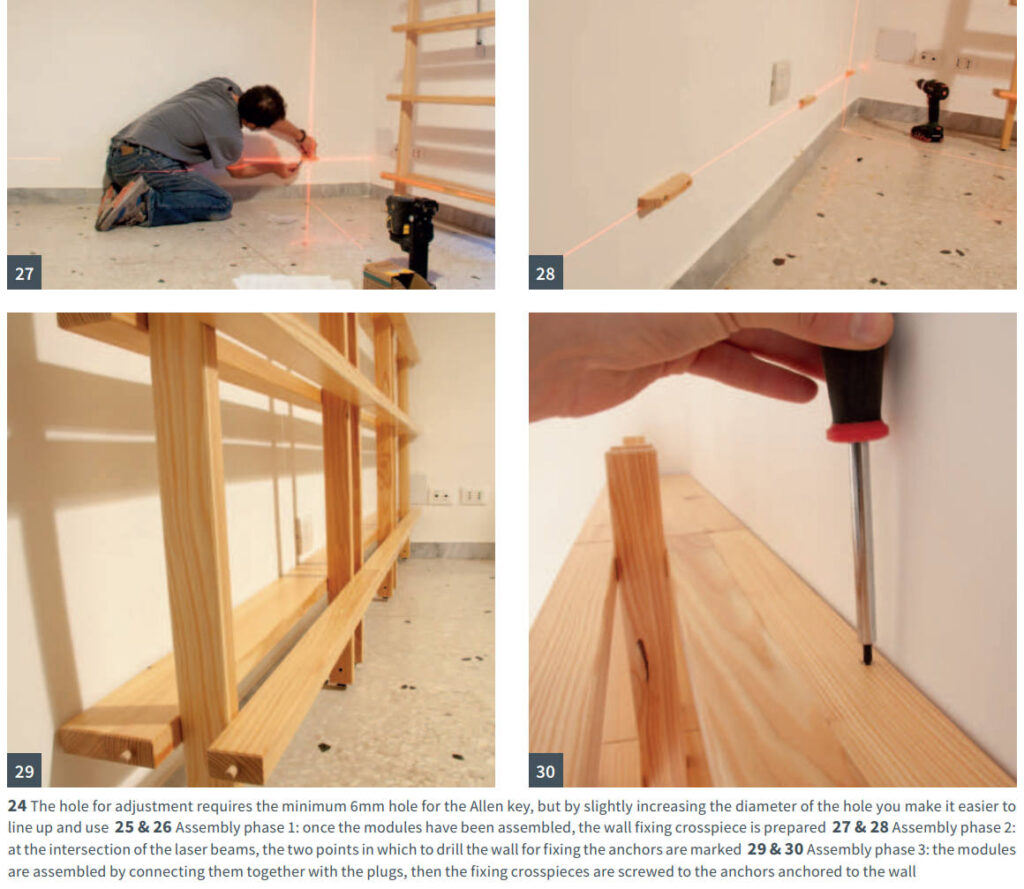
The bit two processes concern the alignment system between the modules and the floor levelling system. In both eases you hare to make holes, in the first on the heads of the crosspieces, to insert 8mm dowels, and in the other on the lower ends of the uprights where we will insert the adjustable feet.
To drill the crosspieces you could use the mortiser but with the uprights, given their length, it is almost impossible so it’s best to work with a hand drill, first assembling a sort of open box at the top in which to hold the head of the pieces.
Once this series of holes has been completed, put the uprights back on the top of the drill press to moke the perpendicular hole for adjusting the foot.
Compared to other projects with a similar footprint, finishing this piece is really simple. After rounding oif the sharp edges, you can group the pieces together to smooch them in a more practical and safe way. The same for finishing. To ptesetre the appearance of the bookcase.
I chose water-based products and applied two coats of base and one of transparent hnish with a brush.
The disappearance of the levelling foot
This is a hardware irem that allows you to level the furniture on the ground discreetly with minimum clearance. The foot is designed to be inserted in the thickness of the sides (starting from 16mm) or in the uprights of the construction. Its installation prondes two holes: one of 14mm in which the body of the mechanism must be placed and the other of 6mm that is used for the inserting the Allen key with which the adjustment is carried out. It can support vertical loads up to 300kg and cross loads, in the sense of the depth of the cabinet, up to 150kg. It is available in various online stores.
Assembly
To assemble the bookcase it is useful to have a laser level but if ooe isn’t available, you can use a spirit level and a fairly long masons ruler instead: it just takes a little more patience and time, but good results are guaranteed either way.
Once the modules hate been assembled and the height from the floor established so as to determine where to fix the three rows of dowels, use the level to transfer the dimensions back to the centre of each module and mark the two drilling points for the dowels.
Drill the wall in those places and screw the anchors into place.
You can then assemble the modules one by ooe and connect them together using the dowels that keep them aligned. Level and square the bookcase through the levelling feet and then hit everything by screwing the crosspieces to the anchors anchored to the wall.
Now you just need to fill the library with beautiful editions and enjoy your work!

