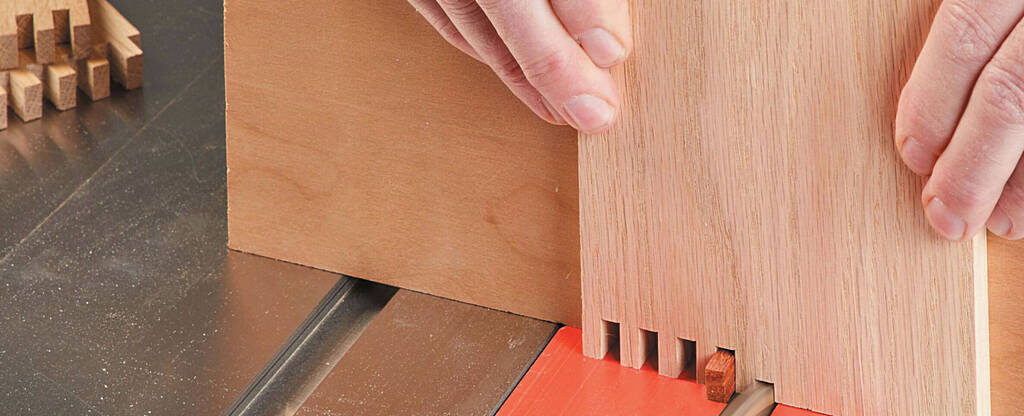
When I needs to add some extra strength to a corner, my first choice is a finger joint. The interlocking pins offer more than enough glue surface to ensure a long-lasting joint, and the patterned comer of the joint is a great aesthetic addition to many projects. However, my favorite thing about the joint is that I can make the perfectly mated parts entirely on the table saw with just a simple, shop-made jig.
Of course, for the joint to be effective, the pieces must fit perfectly. That level of accuracy usually means some careful setup, but by building a little adjustability into this jig fine-tuning the fit becomes much simpler. The key is how you make the jig and attach it to your miter gauge.
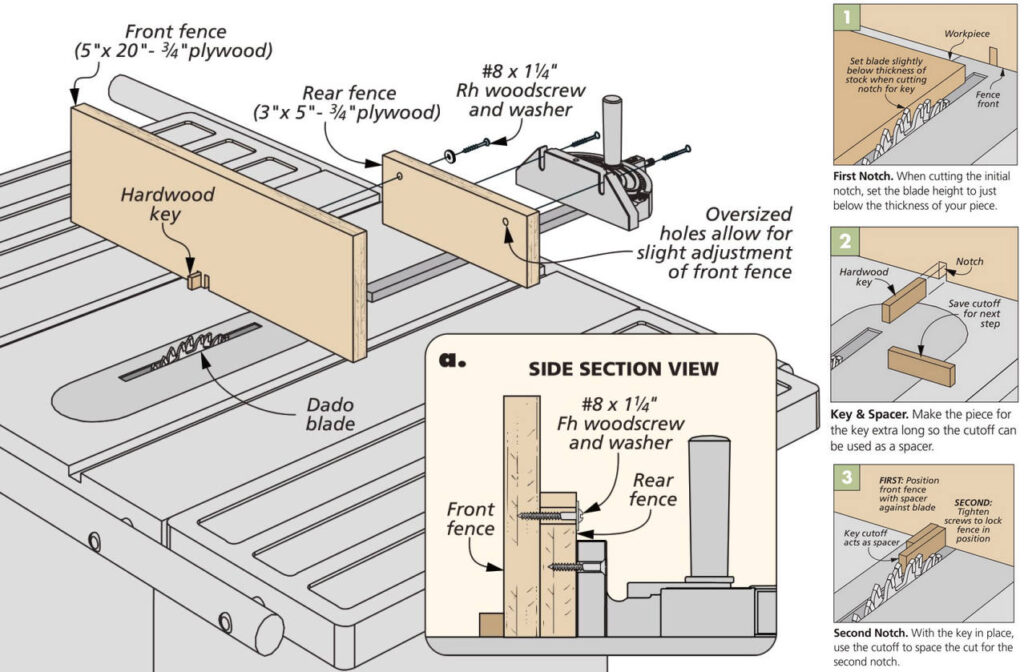
THE DESIGN. This jig consists of a pair of fences, with the rear fence mounted to the miter gauge, using slightly oversized shank holes to attach the front fence. These holes allow easy side-to-side “tweaking” of the spaces in between the cuts.
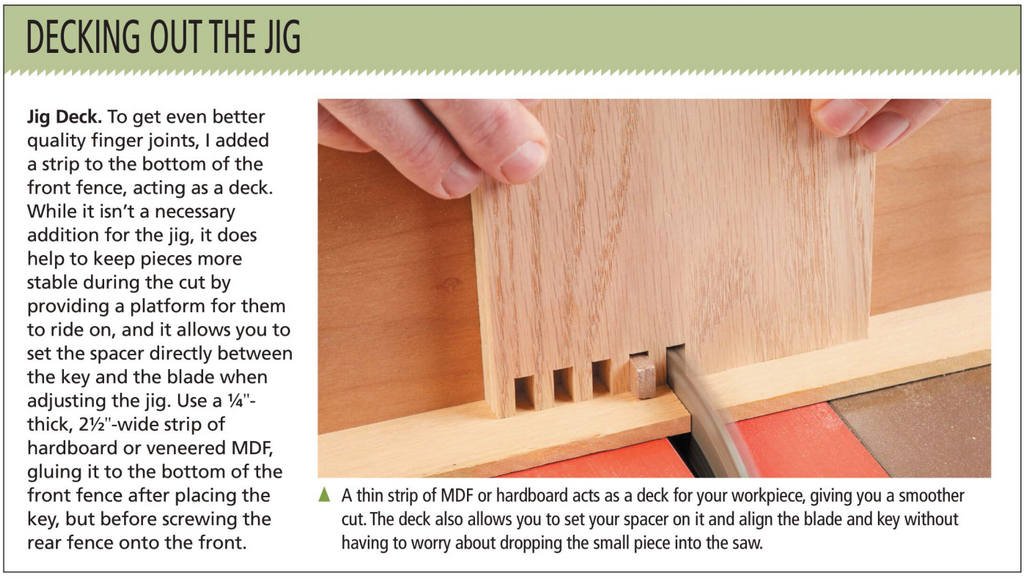
The front fence holds a hardwcxxi indexing key offset from the blade by exactly the width of the cut to control the spacing of the pins. It also backs up the workpiece to prevent tearout during the cuts. The jig is simple enough that I’ve thrown together several of them, ranging from fine fingers to bulkier box joints.
FENCES. You can start building the jig by selecting straight, flat material (I prefer Baltic birch plywood) for tlie front fence. The rear fence can be a piece of plywood as well, also flat and straight. To allow for easy adjustment, drill oversized holes in the rear fence using a larger diameter bit than the screws you’ll use to attach the front fence.
KERF & KEY. Install a dado blade set to match the width of the pins for your project. Set the blade height just below the thickness of the workpiece (as in Figure 1 above). Hold the front fence in position (don’t attach it with screws yet) and make a cut through the fence. Now you’ll need to cut a small piece of hardwood for the key. Be sure the piece for the key is long enough for you to trim a bit off to use as a spacer. Slide the jig up to the dado blade and put the spacer between the outside teeth of the blade and the key (Figure 3). Once you’ve cut the second kerf, you can now attach it to the rear fence with screws.
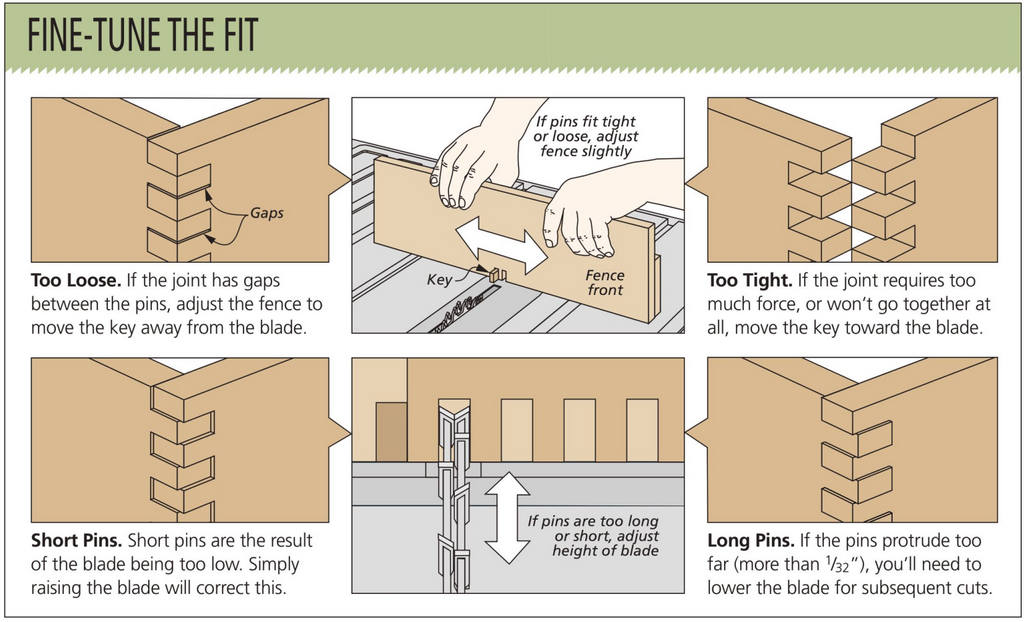
The next step in cutting the finger joints is making the test cuts, and from there it’s all about fine-tuning the fit.
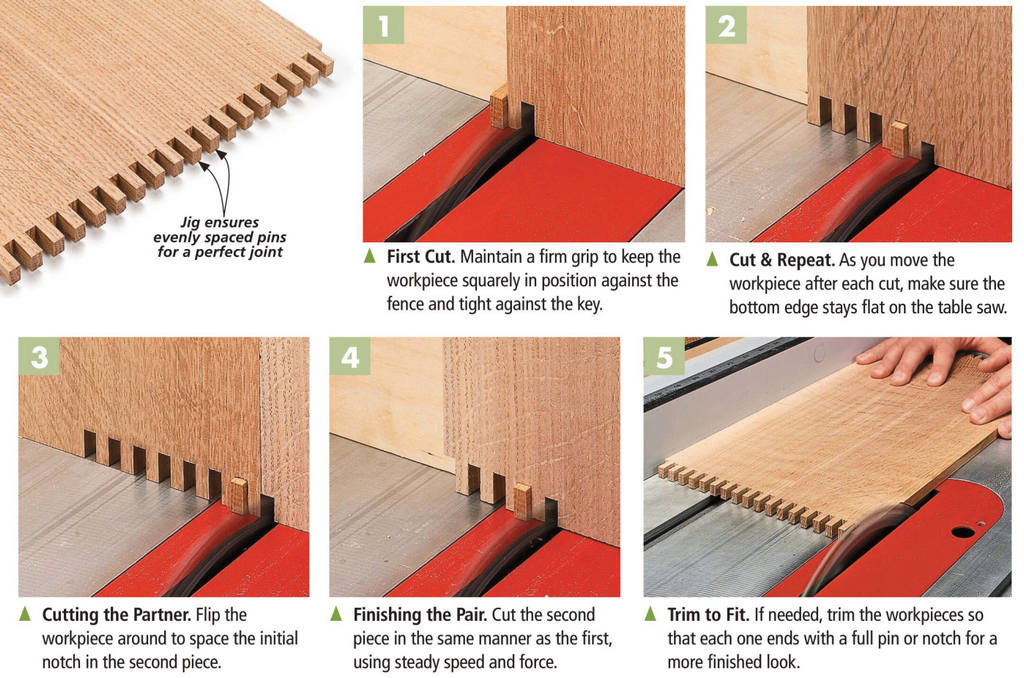
TEST CUTS. With the jig made, it’s time to give it a trial run. Using a couple of test pieces milled to the same thickness and width as your workpieces, make the first cut with one edge against the key (as in Figure 1), then make each successive cut by placing the freshly cut slot over the key (Figure 2). Once you’ve cut all the notches, flip the workpiece around and use the first pin as a spacer. Butt the mating workpiece against it and continue cutting (Figure 3). I prefer a good fit, but not one that requires more than a light tap to seat properly.
TROUBLESHOOTING. The box on the previous page should be able to guide your adjustments, but there is one other thing to watch out for when cutting these test pieces. You may find your pins beginning to drift at some point. If the spacing of your pins starts off good, but slowly becomes offset, then a few things could be at work.
First, it could be the key. It’s important to get the key to the precise thickness. Any play in between the key and the slots in your pieces will cause your cuts to slowly shift off course.
Second, there could be some play between the miter gauge and the slot in your table saw. If there’s any jiggle when you push the miter gauge side-to-side, then this could be the issue. The best fix I found for this is applying aluminum foil tape to the miter gauge for a slop-free fit.
Finally, you may find a bit of play between the piece and the jig itself. As with the miter gauge, consistency is key in this case. When holding the work-piece, apply pressure as close to directly over the key as you can, pressing back against the fence and down against the table. This should help to maintain the most important relationship in this jig during the cut: that between the key and the blade.
CUTTING THE FINGER. Once you’ve adjusted the jig for a good fit, you’re ready to move on to cutting the project workpieces. There are a couple of things to keep in mind while making the joinery cuts. First, hold the work-piece tight against the fence at all times. In the case of larger projects, particularly those that have wide and tall parts made of 3/4″-thick stock, you might want to clamp the workpiece to the fence for added safety and accuracy. The second thing to keep an eye on is making sure the end of the workpiece stays flat against the table for each cut. It’s frustrating to have all the pieces cut only to find out one of the pins wasn’t cut deep enough once you start dry fitting them together. Keeping those things in mind, the rest is just a matter of getting to work and cutting the parts. I find it quite helpful to mark the workpieces to make sure I’m starting the cuts from the same edge each time. I also stop after each matching set and make sure I’m getting a good fit, and that the jig hasn’t drifted out of position. It only takes a minute to check, and an ounce of prevention is certainly worth a pound of cure here.
ASSEMBLING THE FINGERS. After you’ve completed the cuts, you can move on to assembling the project. If you’ve established a good setup, this is where you’ll see a great payoff. Properly cut finger joints are easy to assemble while staying square. I find the biggest challenge is to work quickly enough to have the joint assembled before the glue tacks up. For this reason a slow-setting glue can be a boon. A small brush makes spreading a thin coat of glue on all the mating surfaces a little easier, but it can still be a scramble to get things together, so it’s best to start the assembly well-prepared. Once the glue is spread, all you need to do is tap the joints together and clamp them up. Fitting a couple of plywood spacers inside keeps the assembly square as you apply clamping pressure to pull the joints tight. You can fully seat the sides with a few taps on the ends, then tighten up the clamps and clean any squeezeout. Clamping blocks can come in handy too, as they disperse the pressure evenly across all the fingers.

