Iwas working on a project recently when I got the opportunity to use some air-dried lumber straight from a mill. I started with a couple eight-foot-long slabs of rough-sawn hickory, and I was excited to work with them. Air-dried lumber has a rich color, and I find it’s far less prone to chipping and tearing out than kiln-dried wood. I had one issue though, and those familiar with rough-sawn lumber will likely see where I’m going. I enjoy working with rough-sawn wood, but those planks will almost always dry unevenly, warping, bowing, and twisting. That’s what I was working with, and no planer or jointer I had around was going to be able to deal with it.
 There’s a common misconception that a planer will flatten stock. What a planer actually does is reduce the thickness of a workpiece, making one face parallel to the other. Naturally, this means that to get a flat workpiece, you’ve got to start with one flat face. And with the size of workpieces I wanted to use, the jointer wasn’t going to be an option. I could’ve broken out the hand planes, but that would’ve made for one long day. Instead, I chose to tackle this problem with a router and a shop-made jig. Not only did the jig save me time on this project, but it’ll be great for any rough-sawn stuff I get my hands on down the road.
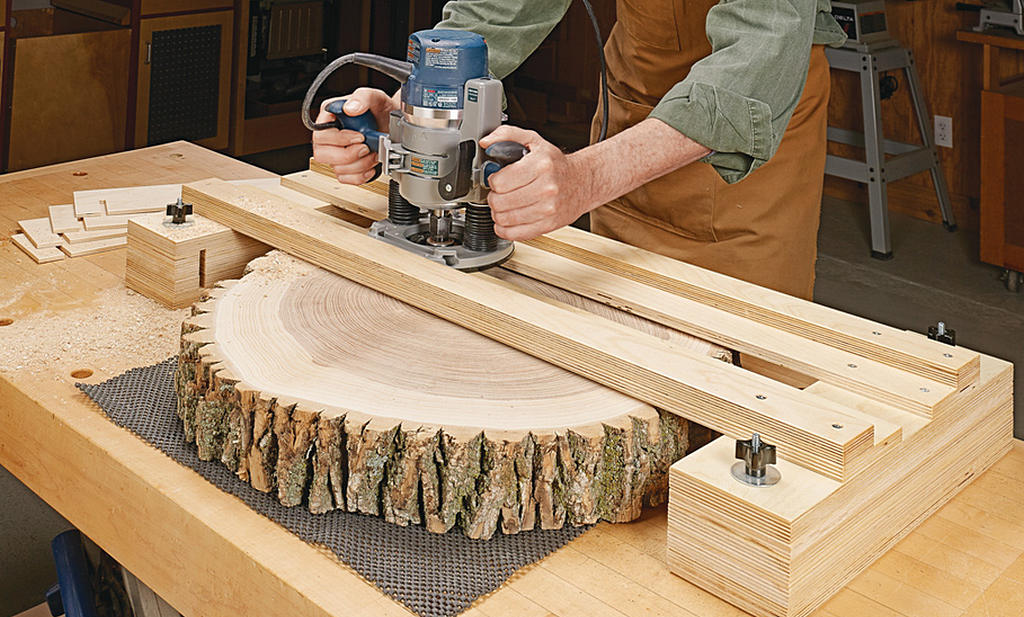
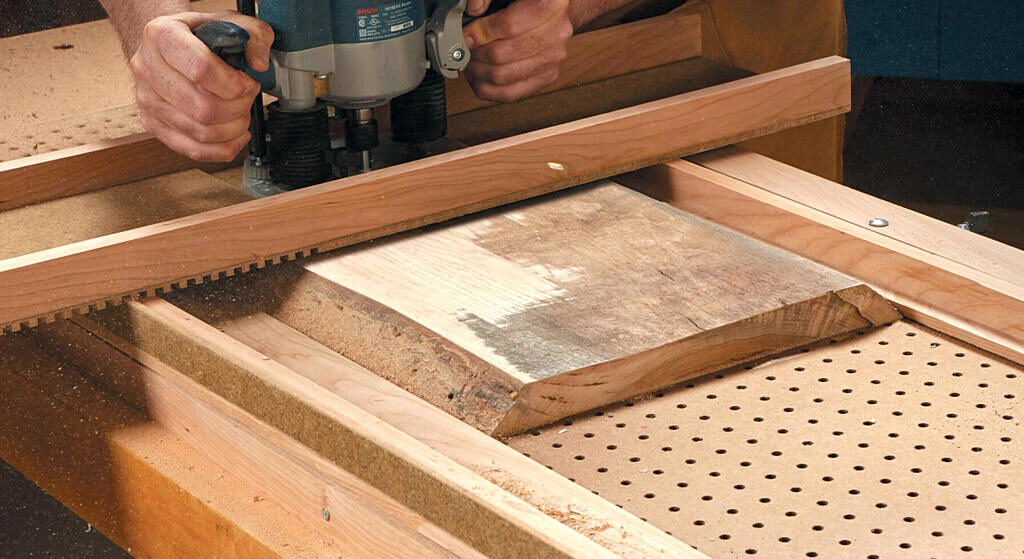
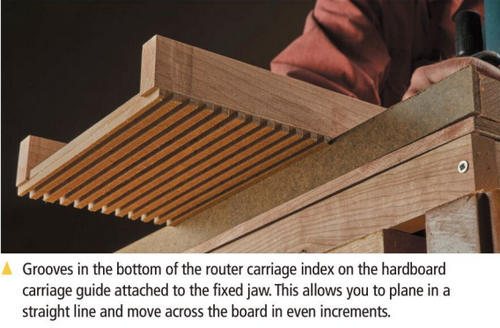
Not only is this jig good for rough lumber, but even glued up panels or end grain cutting boards. After one face is flat, just flip the workpiece over and rout the board to whatever thickness you need, or stick it in the planer if it fits. The jig uses a router riding on a carriage. Grooves in the bottom of the carriage allow you to rout in even increments, sliding along a guide and a couple of rails. The workpiece rests between the rails, below the router. The router is simply moved across the piece, and because it stays at a fixed height, it removes the high spots and flattens the surface.
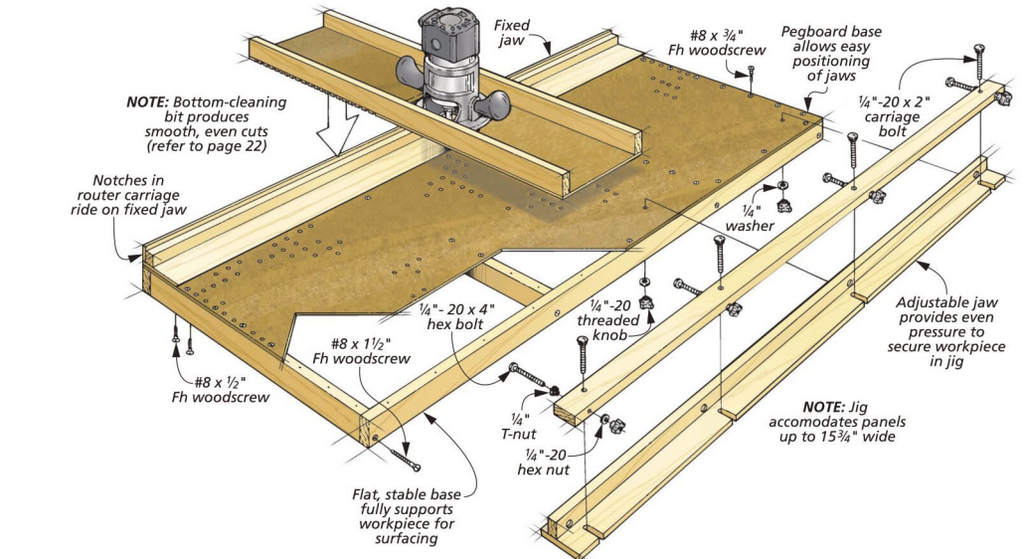 This jig is a great option for any woodworkers without a planer in their shop, and it can also be used on glued-up panels and boards that are too wide for most thickness planers or jointers. The jig here works on pieces up to 1534″ wide – but you could go even further by extending the width of the base and the length of the carriage.
This jig is designed to handle stock up to IV2″ thick, and to plane stock to as thin as 14″ using shims, as long as your plunge router reaches that far. Alternatively, by increasing the width of the rails and carriage guide, the jig could be used to plane down even thicker pieces.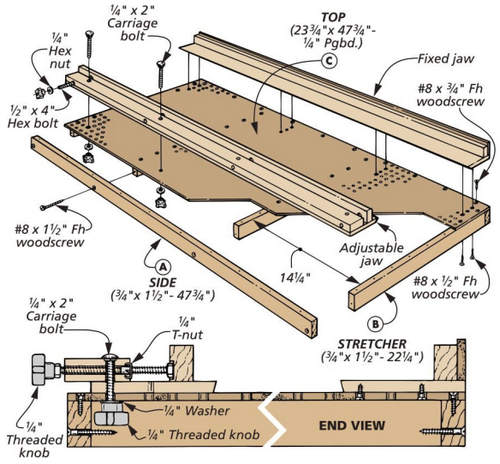
MAKING THE JIG
The base of the jig is just a hardwood frame consisting of two sides screwed to four stretchers (drawing above). For ths surface, I used 14″ pegboard. This lets me adjust the position of the jaws for narrower pieces. Instead of drilling extra holes to attach the pegboard, I cut the pegboard so the existing holes were centered over the frame.
JAWS. Next up is the fixed jaw. As you can see below, there are three parts: a plate, a rail, and a carriage guide.
The plate is beveled (detail ‘a/ previous page) for a better grip. The rail is screwed to the plate to form an L-shaped support for the carriage. Lastly, the carriage guide is made from 14″ hardboard and glued to the rail. Once the fixed jaw is made, mount it to the base.
The adjustable jaw has three parts as well, but there are a few differences at play. First, the plate on the adjustable jaw isn’t screwed to the base. Instead, it’s held by a hold-down bar, allowing the adjustable jaw to move and press against the workpiece.
The hold-down bar sits atop the adjustable plate. Bolts pass down through it and into the pegboard. Again, when making the hold-down bar and adjustable rail, align the holes and slots respectively with the holes of the pegboard. Plastic knobs or wing nuts easily secure the bar and plate to the base.
To allow more minor adjustments to the plate, a second set of longer bolts runs horizontally through the hold-down bar and a T-nut, pressing against the back face of the adjustable rail. Counterbores in the adjustable rail accept the heads of the bolts, keeping the jaw from sliding when pressure is applied (detail T),’ opposite page). The pressure comes from threaded knobs and jam nuts threaded onto the end of each bolt. Once complete, attach the adjustable jaw to the base as well.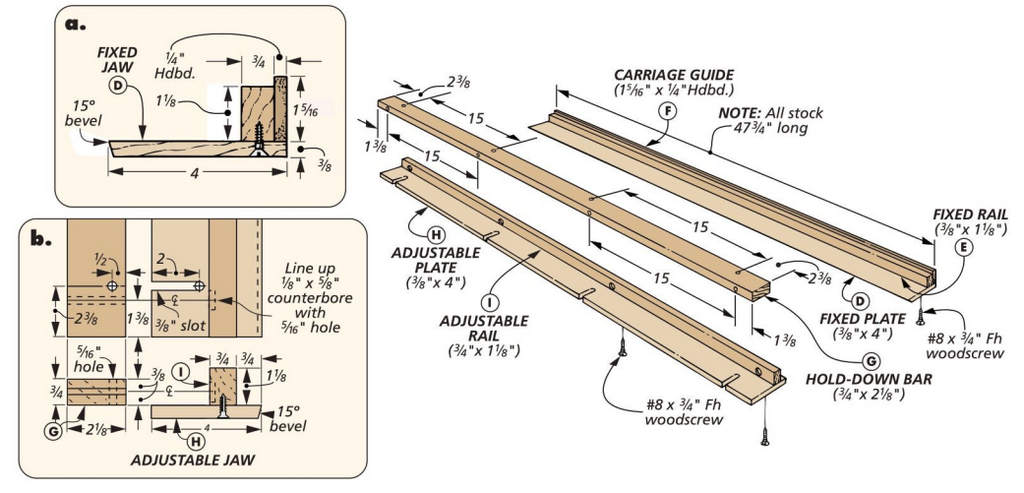
CARRIAGE. The carriage shown in the drawing above supports the router above the workpiece as it rides across the jaws. It consists of its own pair of rails with a base for the router. Grooves in the bottom allow you to index the router above the workpiece in even increments as you plane.
Let’s start on the rails. These pieces are cut extra long so the carriage spans both jaws no matter where it’s indexed. The
rails are glued and screwed to a router base made of H” hardboard. Don’t screw into the section of the base that will be grooved.
To support the grooves, a backing board is cut to fit between the rails and glued to the top of the base. Once the glue dries, the indexing grooves can be made. These are cut on the bottom of the base and sized to fit the thickness of the carriage guide, as shown in detail ‘a’ on the previous page and in the drawing above. I spaced the grooves Vi’ apart from each other, but at minimum the space between them should be 14″ less than your bit diameter to allow for an overlap on each pass. After the grooves are in, cut a hole in the base for your chosen bit and mount your router to the carriage.
PLANING WITH A ROUTER
Now that the jig is built, it’s time to dive into how to use it. Planing a workpiece is fairly straightforward, as most of the work goes into the setup. Once that’s done, it’s all a matter of learning the routing technique and getting to work.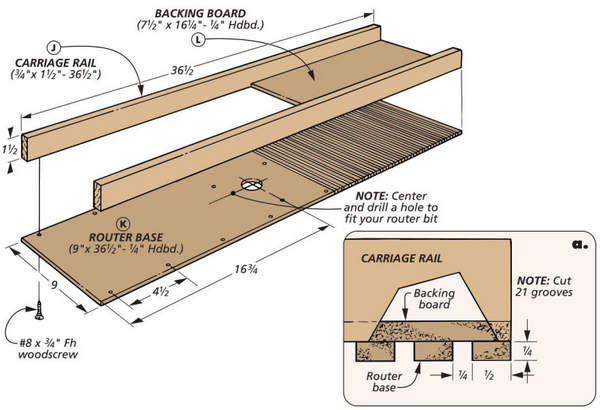
THE BIT. Before we get too far, I should talk about which bit you’ll want to use. This jig works well enough with a straight bit, but after using it the first couple of times, I was a little disappointed with the results. When I was done, a series of swirls had been left on the workpiece. I could’ve sanded or scraped the surface clean, but I figured there had to be a better way.
The issue here was the straight bit I used. Specifically, the points on the bottom of the cutters. After a little reading, I found that a bottom-cleaning bit might be the answer to my problems. It operates much like a straight bit, but it has an additional set of cutters on the bottom to “plane” the surface smooth and flat. This left me with a surface that barely needed smoothed or sanded.
And I was almost satisfied with just that. Luckily, I have coworkers. I was using a 1” bottom-cleaning bit when I was introduced to the bit you see at the left: a spoilboard bit. This bit had a lot in common with my bottom-cleaning bit, and as it turns out, it’s typically used to flatten the spoil board of a CNC machine. The big advantage here is that the one pictured (and the one I now prefer for this jig) has a 2″ diameter. As a result, this bit cut my work time in half. Now I can plane down a workpiece with this jig in minutes.
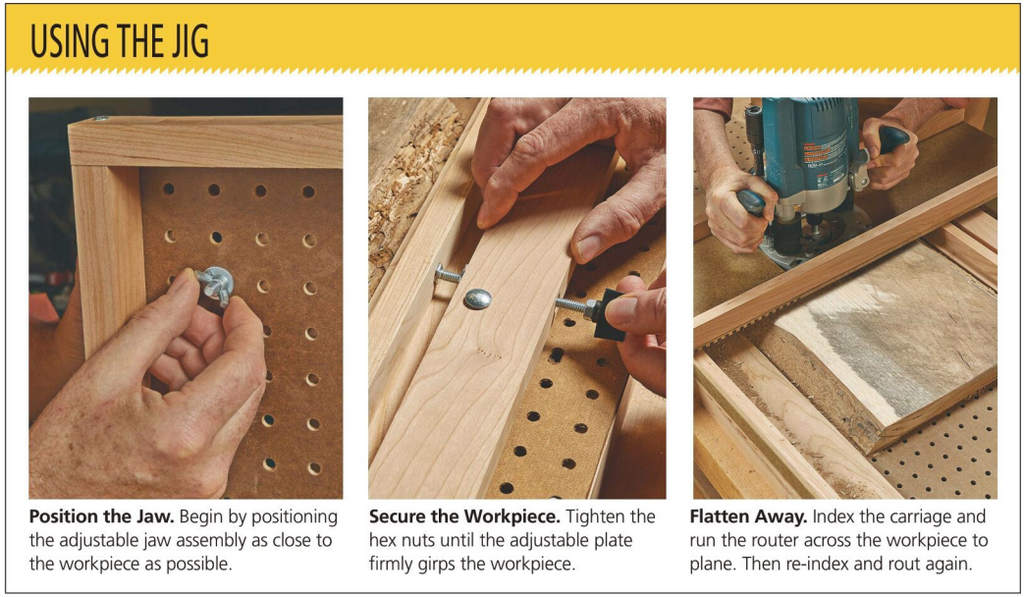
USING THE JIG. No matter which bit you’ve decided to use, the technique is the same, as you can see in the box below.
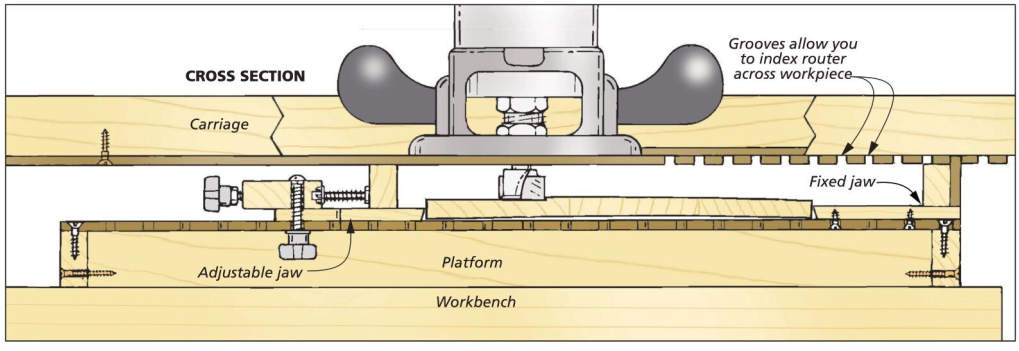 First, secure the workpiece in the jig. Position the adjustable jaw on the platform. This is more of a broad-stroke positioning, so locate it as close to the workpiece as you can now, but leave the hold-down bar a little loose. Now use the knobs to tighten the hex bolts, moving the adjustable rail and plate. When the adjustable plate is firm against the workpiece, tighten the hold-down bar fully to lock it in place. For heavier workpieces, you’ll want to have the jig hanging over the edge of your bench while you get the adjustable jaw assembly in place.
When you place the workpiece in the jig, pay attention to the initial shape. Is it cupped, or is it twisted? If you’re surfacing a twisted piece, you can put either side up first, so long as you make sure to remove all the high spots before flipping it. When working on a cupped piece, start with the concave side facing down (as shown in the art above) to prevent the workpiece from rocking.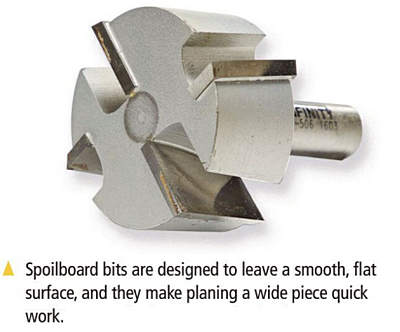
If the jig does end up rocking, you may notice that one stretch has a slightly different depth than the one beside it after you’ve routed, leaving a ridge. You may need to shim up the areas not touching the platform to stop if from moving.
If you keep finding a ridge, check under the hold-down bar to make sure it locks in place. A lot of material gets removed this with this jig, so sawdust will eventually end up everywhere.
If you’re surfacing a warped board instead of a rough one, keeping track of progress during your planing can be difficult without some kind of reference. Covering the surface with pencil marks is an easy way to do this, planing until they’re gone.
While you rout, try to apply a steady amount of force throughout, and keep the force consistent between passes. Several passes may be needed to flatten the surface. This is easy to do with most plunge routers by simply adjusting the turret on the depth stop. I like to limit the depth of the cut to around %” per pass to prevent tearout and keep the stress on my router motor to a minimum, especially with a larger bit like I was using.
 THE OTHER SIDE. Once you’ve flattened one side, you can run the opposite face through the planer, so long as your planer is wide enough. As I mentioned earlier, since you’re starting with one flat face, this will leave you with a flat, parallel-faced workpiece. If you chose to stick with a standard straight bit, you can run the routed face through afterward to remove the router marks. The marks will be small enough that it won’t make a difference when planing the workpiece down to thickness.
Alternatively, this jig can be used to bring a workpiece to thickness in place of a planer. In this case, all you need to do once you’ve surfaced one side of your piece is flip it over and surface the opposite side.
IN PLACE OF A PLANER. This jig has become my go-to for planing rough-sawn lumber. For anyone who has yet to buy a planer, or who’s looking to work with pieces too wide for the one they have now, this jig is an excellent choice. Keep in mind, you can also build the jig longer or wider than the dimensions shown here to accommodate larger pieces, and because the jaws can be easily removed, multiple sets of jaws can be made to handle a wide range of thicknesses. So whether you’re working with a cupped panel or some rough-sawn lumber, this jig is bound to be handy.
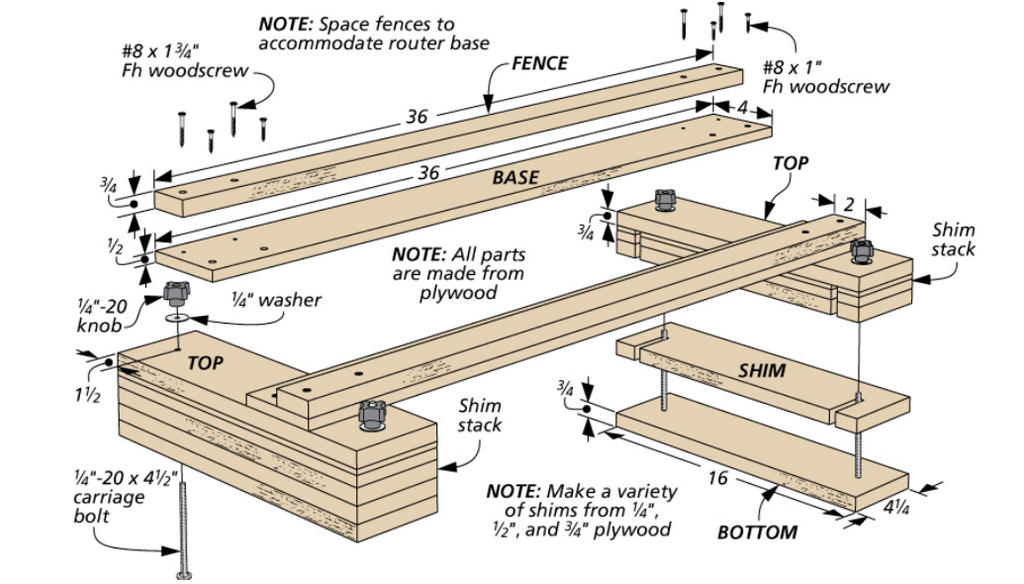
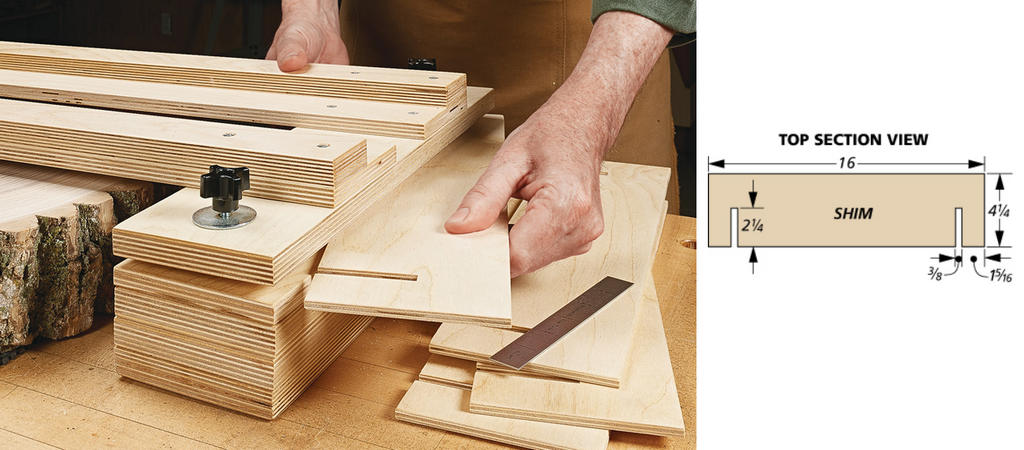
SECOND OPTION: Router Leveling Jig
