Comfortable chairs, especially wooden chairs, are notoriously difficult to design. Consequently, I’m always on the lookout for good chairs. Whether in a restaurant, at a friend’s house, or in a waiting room, every time I sit down, I instinctively analyze what makes my seat comfortable, or not.
Several years ago, my wife bought a double folding chair at a flea market for the grand total of $2. The chair is of a style that was mass-produced around the turn of the century and used almost everywhere, in auditoriums, schools, Grange halls, and libraries. Although not much to look at, it’s a very comfortable chair. The two contact points, the seat and back, are well formed and provide support right where it’s needed. I decided to borrow the back curve and seat shape, the elements that make the chair so comfortable, and incorporate these features into a nonfolding, four-legged dining chair with mortise-and-tenon construction.
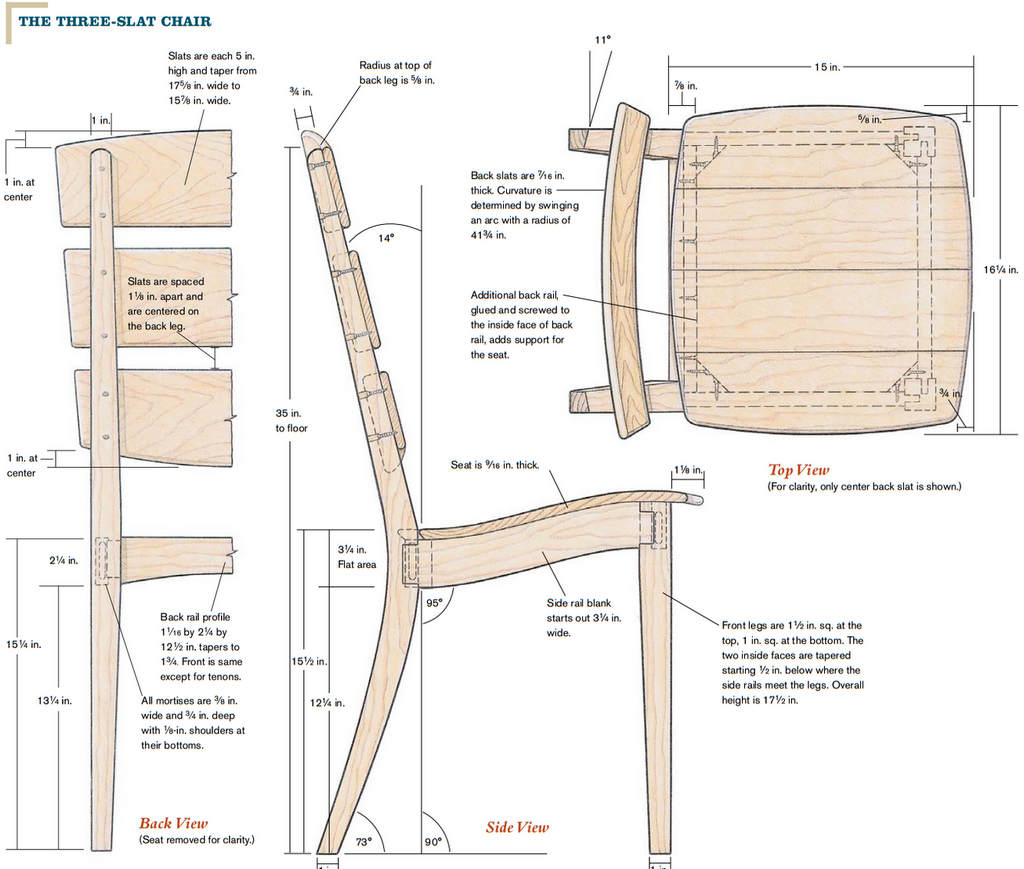
I also adjusted the back angle to 14 degrees from vertical because the original was a little too “laid back” for a dining chair. After a series of sketches, I came up with the chair shown at left and in the drawing on pp. 48-49. Once I’d worked out the details, I made a full-size drawing from which I later made patterns for each chair part.
Laminating and Shaping the Legs
One of the first decisions I made was to laminate the curved back legs rather than cut them from a big blank. Having repaired countless older chairs, I’ve learned that curved back legs cut from solid stock are extremely vulnerable to breaking: The short grain where leg meets floor invariably breaks, sometimes with the slightest tap.
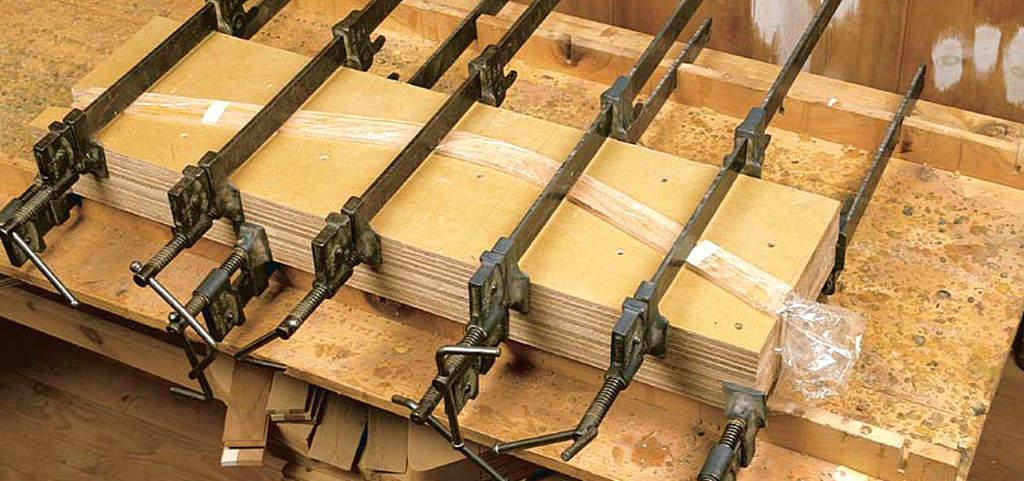
I made a form for the leg-blank lamination from six pieces of scrap 3/4-in. plywood. I bandsawed the plywood to rough shape and then disc-sanded the two halves of the glued-together form until I had a fair, smooth curve on each half with a nice match between the two.
I cut 5/1б-іп.-thick strips for the lamination from a 4-in.-wide piece of 16/4 stock that was 38 in. long. That way, I was able to
match the grain from front to back and get both back legs from the same lamination. I marked each bandsawn strip in order of cut, applied glue between each, wrapped them in plastic wrap so they wouldn’t stick to the form, and clamped them in the form for 24 hours (see the photo above). The next day, I cut the lamination in half lengthwise along its face, ran the outside edge of both pieces over the jointer, and then ripped them to 1 1/2 in.
I cut the back legs so that the tops are 35 in. high and the bottoms are at 73 degrees to the floor (see the drawing on p. 49). Then I marked and disc-sanded a flat section perpendicular to the floor on the front faces of the back legs, where the side rails will intersect the legs.
Next I bandsawed a taper on the inside edges of the bottom section of the back legs, from 1 in. sq. at the floor to 1 1/2 in. sq. just below the flat at the side-rail intersection (about 12 1/2 in. from the floor).
I also tapered the tops of the back legs to 1 in. wide on their inner edges, as viewed from the back (see the drawing at right), and to 3/4 in. front to back, cut from the back and originating just above the flat for the side-rail intersection. If I’d tapered the tops of the back legs on their front edges, I would have changed the seat-back angle, making the chair slightly less comfortable.
I prepared the two front legs of the chair by jointing, planing, ripping and crosscutting rough 8/4 stock to end up with two 1 1/2 by 1 1/2 by 17 1/2-in. blanks. Then I tapered them on their inside faces from 1 in. sq. at the floor to 1 1/2 in. sq., 3 in. from their tops.
Leg-to-Rail Joinery
I used mortise-and-tenon construction on this chair because it has no stretchers, so the strongest possible leg-to-rail joinery was necessary. I laid out all the rails with a 34б-іп. reveal at the leg intersections except the back rail, which I made flush to the inside of the chair.
I cut the four rails from rough 4/4 stock that I planed to thickness and cut to shape from my full-size patterns. The front and back rails start out as 2 1/4-in.-wide blanks, but the side rails start out 3 1/4- in. wide to allow for the bandsawn curve that dictates the seats contour.This takes the side rails down to 2 1/4- in. Also, I cut the side rails at 5 degrees on both ends (85 degrees in the front and 95 degrees in the back), which makes them parallel, though slightly skewed uphill.
At this point, I cut the tenons to fit the mortises. All tenons are centered on the rails except for the back rail. I offset it to within 2 1/16 – in. of the back face to keep it from being too close to the inside corner of the leg, thus compromising the integrity of the joint. Next, I dry-fitted the legs and rails together. I held the chair together with band clamps while I checked the fit of the joints, dimensions of parts and angles.
Fitting a Shaped Seat
To fit a seat that isn’t flat onto a base that is takes a bit of trial and error. I place the seat in position on the chair base, its back edge touching the back legs and its sides centered. By looking beneath the seat on the sides, I can see where the high points are and where I need to remove stock from the rails and legs. Most of the fitting involves fairing into the front legs and hollowing out the side rails where the back of the seat is lowest. With the chair base clamped into the bench vise for stability, I use my belt sander with an 80-grit belt to do most of the work. After one or two test-fittings, the seat begins to look like it belongs on the chair.By now, points of contact have become difficult to see. To circumvent this, I take two sheets of carbon paper (yes, it’s still available at office-supply stores) and place them, carbon side down, on the front edge of the chair. I press the seat down and move it slightly back and forth, which leaves dark patches at the points of contact. I work down these points with a rasp and file. After just a few more fittings, I’ve got a custom fit between seat and chair base.
While the chair was dry-clamped, I also cut a wooden pattern of the seat profile (from the side) and of the back slats (from the top) from my full-size drawing. I drew the pattern for the back slats by swinging a pair of 18-in.-long arcs, 1/2-in. apart, using a piece of string to create a 41 3/4 in. radius. Then I laid this pattern onto the top of the two back rails so that the back of the pattern intersects the front outside corners of both back legs. I scribed this line of intersection onto the top of the back legs, extended the line down the insides of the legs and then jointed down to the line, using
the jointer fence to maintain the angle. Given the leg spacing and the radius of the back slats, the scribe marks formed about an 11 degrees angle from the front edges of the legs, allowing the back slats to sit flush against the back legs. At this stage, I finish-sanded the four legs and rails to 320 grit. Then I assembled the back legs and rail as a unit, pinned the joints and set the assembly aside to dry. I did the same for the front assembly. When it was dry, I connected the two assemblies by gluing and pinning the two curved side rails.
Making the Seat
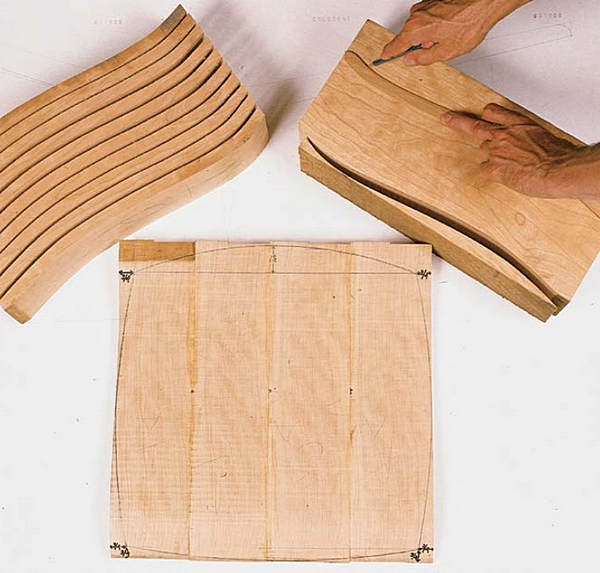
I cut the seat from a 6-in.-wide, 17-in.-long piece of 16/4 stock, choosing a piece with nice color and devoid of sapwood. I also laid out the pattern on the flatsawn face of the board so that the seat surface would be quartersawn (see the photo the facing page). This reduces the amount the seat will move side to side, and it’s quite attractive. Also, the parallel grain makes it less obvious that the seat is glued up from a number of pieces. I jointed the edges and glued the seat blank together. When the blank was dry, I bandsawed the seat to match the pattern and then disc-sanded to fair in the four curved edges.
Shaping the seat top and bottom is probably the most time-consuming step in the whole chairmaking process. I clamped the seat upside down between two bench dogs and beltsanded across the grain with an 80-grit belt. I’ve found that by holding the sander perpendicular to the grain but moving it in a rocking motion with the grain, I can remove stock quickly without gouging the workpiece. As it turned out, the concave portion of the underside of the seat near the front legs was just about the tightest radius possible with this technique, but it worked. I flipped the seat over and sanded the top using the same technique. The top went much faster because its concave section was so much shallower.
Next, I use a 1-in. by 5-in. soft sanding pad (see sources on p. 52) chucked into an electric drill. This soft pad, with a 100-grit disc on it, took out the 80-grit cross-grain scratches and conformed well to the contour of the seat. I repeated on the front and the back of the seat through 180-grit paper. Then I switched to a round, 5-in. orbital finish sander at 220 grit because it leaves fewer and smaller swirl marks. I continued with the finish sander through 320 grit.
When the seat was smooth and scratch-free, I beveled its sides and back edge. I shaped the front edge to a rounded point (see the drawing on p. 49). This went quickly using a combination of block plane, rasp, file, and sandpaper. The seat was now ready to be fitted to the chair. I did this with a couple of sheets of carbon paper, using a technique similar to one used by machinists with their bluing (see the box on the facing page).
Because the back of the seat is beveled and has such a pronounced curve, the ends of the back rail are exposed (see the drawing on p. 49).This doesn’t provide as much support for the seat as I’d like, so I added a second rail on the inside of the back of the chair. I glued and screwed it to the inside of the back rail and made sure it’s tight and flush to that original rail. For additional strength and because the chair has no stretchers, I added corner blocks to the inside of each corner, notching the front blocks on the bandsaw to accommodate the leg corners. When screwing these blocks into place, I’m careful not to mount the blocks too high, which would interfere with the fit of the seat.
At this point, I finish-sanded the seat by hand to 600 grit. Then I screwed the seat to the chair base with two screws up through the front rail and two through the auxiliary back rail, both of them about 6 in. apart.
Preparing the Back Slats
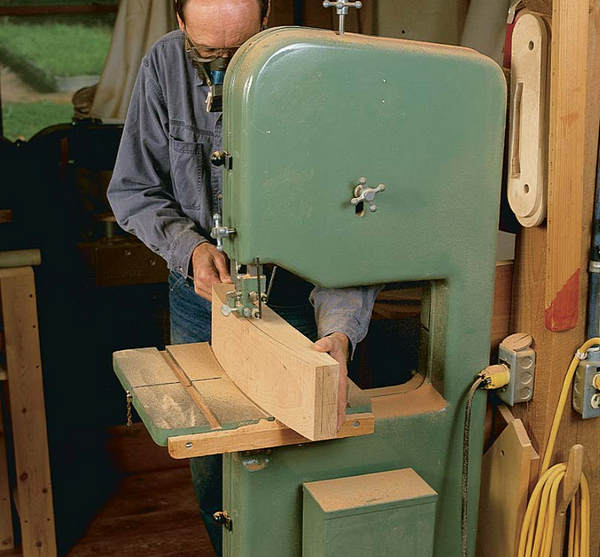
I took my pattern for the back slats from the full-size drawing, transferred the shape three times onto a piece of 18-in.-long, 5-in.-wide 12/4 stock, and bandsawed the slats out (see the bottom photo).This keeps the grain and color nearly the same on all three slats, from top to bottom. I shaped the top and bottom slats by giving them the same radius at the corners (viewed from the front) that I gave them front to back by cutting them on the bandsaw (see the drawing on p. 48). I also tapered the slats’ width from top to bottom. I set the slats on my bench and used spacers to keep the slats 1 1/8- in. apart as they will be on the chair. I marked a 1 3/4-in. taper from the top corner of the top slat down to the bottom corner of the bottom slat, bandsawed to the line and then smoothed the taper with rasp and file.
I repeated the sanding process I used on legs, rails, and seat, except that I used a pneumatic spindle sander for grits 80 through 150. A random-orbit sander will also do the job, just not as quickly. I also rounded all the edges on the front faces of the back slats at this time to make the seat more comfortable and to give the chair a softer appearance overall.
I clamped the slats to the chair temporarily with spring clamps, the top one at 36 in. from the floor, the other two with 1 1/8-in. spaces separating them. Then I marked the centers of the back legs, top to bottom, and I located the screw holes, two per slat on each leg.
I removed the slats and drilled countersunk pilot holes for the screws from the back side of the legs. Because the back slats were only 7/16 in. thick after sanding, I drilled through the leg just until 5/16 in. of the bit was showing. Then I reclamped the slats to the back legs and drilled into the slats until I felt the countersunk portion of the bit just bottom out. Finally, I glued and screwed the slats to the legs, plugged the screw holes carefully, and resanded the backs of the legs.
I used three coats of tung oil as a finish. For a final touch, I added leather pads to the bottoms of the legs to protect fine hardwood floors from being scratched by the end grain of the chair legs.

