
Big panels can be a pain. Keeping all the pieces of a tabletop flush during a glue-up can take almost every clamp in the workshop. And if that surface doesn’t end up entirely smooth, a planer won’t solve the problem. The only option then is to break out the hand planes and get ready for a workout.
There’s a simple solution I’ve found for these big panels: a reversible glue joint bit. The joint it leaves ensures the panels lock in place and remain flush. There are a couple of types of glue joint bits, but the one we’re looking at here is a reversible glue joint bit. The name comes from how the joints go together: simply flip a piece and the edge fits right into its mating joint.
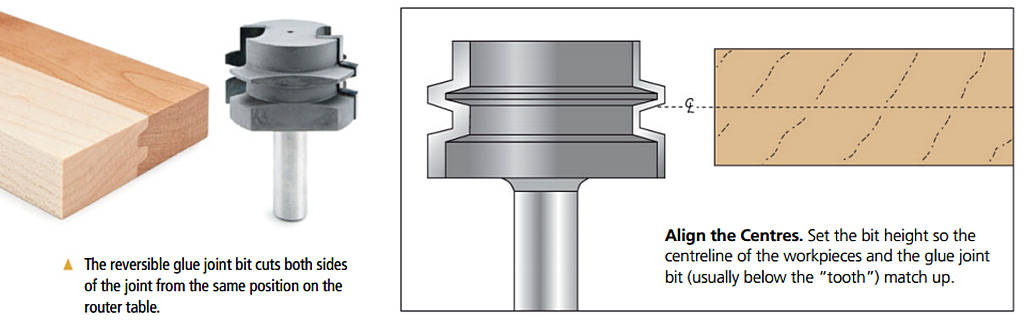
WHY USE A GLUE JOINT BIT? The glue joint bit pictured at left creates a tongue and groove on each edge. This allows it to register with the piece beside it, making it far easier to keep everything straight while gluing and clamping a panel. While I wouldn’t use this bit for every glued panel, the joints made become more helpful the bigger your panel is.
JOINT QUALITY. A reversible glue joint doesn’t add much to a panel’s strength. Glued-up panels are already quite strong when simply butting the edges together. The long fibres of wood hold firmly when glued together. It’s a common saying that the wood itself will break before the joint does. While I can’t say I’ve put this theory to the test, I’ve never seen anything to contradict it.
The glue joint bit shines when it comes to aligning joints and keeping them flush throughout a glue-up. While the initial set-up can take some work, it pays off during assembly.
 SET-UP. When getting ready to use a glue joint bit, first make sure all your pieces are planed to equal thickness. While planing your pieces, plane a few extra test pieces as well. As you’ll see on the next page, the adjustments needed can be quite minute. You could make a number of test pieces to help you dial in the bit height, or a few extra-wide ones that you can trim the edge off of if it doesn’t fit.
BIT HEIGHT. When setting up the router table, you’ll need to make sure the centreline of the bit aligns with the centreline of your pieces, as shown in the drawing above. For most reversible glue joint bits, the centre is right below the “tooth” of the cutter that forms the groove in the workpiece. Unless you’ve got luck on your side today, it’s going to take some finetuning to reach the correct height, but simply marking the centreline on the piece and eyeballing the bit height will work for now.
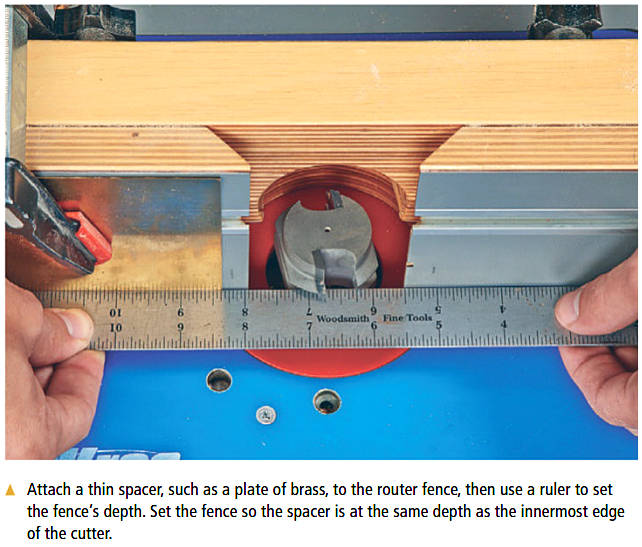
FENCE. Use a ruler to help set the fence, like you see in the photo below. The key is a spacer attached to the outfeed side of your router fence to support the piece after the waste is removed. I clamped a thin scrap of brass to the fence for this.
From here, the fence should be set so the spacer sits flush with the innermost edge of the cutter on the bit. This will be where the tongue is cut on the workpiece. Setting these to match ensures the spacer catches the workpiece and prevents it from sniping at the end of the cut.
KEEPING STRAIGHT. When using a glue joint bit, I recommend you cut the joints and glue up the panel right after sizing and planing the pieces. I usually find myself working with long pieces when using these joints, as even a little warping can keep the joints from lining up with each other.
On the flip side, the glue-jointed edges will pull together easily once they do line up. The angles of the tongues and grooves that the bit makes slide in place with each other as they’re clamped, pulling them into alignment. This saves a lot of clamps, as you’ll no longer need one on each mating edge to keep the panel flush.
ROUTING. Now it’s time to rout. Start with the test pieces, marking out their centrelines and setting the router bit accordingly. Mark the test pieces so you’ll know how the bit needs adjusting, then cut them. Now check the fit and flip to the next page to finetune the joint.
FINDING THE HEIGHT
 Now the real work of using a reversible glue joint bit starts. You may go through a number of test pieces while you find the perfect fit, but once you’ve routed a good joint, remember to keep the pieces.
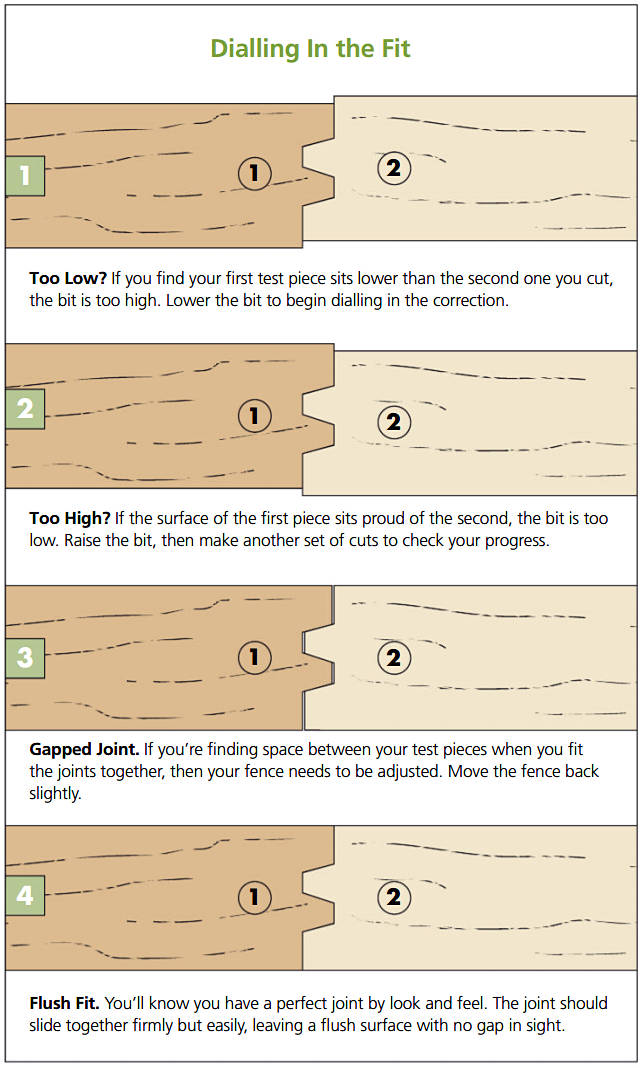
DIAGNOSIS. The first step is to see how the joint fits. You can see my marking system at right, and it’s pretty simple. I mark the first edge I cut as 1, then I mark the second edge as 2, knowing it needs to be flipped to fit with the first. By fitting the two test pieces together and using the illustration, you can see how to “dial in” the fit. As I mentioned before, make small adjustments when setting the height. Since the pieces reverse to fit together, any adjustment you make is effectively doubled.
LOWER THE BIT. In Figure 1 in the drawings at right, the first piece cut sits lower than the second one. This means the bit is too high. Lower the bit slightly, then make another set of test cuts.
Remember how far you turned the crank, and compare it to how much the offset was adjusted. This is a good way to begin gauging how to adjust the router bit. Paying attention to this will make your subsequent adjustments go quicker.
RAISING THE BIT. If you find the first piece sits higher than the second, then you face the opposite problem: the bit is too low. Raise the bit slightly and make another set of test cuts. EX) the same as with lowering the bit, paying attention to how far each adjustment moves the joint on each piece.
ADJUSTING THE FENCE. If there’s a gap between the tongues and grooves (as you can see in Figure 3 above), then the fence is set too deep and the bit isn’t making a full depth cut. Move the fence back slightly, using the ruler as shown onlpage 231
SNIPE. On the flip side, you may find that some pieces have a bit of “snipe” on the back end, as you might find when using a planer. You’ll certainly hear and feel if it happens. This means the fence is too far back, causing the piece to move at the end of the cut. In this case, move the fence forward.
When you adjust the fence, be sure the bit is turned so the cutter is as far forward as it can go. Making sure the cutter and shim are aligned exactly is key to positioning the fence properly.
A PERFECT FIT. You’ll know you have the perfect fit when the pieces fit flush together, with no gap on the surface or in the joint. Because of the angle on the tongues and grooves, the pieces should slide easily into each other. Set the test pieces aside for future reference and get ready to rout.
ROUTING FOR REAL
Now the actual pieces can be cut. Chances are you’ll be gluing up a number of boards at once, and there’s a bit of strategy required here. Because this glue joint mates with its reverse, each inside piece will be flipped after cutting the first side, while the end pieces will only have their inner edges routed. You can see this illustrated at right.
To be sure I’m routing and assembling the pieces as intended, I mark the edges the same way I marked the test pieces: one for the first side, two for the flipped side. I also letter the pieces to be sure the interior ones don’t get mixed up.
THE GLUE-UP. Once all pieces have been routed, it’s time for the glue-up. You’ll find the gluing goes much smoother with these routed edges than with simple jointed edges. Apply a thin layer of glue over the tongues and grooves of each edge. As for clamps, you’ll only need them to pull the far ends together. Because of the angle on the tongues and in the grooves, clamping at the ends will force the boards to sit flush, so no clamps are needed to keep the assembly aligned.
After the glue-up, the surface should be flat (except for squeezeout). Remove any excess glue and sand the surface for a perfectly smooth panel.
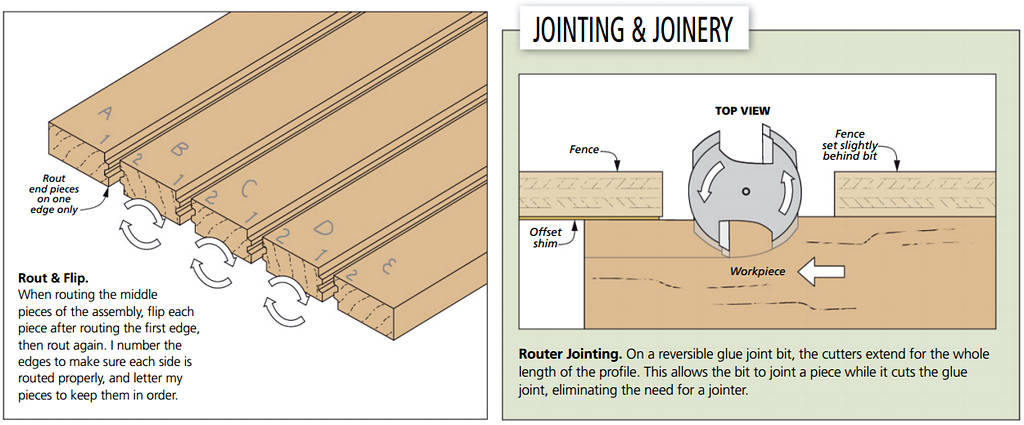
THE “JOINT” IN GLUE JOINT. One nice thing about reversible glue joint bits is that when preparing the actual pieces, there’s no need to joint an edge before you rout it. Because the cutter covers the whole length of the bit, it will joint the piece while it cuts the profile. While I would reserve this for straighter, cleaner stock rather than rough timber, this does make these glue joint bits particularly useful for woodworkers still building their tool collection, allowing them to make panels without needing to have a jointer available.
While you probably won’t be using a reversible glue joint bit for every workshop session, it can be a handy bit to have in your arsenal. After dialling in the height, the bit simplifies large glue-ups and minimises the amount of clamps needed (along with the stress of getting everything in place before the glue sets). When a planer isn’t going to be an option, having a way to ensure the panels stay smooth can be a godsend.
Using the right tool for a job makes a big difference in the quality of a project. The router is a fantastic tool for the number of jobs it can perform — if you have the right bits. The reversible glue joint bit is a handy tool for tricky glue-ups, and that earns it a place in my workshop.