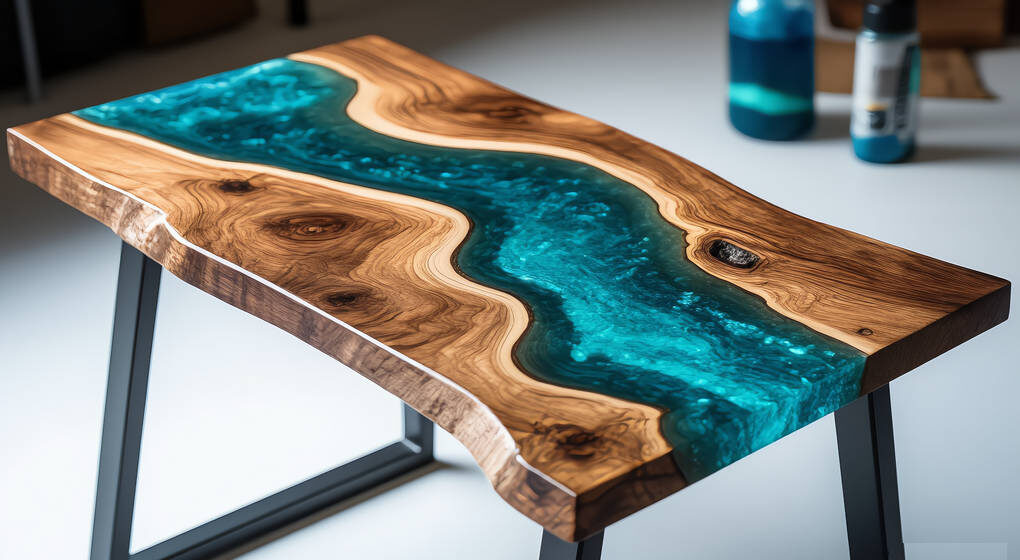
Why River Tables Captivate Woodworkers
River tables blend natural wood’s organic beauty with epoxy resin’s liquid illusion, creating functional art pieces that dominate modern interiors. This unique furniture style transforms defects like cracks and voids into stunning design features. As master craftsman David Marks notes: “Epoxy doesn’t repair wood – it reveals its hidden story.” From coffee tables to conference desks, these pieces combine craftsmanship with artistic expression.
Essential River Table Supplies Checklist
Successful projects begin with proper materials. Here’s your comprehensive shopping list:
| Category | Essential Items | Recommended Brands |
|---|---|---|
| Wood Selection | Live-edge slabs (1.5-2″ thick), kiln-dried (8-10% moisture) | Black walnut, spalted maple, oak |
| Epoxy Resin | Deep-pour UV-resistant resin, pigments, mixing tools | ProMarine, Ecopoxy, Liquid Glass |
| Mold Building | Melamine boards, silicone caulk, mold release spray | Titebond III, Everbuild |
| Tools | Router, orbital sander, bubble torch, clamps, level | DeWalt, Makita |
| Finishing | Sandpaper (120-3000 grit), polishing compound, food-safe oil | Mirka, Osmo Polyx |
Budget Tip: Beginner kits like “River Table Pro Kit” include pre-measured epoxy, pigments, and mold supplies.
Step-by-Step River Table Construction
Wood Preparation & Stabilization
Start by inspecting slabs for stability. Fill cracks with thick epoxy mixed with sawdust. Sand progressively (80→120→220 grit) ensuring flat mating surfaces. Seal end grain with anchor seal to prevent air bubbles from compromising your pour. Allow 24-hour curing for deep cracks.
Building the Perfect River Table Mold
Construct your form on a perfectly level surface – use a machinist’s level for precision. Assemble melamine boards 2″ wider than your slab arrangement. Seal joints with silicone caulk and apply mold release spray. Pro tip: Create a “test mold” with scrap wood to check for leaks before the main pour.
Epoxy Mixing & Pouring Masterclass
Combine resin and hardener at manufacturer’s specified ratio (typically 2:1 or 1:1). Mix slowly for 5 minutes using double-container method to prevent overheating. Add pigments gradually – mica powders shouldn’t exceed 5% volume. Pour initial 0.5″ layer to seal the riverbed. Remove bubbles with torch passes 6-8″ above surface every 20 minutes for first 2 hours.
Curing & Demolding Process
Cover project with dust-free enclosure for 72-hour cure. Test readiness by pressing a coin into hidden area – no indentation indicates full cure. Remove mold walls with rubber mallet. Trim excess resin with flush-trim router bit using carbide blade.
Professional Finishing Techniques
Begin sanding at 120 grit, progressing through 220, 400, 800, 1500, and 3000. Employ wet-sanding beyond 800 grit to prevent heat damage. For glass-like clarity, polish with three-step automotive compound system. Enhance wood grain with oil/wax hybrid finishes. Final step: Apply UV-resistant clear coat for outdoor pieces.
Creative River Table Design Inspirations
- Glowing Rivers: Embed LED strips between pour layers with remote controls
- Geode Tables: Combine amethyst chips and metallic pigments
- Coastal Themes: Incorporate seashells and turquoise pigments
- Floating Effect: Use acrylic legs with embedded wood fragments
- Terrazzo Style: Mix crushed glass or stone into clear resin
Pro Tip: Create sample boards testing 3-4 color combinations before full-scale projects.
Troubleshooting Common DIY Issues
| Problem | Causes | Solutions |
|---|---|---|
| Sticky Resin | Incorrect ratio, low temperature | 24-hour 90°F “post-cure”, surface wipe with acetone |
| Cloudy Epoxy | Moisture contamination, over-sanding | Light sanding to 800 grit + thin clear coat |
| Wood Float | Insufficient weighting | Use granite weights during first 3 hours |
| Cracks | Wood moisture >10%, thick pours | Max 1″ layers, pre-dry wood to 8% |
| Yellowing | UV exposure, low-quality resin | UV-resistant epoxy, automotive clear coat |
Frequently Asked Questions
Q: What’s the maximum pour depth per layer?
A: 1″ for deep-pour epoxy, 0.25″ for standard resin. Thicker pours generate excessive heat.
Q: Can I use regular resin instead of deep-pour?
A: Not recommended – standard resin cures too quickly, trapping bubbles and cracking.
Q: How much epoxy for a 48″ dining table?
A: Calculation: (Length x Width x Depth) x 1.2. Example: 48x30x2″ river = (48*30*2)x1.2 = 3,456 oz (27 gallons).
Q: How to prevent bubbles around wood edges?
A: Seal wood with thin epoxy layer before main pour. Use pressure pot for bubble-free results.
Q: What wood species work best?
A: Stable hardwoods: walnut, maple, cherry. Avoid pine (too resinous) or teak (natural oils).
Related Woodworking Projects
Epoxy Countertops
Kitchen surfaces using similar techniques with food-safe finishes
Resin Art Panels
Wall art combining pigments, wood slices, and metallic leaf
Live Edge Furniture
Benches, shelves, and desks featuring natural wood edges
Hybrid Metal-Wood Tables
Industrial designs combining steel frames with resin rivers
Conclusion: Your Journey to Resin Mastery
Creating stunning river tables combines meticulous preparation with creative experimentation. Remember these core principles: quality materials (especially moisture-stable wood and deep-pour epoxy), temperature control, and patience during curing account for 90% of success. Start with small projects like serving trays before advancing to large tables. Document your process – each project teaches valuable lessons. Share your creations using #RiverTableMasters and join online communities