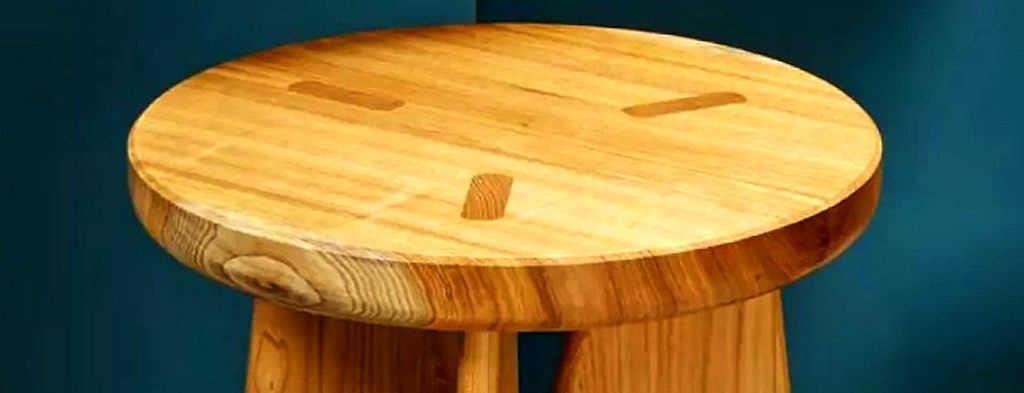
Ten pieces of wood are all it takes to make this sturdy piece of shop furniture.
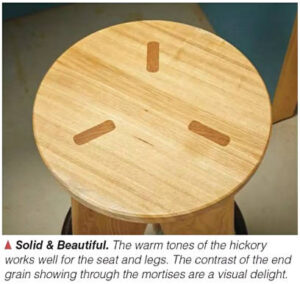 As fun as it is to while away the hours in the shop, it’s a good idea to take a break now and then. And although my partner loves the projects that come out of the shop, she’ll give me the stink-eye if I show up in the house covered in dust and sweat. I don’t blame her.
So one way to bridge the divide was to come up with a resting spot in the shop that’s comfortable (but not so much that I’d end up looking for a remote and a libation) and doesn’t take up much space. The stool you see here rings the bell in all categories. It’s tall enough that you can work comfortably at the bench and stretch your legs at the same time, yet sturdy enough to take the occasional unintended abuse.
And really — who are we kidding — this stool is nice enough to take up residence in just about any place in your home as well as the shop. So look out, this project might end up in the house and you’ll be back in a lawn chair.
Start with a stable Tripod
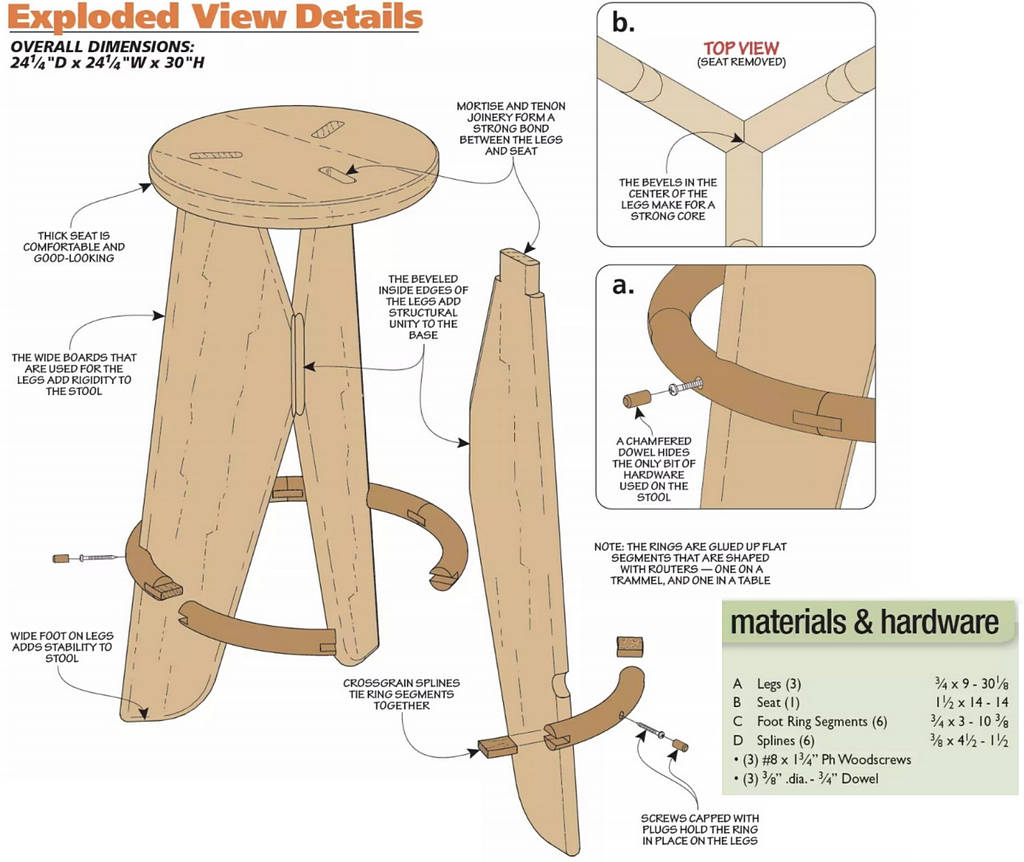
You might find material wide enough for each of the legs. If not, you’ll need to spend some time gluing up three blanks to create the width you see in the drawing above. When the clamps are packed away, cut the three blanks to their final size. The game plan is to complete the profile of one of the legs following the pattern shown to the left, then use it as a template on the remaining two. That being said, there are two operations you can do to all three blanks beforehand — the bevel on the inside edge (Figure la and b), and the body of the tenon on the top (Figure 1a).
BEVEL FIRST. Cut the bevel at the table saw using the rip fence. Sneak up on the center of the bevel (Figure 1c).
Normally you would make the mortises first and fit the tenons to them. Here, since the tenons are a unit that’s joined in the center with the bevels, it proved easier to reverse the process. You’ll cut the tenons first and use the clamped up leg assembly to lay out the location of the mortises.
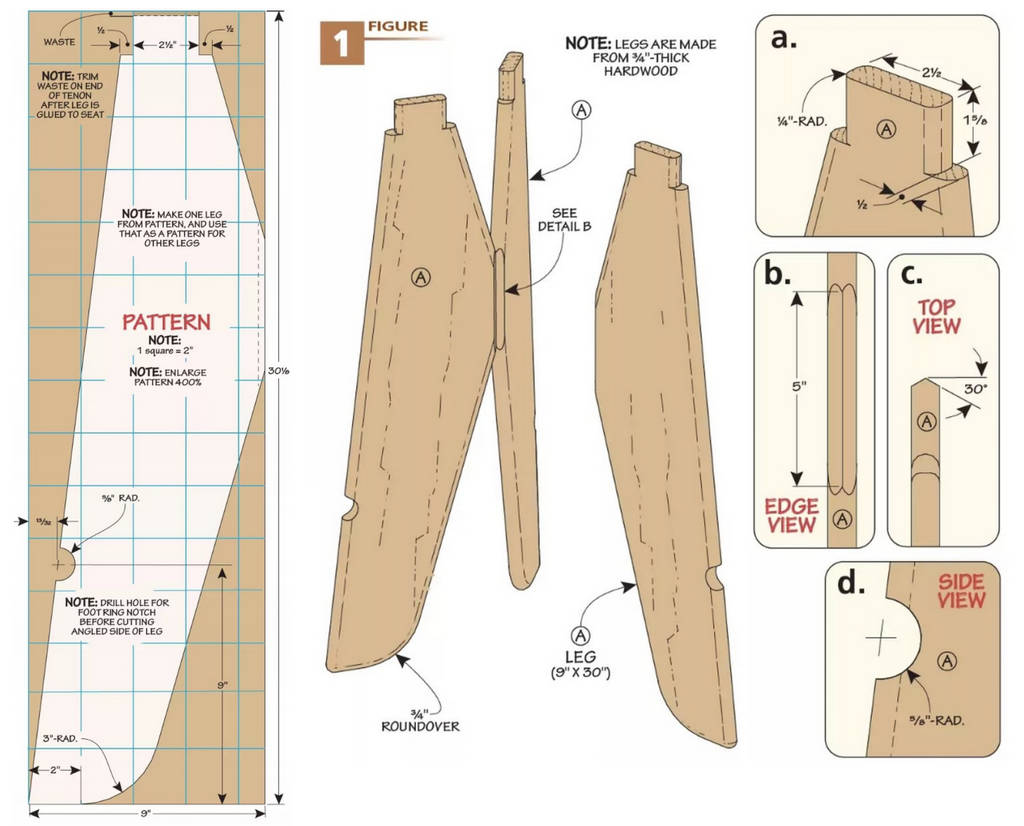
TENONS. Stand the legs on end to cut the edges of the tenons. Support the legs with an auxiliary fence attached to your miter gauge. As for defining the shoulders, a hand saw at the bench does the job nicely. Wait on shaping the corners of the tenons until the mortises in the seat are done. There’s one more thing to mention about the tenons: if you want them to be perfectly flush with the seat, you’ll need to leave them a little longer, like we’re showing in Figure 1a. Then you can shave and sand them flush to the seat.
Now you can focus on the profile of the leg with one of the partially finished blanks. After laying out, or tracing the angles on the blank, the first thing to do is drill the hole for the foot ring at the drill press (Figure 1d). Using a Forstner bit and a sacrificial board underneath the blank will make for a clean hole.
ANGLED CUTS. The band saw is the tool of choice for the angled cuts — along with the radius on the inside corner of the legs. Remove the blade marks and smooth the edges with whatever method works for you.
Now you can trace the profile of the finished leg onto the remaining leg blanks. Then repeat the shaping process, starting with the foot ring holes.
The roundover on the edges of the legs that you see in Figure 1 and details above are next on the to-do list.
The smaller radius on the tenons will be done after the template for the seat is made, let’s head that way now.
The Seat
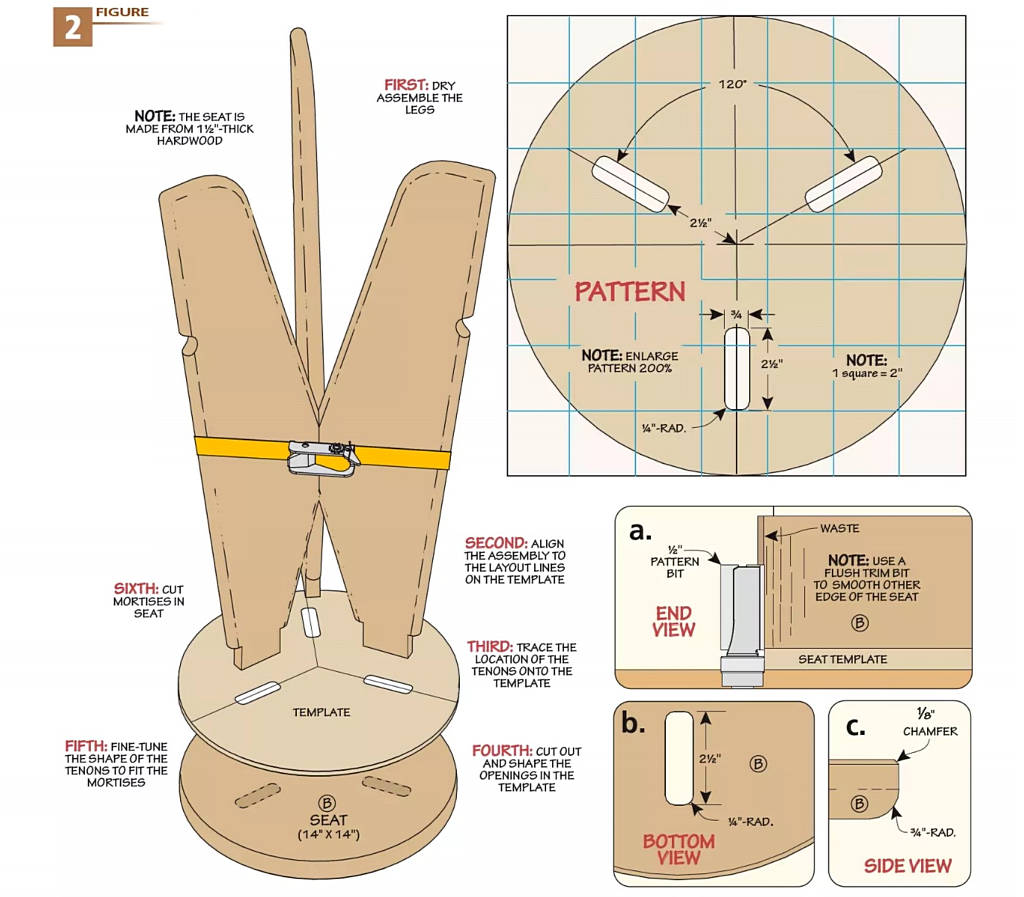
The seat, like the legs, is made of hickory blanks (thicker than the legs though)that are glued up to the width needed. A hardboard template (Figure 2) will help you shape the contour of the seat. It will also guide you in making the mortises for the leg tenons. Let’s look at the mortises for a moment.
In a perfect world the mortise locations you see in the pattern detail will line up exactly with the tenons on the leg assembly. While we’re waiting for that perfect world, you might want to consider locating the mortises in the template using the legs dry assembled as a guide. Figure 2 below walks you through the steps.
A band clamp is the ideal tool to hold the legs together for this task. Next, line the legs up to the mortise center lines on the template. Trace the tenon locations on the template with a sharp pencil. Then you can cut out the mortise openings in the template, shaping the comers at the same time. Now set the template on top of the legs and trace the mortise profile on the ends of the tenons. Rasps and files are the tools of choice to round over the tenons.
SHAPE THE SEAT. First, trace the template profile and mortise openings on the seat blank and rough out the shape to the waste side of the line at the band saw. Drill out most of the waste in the mortises as well. Attach the template to the seat with double-sided tape. Use a pattern bit at the router table to make the final seat shape (Figure 2a).
There’s a little cosmetic work needed to finish out the top. Start by routing the large roundover on the underside of the seat. Also, ease tire top edge with a chamfer bit (Figure 2c). Before we glue the legs and seat together there’s a segmented ring that needs to be made, that’s next on the agenda.
Crafting the Foot Ring
The foot ring is the last piece to make before assembling the stool. Figure 3 above shows you the raw anatomy of the ring and the two parts it’s comprised of — a ring segment that is beveled and slotted on the ends, and splines that join the segments.
Both parts are made of strong and durable ash (the same material that’s used for baseball bats) so it won’t take the abuse that comes its way personal. But it’s the grain direction of the two parts that put the ring’s strength over the top. The long-grain strength of the beveled segments combined with the crossgrain structure of the splines all but eliminates the weak short-grain sections at the tips of the segments. You’ll spend a little time at the table saw making these parts.
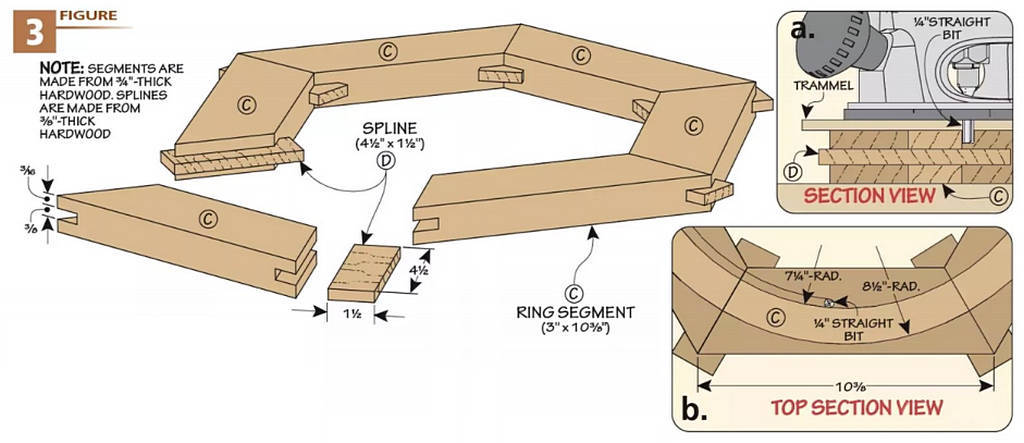
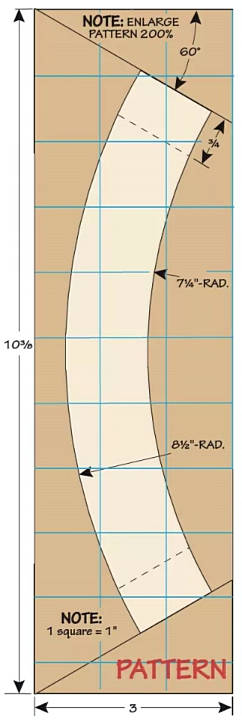
SEGMENTS FIRST. After ripping the segments to width cut each piece extra-long. Adjust your miter gauge to 30° and attach an auxiliary fence to it with screws. You want all the segments to be identical in length, to do this, lay out and cut the angles on one of the segments. Hold the segment to the gauge and against the blade, then clamp a stop block on the other end of the auxiliary fence. With that you’re set up to cut the other five segments.
 Next is the slots for the splines. The set up for this is fairly simple — a 3/8″ dado set in your table saw along with your rip fence. The angled sides of the segments are long enough that they don’t need any support when cutting the slots. But if you’re not comfortable with that, you can use a backer board to support the piece while making the cut.
CROSSGRAIN SPLINES. As I mentioned earlier, you’re going to make the splines with the grain running perpendicular to the slots. This is a much stronger than a long grain spline.
Start with a blank that’s wider than the length of the slots and long enough to safely cut a spline out of each end of the board (5″-6″ should be fine, three blanks will yield all the splines you need). Using a zero-clearance insert in your saw, set the rip fence so it leaves you with a spline that’s the proper thickness (3/8″ in this case), and raise the blade high enough to match the length of the slots. Adjust the rip fence and lay the board flat with the splines to the outside of the blade to cut them free. The spline should fit snugly in the slot — since you’ll see the ends between the ring segments you don’t want a loose fit.
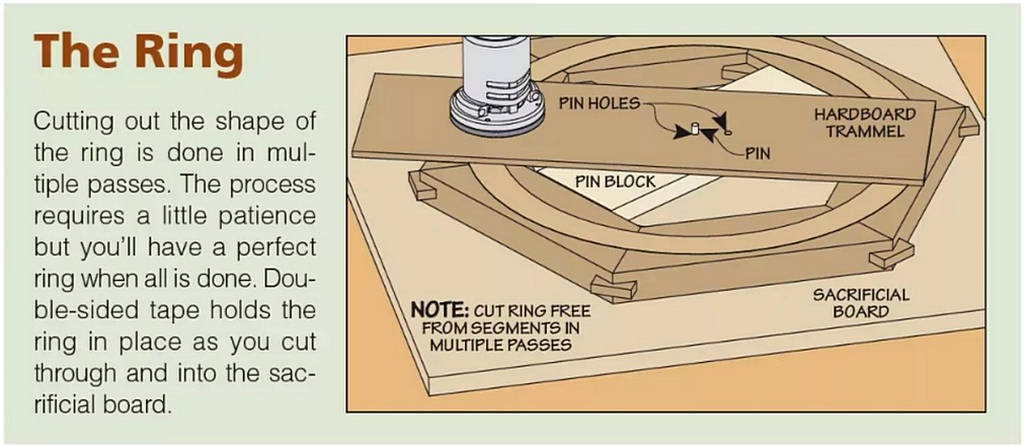
To glue up the foot ring, use epoxy and a band clamp. After the assembly has cured you can turn your attention to bring the ring to its final shape. A trammel is in order for this step.
TRAMMEL TIME. A piece of hardboard for the trammel is all that you need for this jig. Drill mounting holes for your router and attach it to the base. Drill the holes at the opposite end that will define the inner and outer edges of the foot ring (Figure 3b). Stick the ring down with double-sided tape to a sacrificial board that has a center block and pin to guide the trammel. It’s best to make multiple 14″-deep passes on the ring. When the ring is free of the blank, head over to the router table and round over the edges (Figure 5b). Since the ring is finished with Old Masters Carbon Black (and lacquered) to create a nice contrast at the base of the stool, do that now. Then you can assemble the stool.
ASSEMBLY
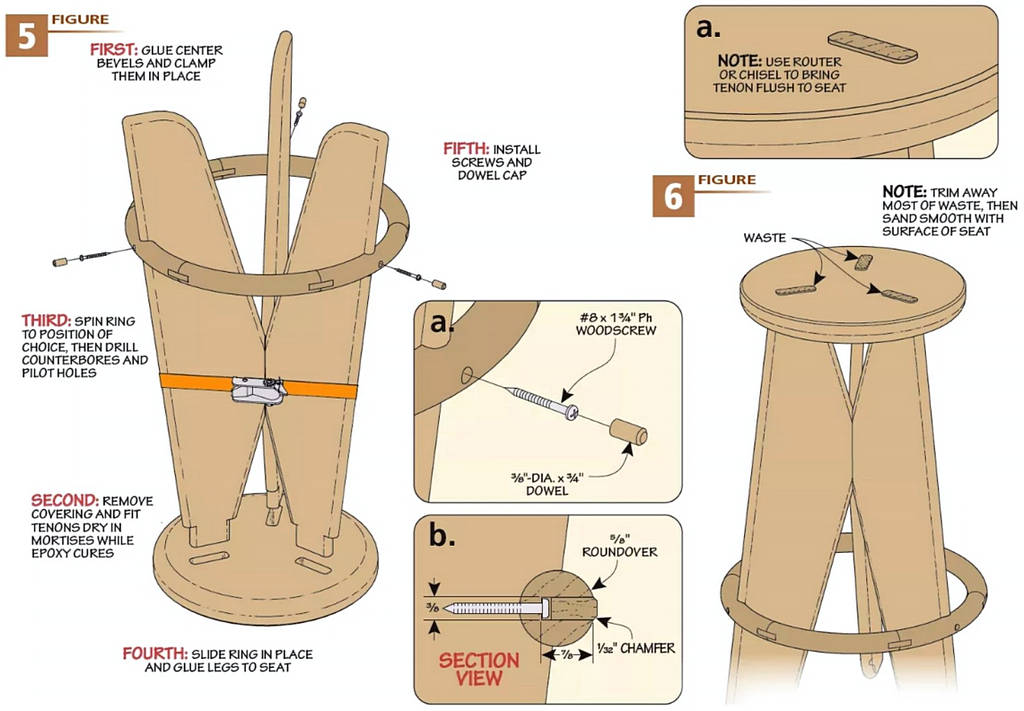
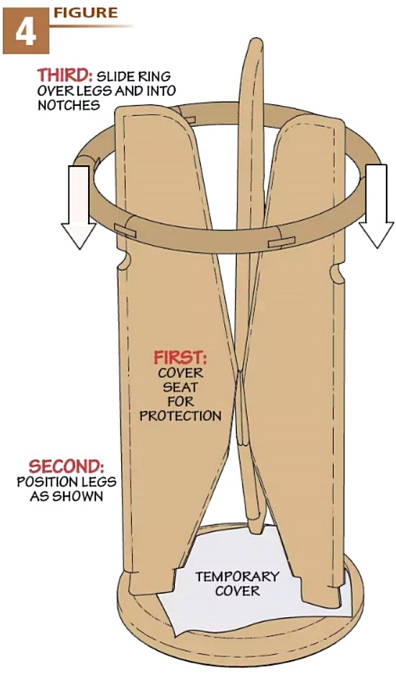 On this page the three figures and their details walks you through assembling the stool. Here I’ll expand on the process a little more. First, it would be wise to call in a friend to help maneuver the legs and foot ring during this stage. The temporary cover you see in Figure 4 protects the seat while you’re maneuvering and gluing the legs.
Apply epoxy to the beveled surfaces of the three legs. With the help of said friend, turn the legs together and lower the tenons into the mortises (dry for now) while holding the foot ring in the grooves. Clamp the center with a band clamp and let cure (Figure 5). Once cured, drill countersunk pilot holes. A chamfered dowel that’s left proud of the surface of the foot ring adds a nice visual contrast. (Figure 5a and b).
Finally, flip the stool upright and remove the seat. Apply epoxy to the seat and the tenons, then clamp the two together. After the joints have cured, cut the tenons flush and sand smooth (Figure 6a). Two coats of lacquer are all that’s needed to protect the stool.
