John Bullar performs a woodwork miracle with this intriguing joint.
How does this joint fit together? With a fully interlocked dovetail visible on each of its four sides, it certainly is a puzzle! Functionally, this strong joint splices the ends of two short square posts together into a longer post that might, for example, form the leg of an eye-catching coffee table.
The secret to the way the joint works is in the final stages where the joined-up post is reshaped with a plane, slicing obliquely through a straightforward pair of twin dovetails. All will be revealed!
Preparation
1. Start by selecting two woods in contrasting colours, so the details of the finished joint are clearly visible. 1 used dark walnut and pale elm – both woods that cut crisply and form strong joints. Cut the wood into square sections, just over 40% bigger than you want the final post to end up. This allows for the final re-shaping.
2. For accurate joinery work, you need straight, flat reference surfaces. I enjoy this stage, getting the feel of the wood with a sharp, finely adjusted plane. From bitter experience, I know that good preparation at the start of the job saves a lot of sweat and tears later on!
3. As well as each surface being straight and flat, they all need to be accurately square against their neighbours. Use a try-square to check this at each end of the wood. Position a light behind to reveal any glimmer of a gap between the wood and the square.

Marking the joint
4. Choose which piece of wood is going to carry the tails. Mark the end with a fine pencil, dividing the face in half, then in half again to locate the centres of the twin tails. On either side of each centre, mark out the width of a tail. Use a try-square to mark a shoulder line at the base of the tails.
5. If you use a bevel gauge to mark the sides of the tails as I did, set it to an angle so the width to length forms a ratio of around 1:8. This may sound a shallow angle compared to normal dovetail sides, but you will see later that the final stage of this joint slices obliquely through the tails, widening their appearance. I chose long, slim, tail dimensions to allow for this.
6. Mark the tail sides against the bevel gauge using a fine pencil. There is no need to use knife lines at this stage, because the exact shape and position of the tail sides is not critical.

Bandsaw work
7. A bandsaw is ideal for cutting joints like this, although you could use a dovetail saw or a small tenon saw. The sides of the joint must be cut square to the faces, so the bandsaw blade must be precisely at right-angles to the table. If need be, trim the level adjustment on the bandsaw table before making any cuts.
8. Saw the sides of the twin tails to follow the angled pencil lines. Remember that the kerf, or slot made by the sawblade, is wider than the pencil line. This means that the blade should run down the waste side, attempting to leave half the pencil line behind.
9. I also cut the shoulders of the tails on the bandsaw very slowly and carefully. These are probably the most critical part of the joint – any unevenness here will convert straight into gaps in the finished joint, or else stop it closing properly.

Between the tails
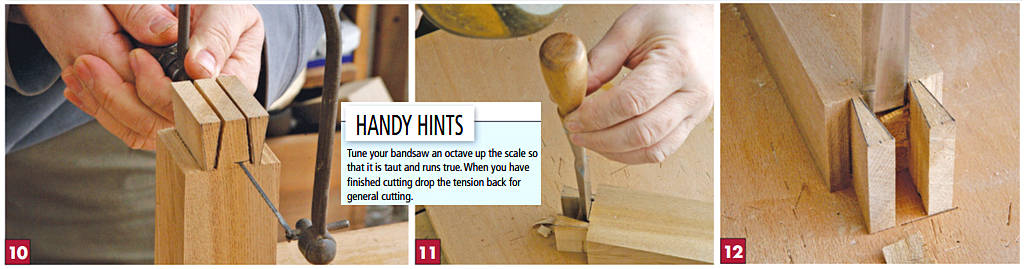
10. I used a coping saw to cut a socket between the twin tails. You could use any small frame saw, a fretsaw or an electric scrollsaw if you have the use of one. Keep the saw cut a couple of millimetres clear of the shoulder line.
11. Use a bevel-edged chisel to chop the socket back towards the line. Choose the widest chisel you can find that fits the space so it practically cuts the full width. Make sure the edge is razor sharp.
12. When I am chopping sockets like this, I like to leave the last half millimetre. Finally, I chop this back in one go or pare it back with hand pressure on the chisel handle for a really clean edge.
Marking the sockets
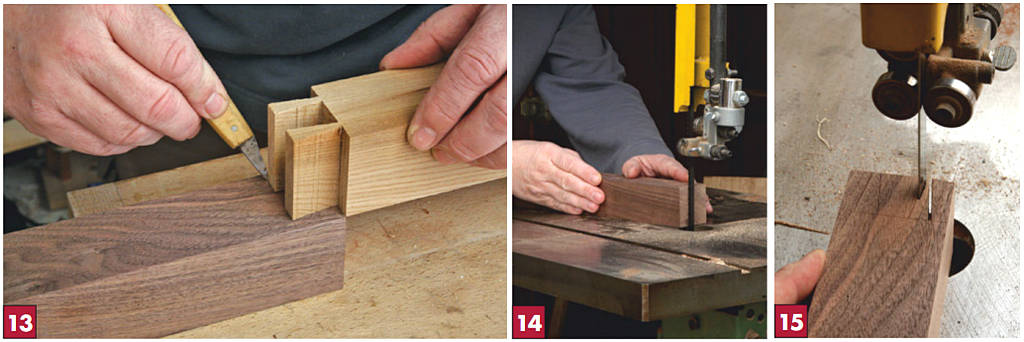
13. Take the wood with the newly cut tails and, supporting the far end on a piece of scrap, lay the tails on top of the second piece of wood. Ensure that both pieces are precisely in line, ready to mark around the tails. Use a marking knife with a sharp pointed blade to reach into the gap, and mark all around each tail.
14. Back on the bandsaw, the sides of each socket need to be very carefully cut. Use good lighting and position yourself for a clear view of the blade. While the exact shape and size of the tails didn’t matter too much, the sockets must exactly match the outline of the tails so there will be no gaps in the finished joint.
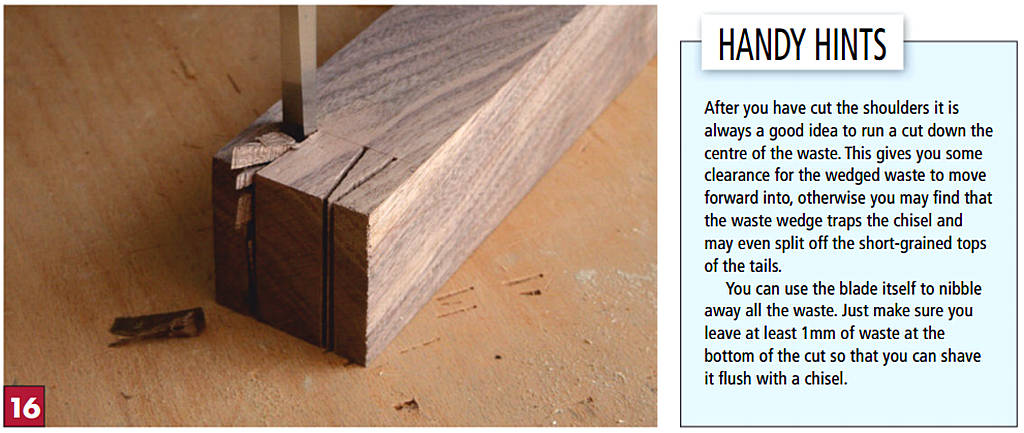
15. The bandsaw blade must run along the waste side of the knife line, so that the kerf formed by the blade just butts up against the line. Stop on or just before the shoulder line, so there is no risk of overshooting.
16. Because these sockets are narrow – half the width of the socket between the twin tails – I decided they did not need to be sawn out. A narrow bevel-edged chisel chopped out each socket with a few mallet blows on each side. As before, I left half a millimetre to be carefully pared back to the line.
Fitting the joint
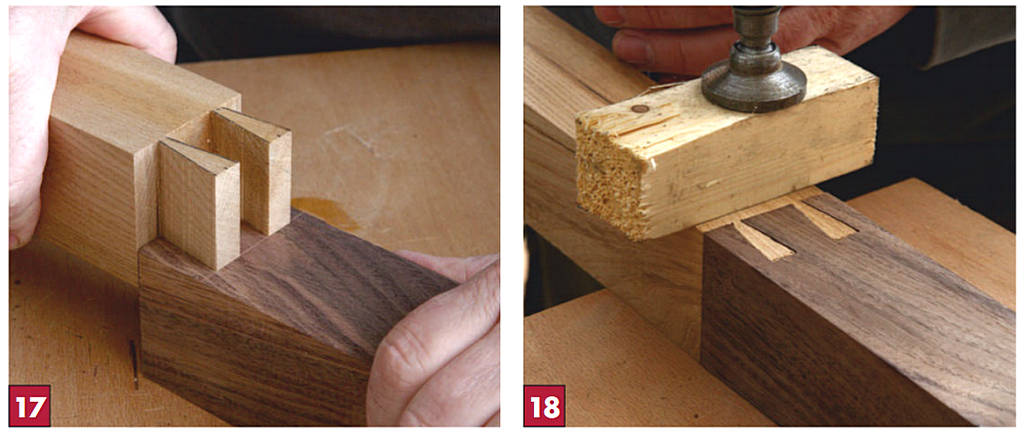
17. The moment of truth comes when you first try to engage the twin tails in the twin sockets. Don’t be worried if they will not slide straight in – in fact if they do, they are probably too loose. It is quite common to need to trim a joint for a good, firm fit.
18. Only partially engage the joint for a trial fit – pushing it too far may cause it to break as you try to pull it apart. Once you are satisfied that the joint is going to fit, glue it up and use a clamp or a vice to finally pull it together.
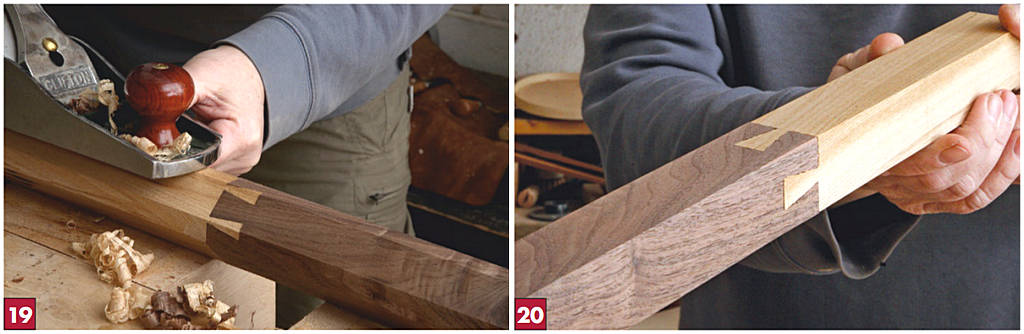
Re-shaping the post
19. The trick now is to turn this twin dovetail into a puzzle joint. The joined-up post needs to be planed at 45°, removing a large number of shavings from each corner. Keep going until you convert each of the corners into a new face. At the same time, each of the old faces will be reduced in width until it forms a new corner.
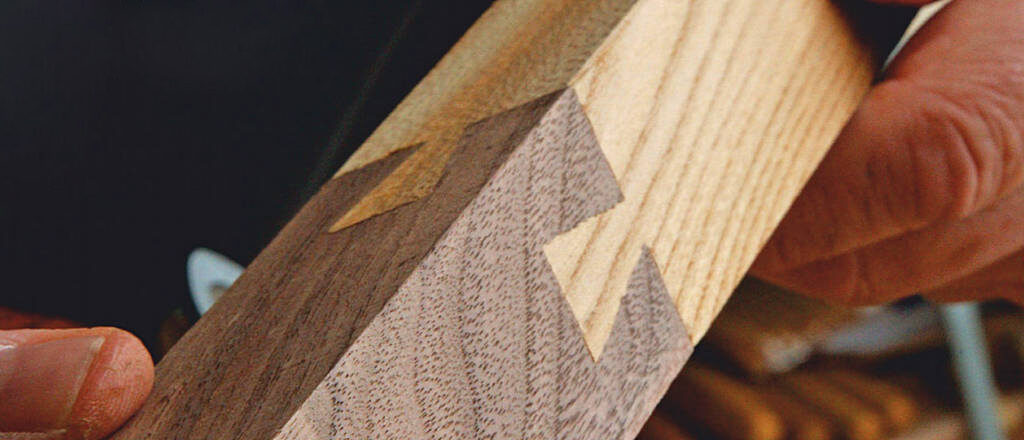
20. The job is finished when each new face of the joined-up post is equal in width, and each new corner is straight and even. Instead of showing twin dovetails, the newly angled surfaces now display a single tail on each face. You can challenge anyone to work out how this strong spliced joint fits together!