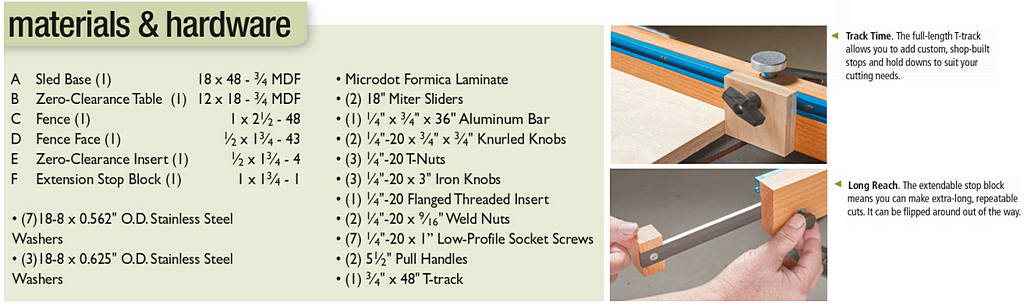
There’s a persistent idea in woodworking that bigger is better. We need the most powerful saw motor, the largest slabs, the widest jointer. Now normally I don’t exactly follow that notion, but I’ve learned in some situations bigger actually is better. It’s how you go about that size that makes the real difference.
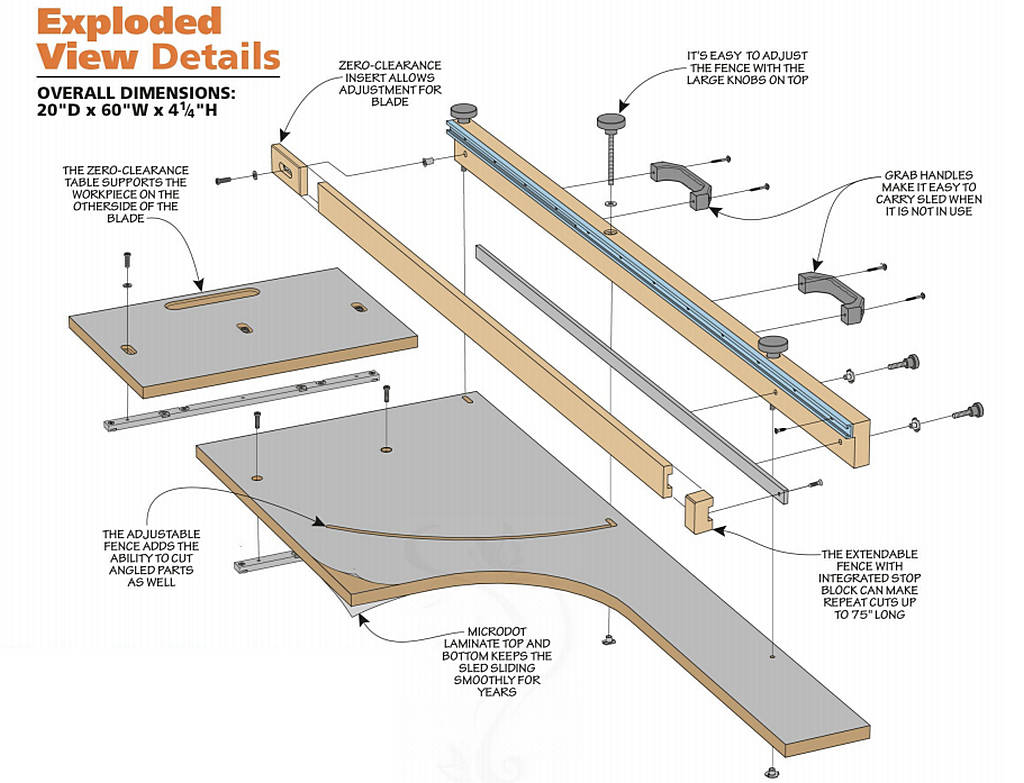
 This table saw sled is a good example of that philosophy. It’s not the largest in every dimension, but it’s bigger where it counts — that is to say, fully supporting all size of workpieces on your table saw.
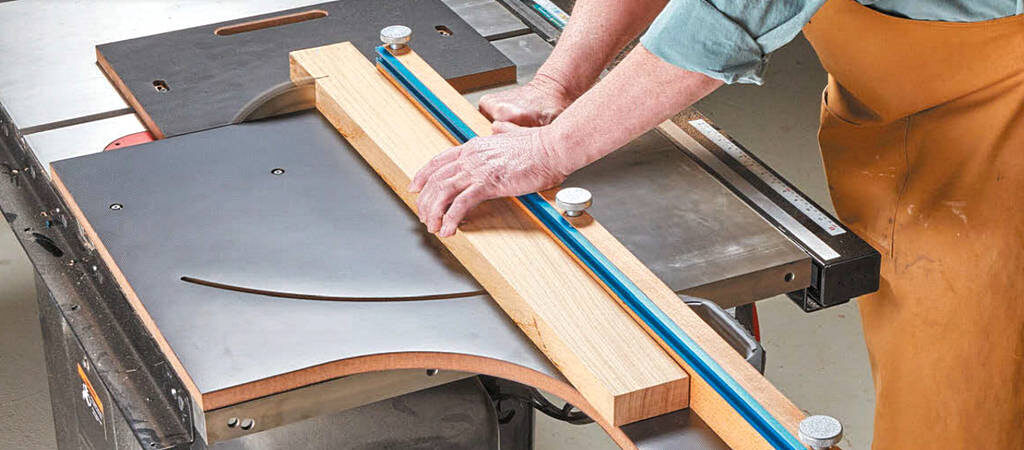
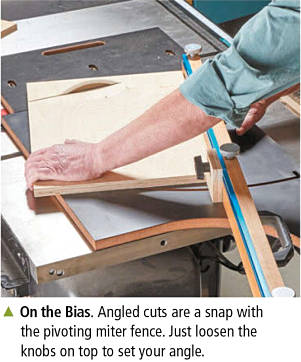
There’s more to a good sled than just size though. Which is why this one features a pivoting fence, adjustable stop blocks, a T-track for accessories, and a zero-clearance auxiliary table, just to name a few.
The base sled itself is designed to take plenty of abuse over time and still remain square. MDF construction means that you don’t have to worry about grain direction, and should have little issue with seasonal expansion and contraction. The top and bottom of the sled are covered in Micro-Dot laminate to protect the sled and help it slide easily on your table saw surface. Once you use a sled like this, you’ll wonder how you got by using a dinky miter gauge for so long.
Smooth Surface, Strong Core
With a sled of this size, the accuracy of each part is paramount — a small deviation can throw everything out of square on a much larger scale. With that in mind, choosing a solid core material is the first step towards accurate results. While you could use a good sheet of plywood, MDF is going to be the most stable option to work with.
LAMINATION. With your core sheet chosen, it’s time to apply the laminate to the top and bottom of the sled. The sheet should be oversized and trimmed to fit afterwards. You want a strong, permanent adhesive like contact cement for this, and your standard yellow wood glue isn’t going to work in this application.
Make sure both surfaces are free from sawdust and apply a thin layer of adhesive to each. Allow the contact adhesive to set up, so it won’t peel off during assembly. Use spacers to suspend the laminate over the MDF. Starting at the center remove the spacers one by one and use a rubber roller to apply pressure. With one side complete, flip the workpiece over and glue the laminate to the opposite side. Trim to size with a flush trim bit.
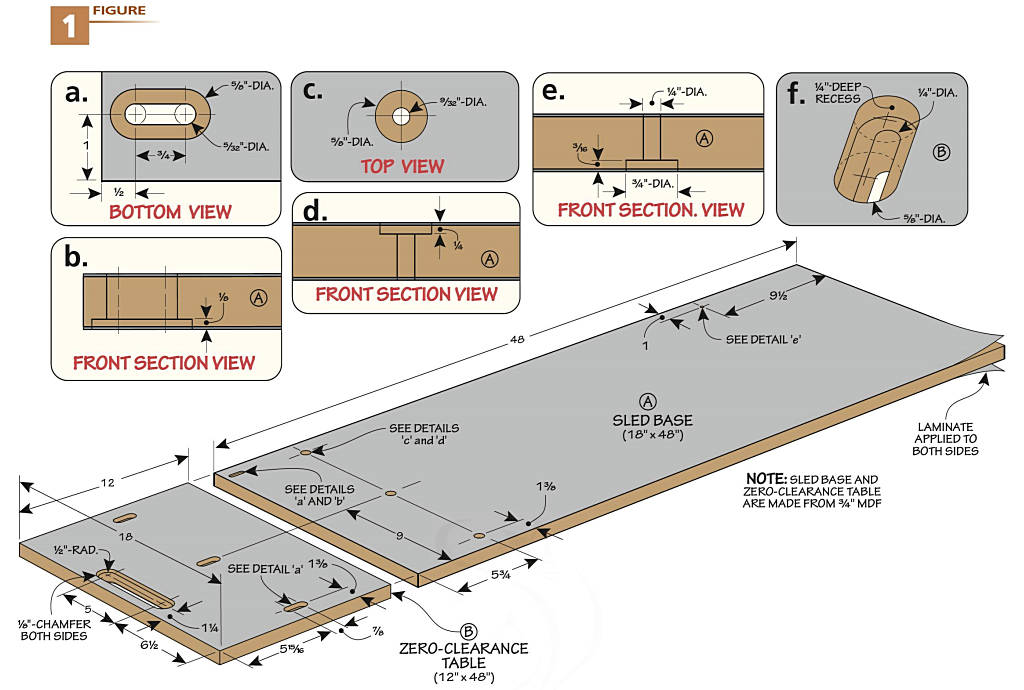
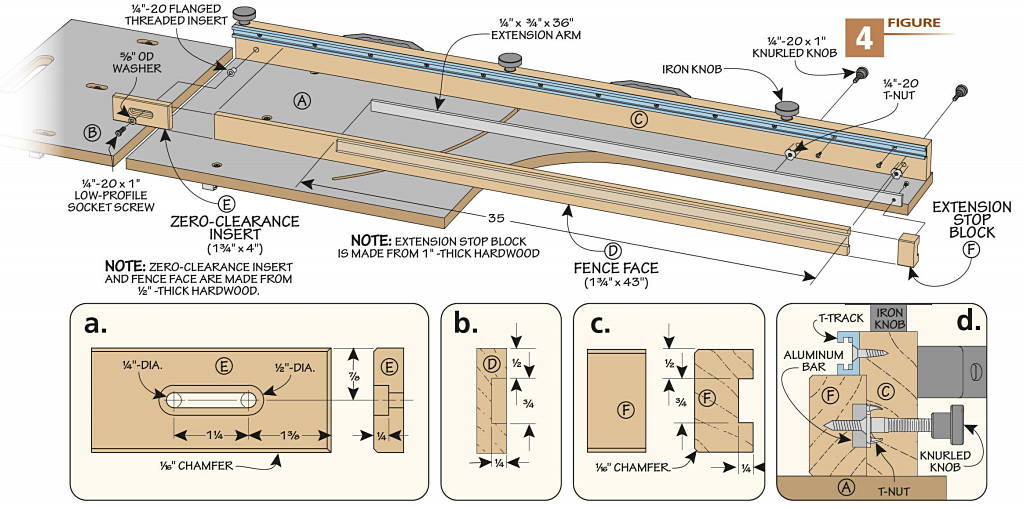
 FENCE ACCURACY. The key element to making the sled work as intended is the relationship between the fence and blade. Take your time to measure and mark the two holes for mounting the fence — the first is 1¼ from the edge closest to the blade and will be turned into small slot later, as shown in Figure la. The located near the opposite end and is highlighted in Figure le.
The sled base miter bar is the only zero-clearance element that isn’t adjustable later. Once it’s set you don’t want any risk it will shift out of the alignment. You can measure the distance on your table saw directly, but I prefer to use doublesided tape. Simply drop the runner into the slot with a piece of double-sided tape on top, then place the sled on top butting the end against the blade. With the miter bar set, use a square to transfer its location to the top of the sled so you can mark and drill the mounting holes.
Now that you’ve laid everything out, you’re going to use a drill press to bore all of the holes. You’ll come back later with a router to make the slots and cut the recesses, but for now placing all of the holes in the correct spots is the goal we’re looking to achieve.
TRAMMEL TIME
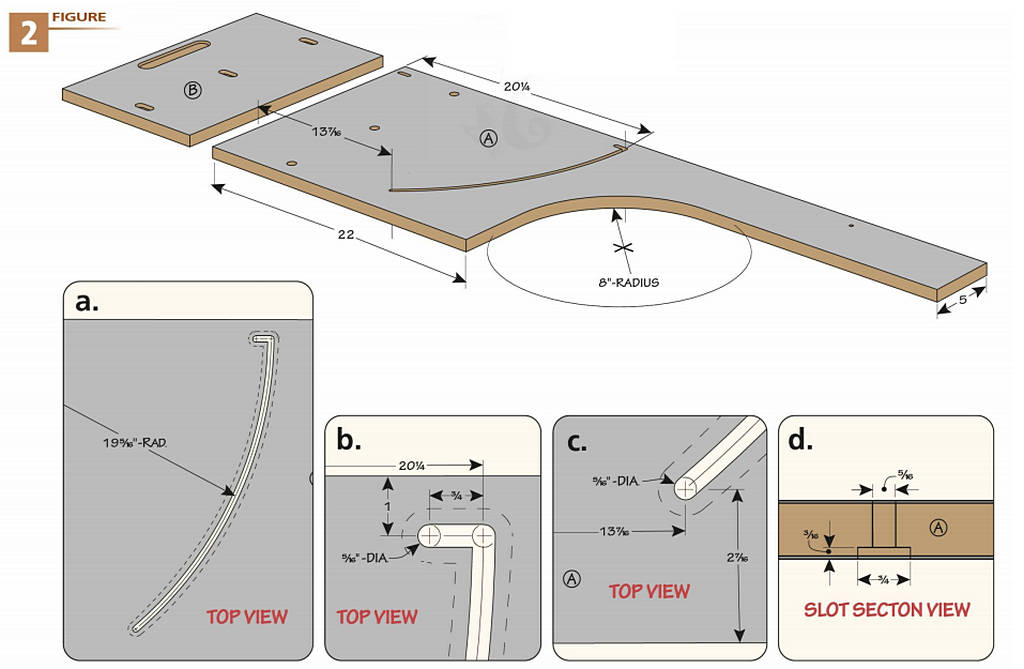
The sled fence can be adjusted along a curved slot cut into the base. Like the holes you drilled before, this process will take two passes with the router. Instead of relying on an exactly placed jig, a router trammel can be used to create a perfect arc.
SHAPING. Before breaking out your trammel, it’s time to cut the table to shape. You’ll want to use a sharp, fine-tooth blade for all of your cuts to prevent chipout. I cut the curve on a band saw and cleaned up the edge with a sander. The shape of the curve matters less than reducing the overall mass of the sled, while still providing enough surface to support long parts.
TRAMMEL SETUP. Before anyone has a geometry flashback and starts stressing about using a trammel to make ellipses, let me assure you’re we’re simply making an arc. We actually made a router trammel way back in ShopNotes No. 3 but a store-bought one works as well. The main concern is that the trammel mechanism stays exactly in place while you switch out your router bit.
When preparing to make the cut, your sled should be facedown on a sacrificial surface. You’re going to use the hole closest to the inside edge of the table to set the fixed side of your trammel. Then carefully measure the distance and set up your router on the trammel.
CUTTING THE ARC. The first cut you’ll want to make with the router is the narrow-diameter slot that goes through the entire table. You’ll make this in a few passes since the trammel allows exactly repeatable arcs each time. Swap in your larger diameter bit, set it to 3/i6B depth, and make the large recessed cut.
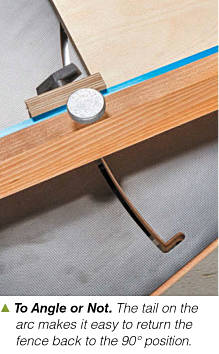
SLOTS, RECESSES & TAILS. Now that your arc is complete, you’ll need to go back with your router and take care of some details. Affix an edge guide to your plunge router and add the tail to your arc from Figure 2b. Then cut the through-slot for the fence as seen in Figure la on the previous page. Keeping the edge guide set, swap in the corresponding bits and cut the recesses for the slots, the holes, and the tail. Pay close attention to the location as some are located on the bottom and others on the top.
ZERO-CLEARANCE TABLE
If you’ve been following along with the process so far, the zero-clearance table is going to be a snap. Both the top and bottom, same way as the sled base.
SLOTS & HANDLE. Since it’s less essential for this table to be square to the blade you can cut slots for the miter bar screws, then make the final adjustments when installing. All you need to do is measure the distance for your saw between the blade and miter slot, then locate the opening based on that. Your plunge router and edge guide will work great. To cut the handle simply drill out the ends, rough out with a jigsaw, and clean up the edges with a router and straightedge.
Feature-Packed Fence
The cutoff sled fence looks deceptively simple at first glance. A few boards, some track, an extension arm and you’re set. However it’s actually chock full of useful features and thoughtful details you’re going to appreciate when using it.
CORE DETAILS. Our fence is made out of European beech, but most any hardwood will do. You’ll want to pick a board that’s completely straight and fully dry — this ensures the fence will stay straight over time.
Once you’ve cut your fence to size, it’s time to drill the holes for the various fence attachments. A drill press with a fence is going to be your friend for the three through holes you’ll drill for the threaded iron knobs that hold the fence in place. As you can see in Figure 3a, there’s also a slight counterbore at the top that you’ll drill first.
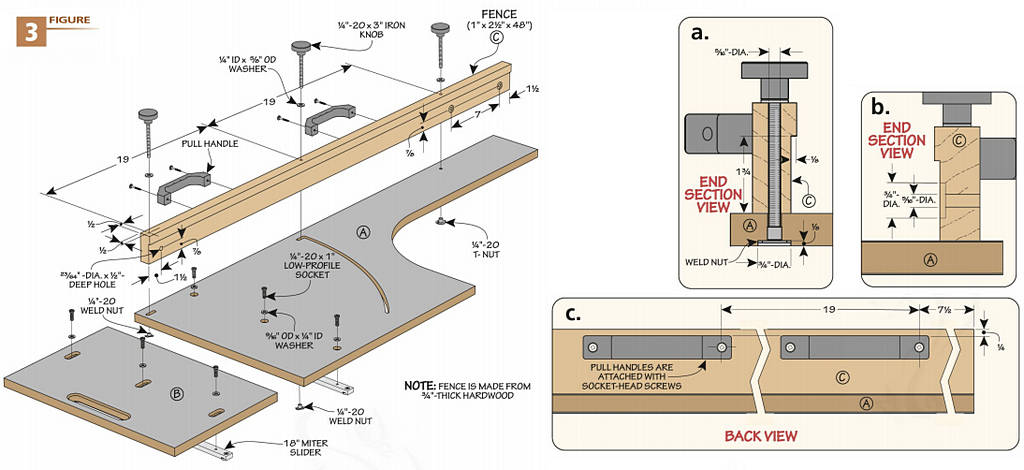
You’ll need to make the full-length recess on the face for the auxiliary components. You could cut it with it an extra-tall straight bit on the router table or make a pass on your table saw. With the recess cut, you can drill the hole for mounting the zero-clearance insert. Note that it isn’t drilled all the way though, just deep enough to hold the threaded insert. Lastly, drill the two through holes and counterbores near the outside end of the fence. Those will hold the extension rod in place later.
FENCE EXTRAS
The front portion of the fence has a few tricks up its sleeve. There’s an adjustable zero-clearance insert and an extension arm with an integrated stop block that can extend almost three feet out that you can see in Figure 4.
Head over to your router table and cut the stopped groove for the extension bar. You can glue the fence face to the main fence now. Take it easy on the glue though, you don’t want to impede the movement of the bar.
There are a few smaller components you’ll be making here, and the safest way to do that will be making them overlong, then cutting to size at the end. It’s not worth it to mess with parts this small when using a router.
ZERO-CLEARANCE INSTERT. First up is the zero-clearance insert shown in figure 4a on the next page. Cut the stock to the correct width and thickness, and but leave enough extra length to safely work with on your router table. Use the fence to make your through cut and recess on the face. Then swap in a chamfering bit and rout the three sides. Now you can cut it the final length.
EXTENSION FENCE STOP BLOCK. The extension fence stop block in Figure 4c is a similar story. Rout the groove on your overlong piece, then chamfer the top and bottom comers of the face. Trim it to length and it’s ready to affix to the extension bar.
HARDWARE & ASSEMBLY. At this point, you’re done with the woodworking portion of the project and on to the final assembly process. There’s quite a bit of hardware involved though, so I’ll walk you through the process.
EXTENSION ARM. The arm itself is simply an aluminum bar with a hole drilled in one end to secure the stop bock. The hole can be drilled with a regular twist bit thanks to how soft aluminum is. Don’t forget to add a countersink for the screw so the bar can slide in all the way. Now you’re ready to attach the stop block.
The extension fence is held in place with two threaded knobs from the back of the fence. The knobs thread through a pair of T-nuts. You’ll tap them into place with a hammer, and tightening the knobs will hold them in place. The extension arm is ready to be installed.
It’s a similar story on the opposite end with the zero-clearance insert. A flanged, threaded insert is installed on the main body of the fence, then the insert piece itself is installed with a screw and washer.
The T-nut on the base is next, and can be epoxied in so it doesn’t fall out when you unscrew the knob. The T-track and handles simply screw into place. The fence is affixed to the sled with the remaining two threaded knobs screwing into a pair of weld nuts nested into the bottom recesses, followed by the last knob into the T-nut. All that’s left is to make final adjustments to the zero-clearance components and your sled will be all ready for action in your shop.