Finding the right layout tool for good work isn’t as easy as it seems. It’s not for a lack of tools — if you’re anything like me you’ve likely got a menagerie of rulers, straightedges, and squares scattered about the shop already. Instead, I find the issue is that most layout tools live in one of two camps: they’re either small and precise tools for fine woodworking, or large, cheaper tools for rough-in carpentry. Of course, some manufacturers do offer layout tools that are both large and precise, but they can get expensive quite quickly.
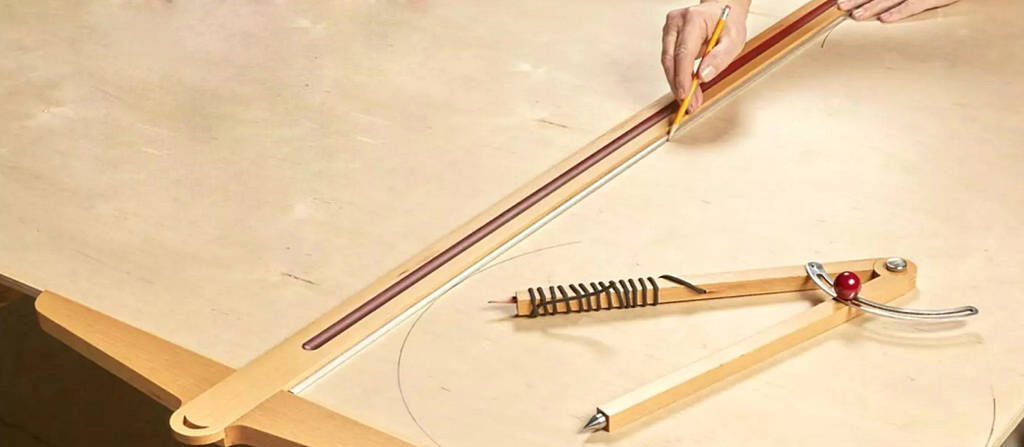
 Our answer to this quandry is the tools you see above: a shop-made T-square and compass, both sized for large projects. These two offer size and accuracy, while also boasting a low cost in materials and even lower cost in time.
As you can see above, these two tools couldn’t be simpler. The head of the T-square is kept at 90° by a dado, and its blade is stiffened by a pair of aluminum bars. As for the compass, a lap joint connects the two arms at the fulcrum, while they pivot on a thumbscrew and lock on an aluminum slide. The slide is routed to shape from sheet stock, and the pivot needle is shaped from low-carbon steel. These tools are certain to improve your large-scale layouts, and all they’ll cost is a few pieces of wood, a handful of hardware, and a pleasant day in the shop.
Large-Scale T-Square
The first tool up is the T-square. The square is simply two pieces of hardwood: the blade (illustration at right) and the T-head (next page). The T-square can be used on pieces up to 4-wide — long enough to stretch across a full sheet of plywood.
BLADE. Begin by cutting the blade to size. A stable hardwood is a good idea (we went with European beech), but since the square is wood it can be fine-tuned down the road if need be.
Next, take the blade over to the router table. Starting off, you’ll need a core box bit to rout the cove down the middle (Figures 1a and 1b). As this is a stopped cove on both ends, mark out the bit’s cutters on the router table fence, then mark out the starting and stopping point of the cove on the piece.
Once the cove is routed, swap out the core box bit for a straight bit to rout the rabbets on the back side (Figures 1b and 1c). These are stopped on one side as well, so mark the bit’s cutting edges on the fence and the stopping point on the workpiece. Rout the rabbets and square up the stopped ends with a chisel.
Lastly, before shaping the end, drill the hole at the bottom of the ruler (Figure 1c). This is used to hang the square up on the wall when not in use.
CUTOUT & SHAPING. To complete the blade, you’ll need to shape it as you see in the main illustration. To help you get both the radius and the cutout shaped, we’ve included a pattern you can attach to the blade’s end.
Begin with the cutout. After attaching the pattern, drill out the majority of the waste at the center. From there, use a coping saw to get as close to the pattern as possible, and use files to refine the shape. Don’t be overly concerned with how precise the cutout is — it’s decorative, so shaping it by eye works fine.
Finally, cut off the top comers at the band saw, then clean up the blade marks and refine the final shape of the blade at the edge sander.
That completes the first half of the T-square. Next we’ll work on the T-head, then dig into the compass.

T-HEAD
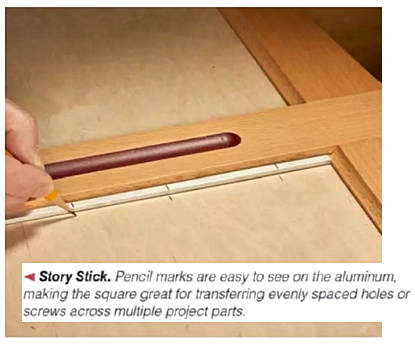
The T-head and a pair of aluminum bars complete the T-square. A dado in the T-head keeps it perpendicular to the blade, and the aluminum bars provide the blade with increased durability for use as a marking guide.
 After initially sizing the T-head, I took it over to the table saw to cut the dado that will accept the blade (shown in Figure 2a). Once that was in place, I used a core box bit to rout in a cove along one edge (Figure 2b).
Now to shape the head. Print out the pattern and attach it to the head blank. Cut the waste free at the band saw, staying to the waste side of the pattern, then use the edge sander and spindle sander to reach the final shape. With the head shaped, it’s time for assembly.
ASSEMBLY. To put together the T-Square, I started by gluing up the head and ruler. Be sure to keep a couple of squares at hand to make sure the two pieces stay at 90° throughout the glueup. Once dry, sand around the lap joint for a more continuous look.
ALUMINUM EDGE. As shown in Figure 2c, I attached the pair of aluminum bars with epoxy. These provide a cleaner reference edge when making a layout, and they’ll help keep the ruler straight despite changes in humidity.
FINISHING TOUCHES. For a bit of color on the T-Square, I painted the center cove a dark red. To keep the parts sealed (and to make them pop in the photographs) I also added a coat of boiled linseed oil and a few coats of spray lacquer.
Wide-Arc Compass
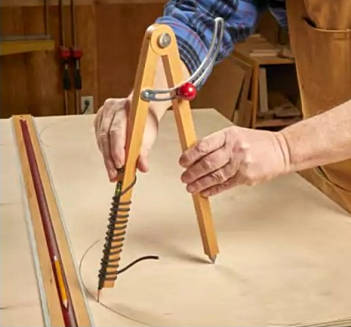 A compass is invaluable for laying out a radius on the end of a board or a hole on a workpiece. However, if you’re working on a larger radius — the top for a circular end table for instance — then the usual compact compass won’t cut it.
Our funiture-sized compass was designed for these larger layouts. The thumbscrewed lap joint acts as the fulcrum, while the phenolic knob tightens down on the aluminum slide to lock it in place at the correct radius.
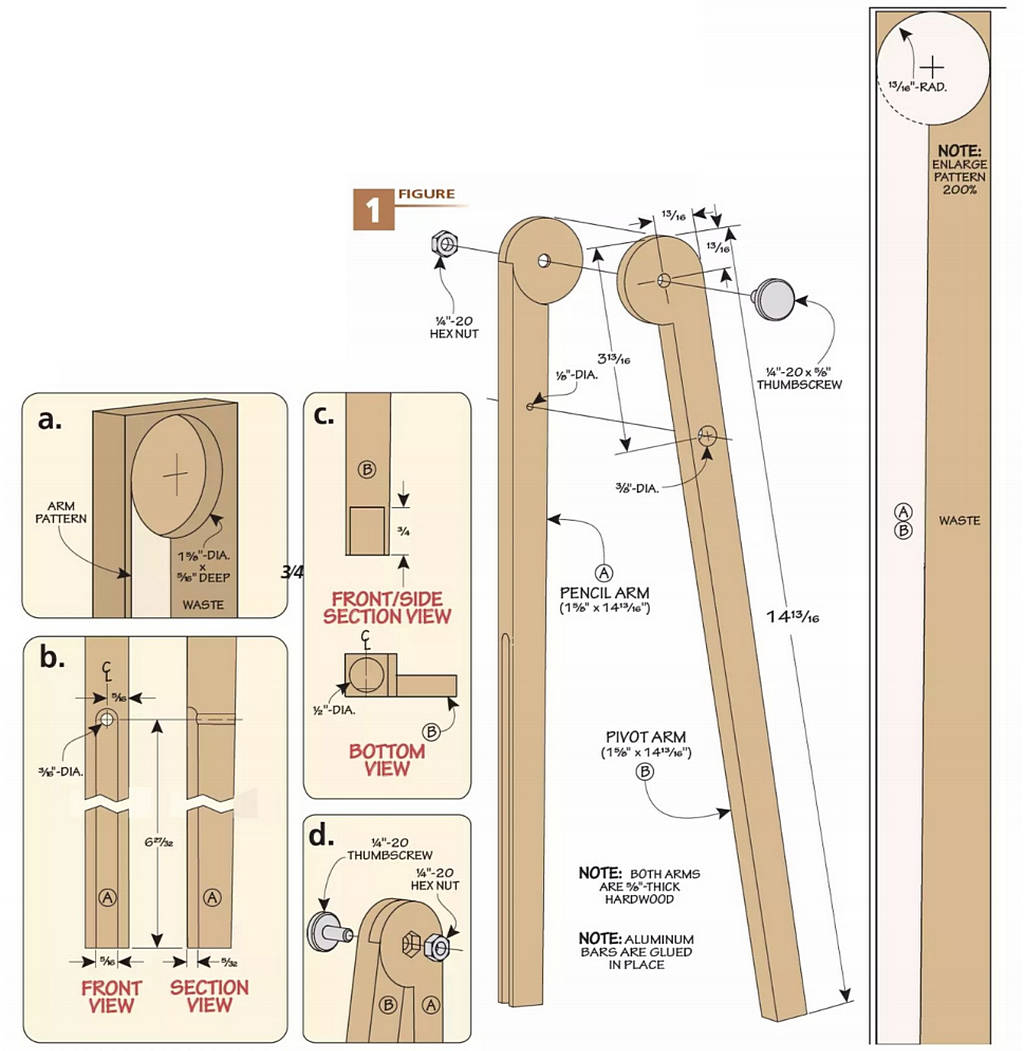
ARMS. The work here begins with the two wood arms. After sizing the blanks, apply the patterns to them. Before shaping them, use a Forstner bit to drill out the recesses for their lap joint, as in Figure 1a below. Then the waste can be cut free and the arms filed and sanded.
The two arms are the same size and shape, though there are a few differences between them. First, a stopped cove is routed in the pencil arm for the pencil, then the hole for the rope is drilled at the stopped end of the cove. Both of these are shown in Figure 1b.
As you can see in Figure 1c, a hole needs to be drilled in the end of the pivot arm for the pivot point. Either tilt your drill press table 90° or use a doweling jig here. Whichever you do, use a brad point bit and drill slowly to get through the end grain. Finally, a hole needs drilled in the pencil arm for the slide to screw to later, and another needs to be made in the pivot arm for the knob’s insert.
LAP JOINT. Now to join the arms. Drill out the screw holes using the dimples left behind from the Forstner bit. Trace the position of the nut over the hole with a marking knife and chisel out the waste. Press-fit the nut in place, then thread in the thumbscrew (Figure 1d).
Compass Hardware
 The last steps of the compass deal primarily with the hardware. Some of them can simply be attached as-is, and some of them will need a little work. Don’t fret though — it’ll just be some simple shaping on the metal parts.
FITTING. Before getting into the hardware, check the fit of the arms. Do they match flush with each other? Is the whole range of motion free, or does some material need to be filed away? This will be easier to deal with now, but once you have a full, smooth range of motion between the arms, move on.
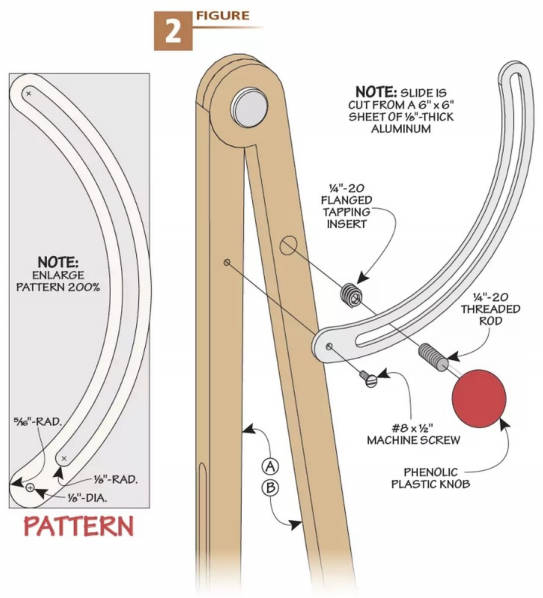
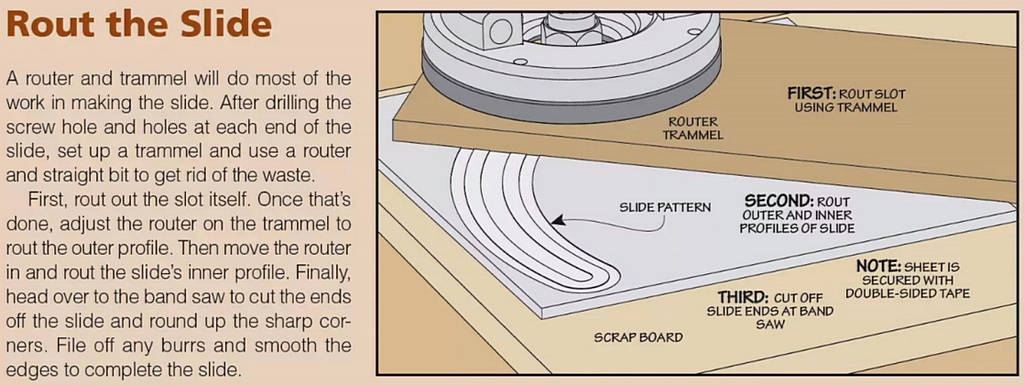
SLIDE. The slide begins as a 6″ x 6″ sheet of aluminum stock. Print out and attach the pattern to the stock, then drill the pilot holes. One hole is for the screw that mounts the slide to the pencil arm, and the other two establish the ends of the slot before routing.
Now use a router and a trammel to cut the slide to shape. With a straight bit and a piece of scrap for the trammel, the slide isn’t hard to make — the box below goes over how. After you’ve shaped the slot, file off any burrs and sand the edges for a smooth feel. If you appreciate a more polished look, this is a good time to go over the aluminum.
SLIDE MECHANISM. Now all the hardware for the slide can be attached to complete the upper portion of the compass. First, screw the slide onto the pencil arm. Second, press the flanged tapping insert into place. Pivot the slide until the slot sits over the insert, then thread in the rod and thread the phrenolic knob over that. Tightening and loosening the knob locks the compass in place. However, we still need to deal with two vital pieces: the pencil and the pivot point.
PENCIL & PIVOT
The pencil and pivot point make for an easy home stretch on this tool. As shown on the next page, the pencil is simply attached by a piece of nylon rope. The pivot point begins as a length of low-carbon steel rod, but we’ll quickly reshape it to suit our needs.
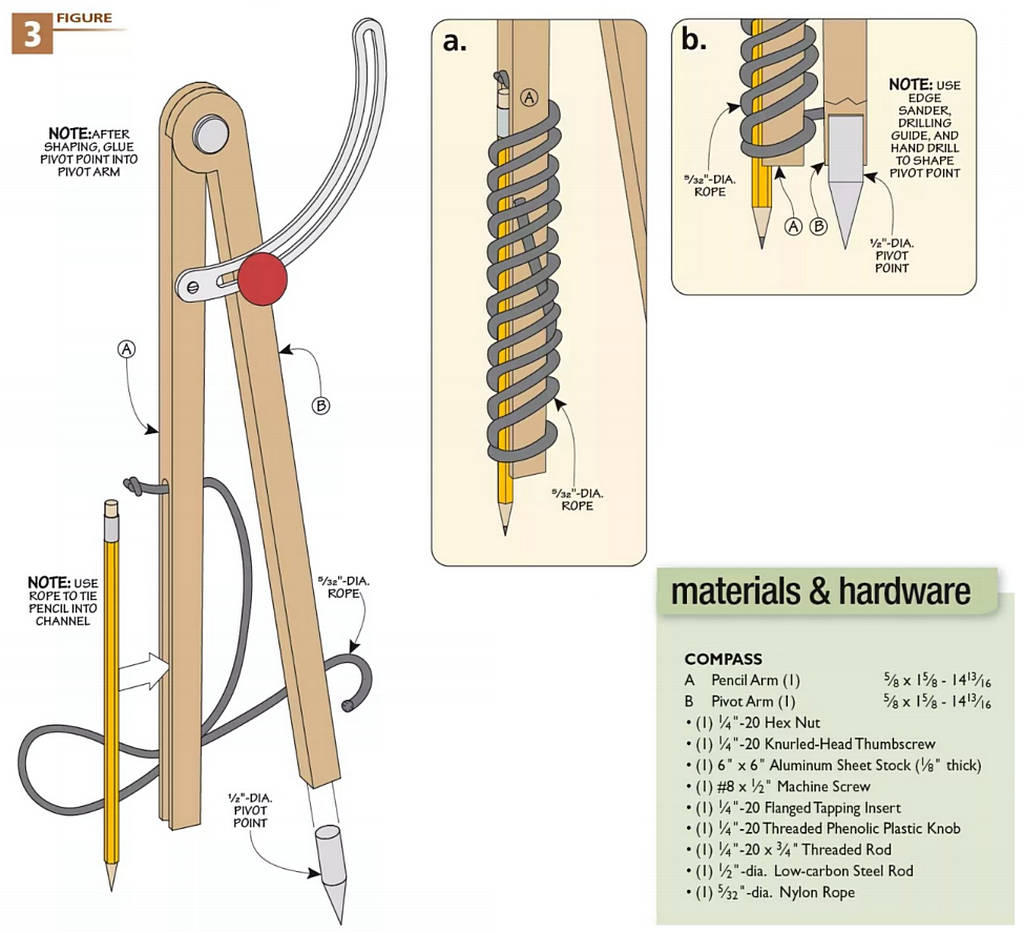
ROPE & PENCIL. To find how much rope you’ll need from the spool, wrap it around a pencil and the pencil arm, as shown Figure 3a on the next page. Cut the length off and feed it through the hole at the stopped end of the pencil groove. Knot one end, then melt the other to prevent fraying. Place a pencil in the groove, then tie it in place.
PIVOT POINT. Similarly to the slide, we’ll be starting the pivot point with a piece of stock (although it’s low-carbon steel rod this time) and shaping it ourselves to the desired point.
To make the compass’s point, you’ll first want to start by making a drilling guide for it. This can be quite simple — I just used a piece of scrap and drilled a hole through it the same diameter as the steel rod. With the drilling guide in hand, head over to the disc sander (or edge sander) and clamp it down to the table. Chuck one end of the rod in a hand drill and feed it through the hole in the drilling guide.
Then, while the disc sander is running, run the hand drill while sanding the rod down, backing off occasionally to avoid building up too much heat.
The hand drill makes it easy to take material off all sides evenly, like a lathe would, while also leaving the point centered on the rod. Low-carbon steel is relatively soft for a ferrous metal, and it can be shaped easily by sanding. Continue sanding until the rod is shaped to a fine point.
The exact angle or length of the point isn’t particularly important — as long as you have a sharp, centered point, the compass will work perfectly fine. After you have sharpened the steel rod to a satisfying point, epoxy it into the recess at the bottom of the pivot arm. When it cures, you’ll have a fully functional, furniture-sized compass. The compass can easily scribe out a radius of up to sixteen inches, but I find it works best for radii between six to twelve inches.
FINISHING TOUCH. As a final note, we finished the compass with a coat of boiled linseed oil and a few coats of spray lacquer. As I mentioned with the T-square, this will keep the wood sealed and give the tool some more visual vibrance.
These two tools make a great weekend shop project, and are an excellent addition to anyone’s arsenal if they plan on building furniture. Not only are they quick and easy to make (not to mention cheaper than a quality commercial option), but they’ll last you for years to come. You can never have too many layout tools, and these certainly won’t just be collecting sawdust in your shop.

