This versatile sea chest is just at home in your workshop packed with tools as it is in a bedroom storing an extra set of linens.
In the past, a sea chest (or seaman’s chest) was used by sailors to store their personal property such as clothes and toiletries. Now, I don’t know many lucky ducks who get to spend their lives on boats and need a sea chest, but that doesn’t mean you can’t give yourself the experience of building this fun piece of history.
 FUNCTIONAL CONSTRUCTION. One thing that’s fascinated me about utility pieces of furniture, such as a sea chest, is the no-nonsense construction techniques that are used to build them. And our designer, Dillon Baker, kept with that theme. A solid-wood case is assembled with rebates, and the tongue and groove bottom is nailed directly to the case. This would make it easy for the sailor to replace the bottom if the slats got wet and started to become compromised.
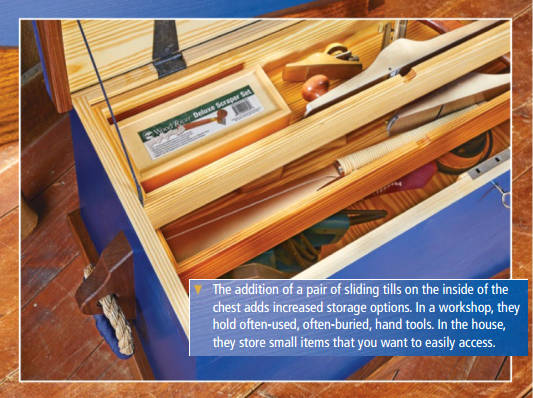
THE GUTS. Just because the construction techniques are pure utilitarian, doesn’t mean the inside can’t be user friendly. The inside of the case is broken up with a couple of sliding tills. The till construction, like the case, is pure utility. The tills slide on runners so you have easy access to all of the items stored within.
BLACKWOOD DETAILS. Of course, we couldn’t build a pure utility piece without adding some pizzazz. In this case, we added blackwood trim around the bottom and top ends of the chest. In addition, the blackwood handle block and rope becket tie everything up in a pretty bow.
A Slanted CASE
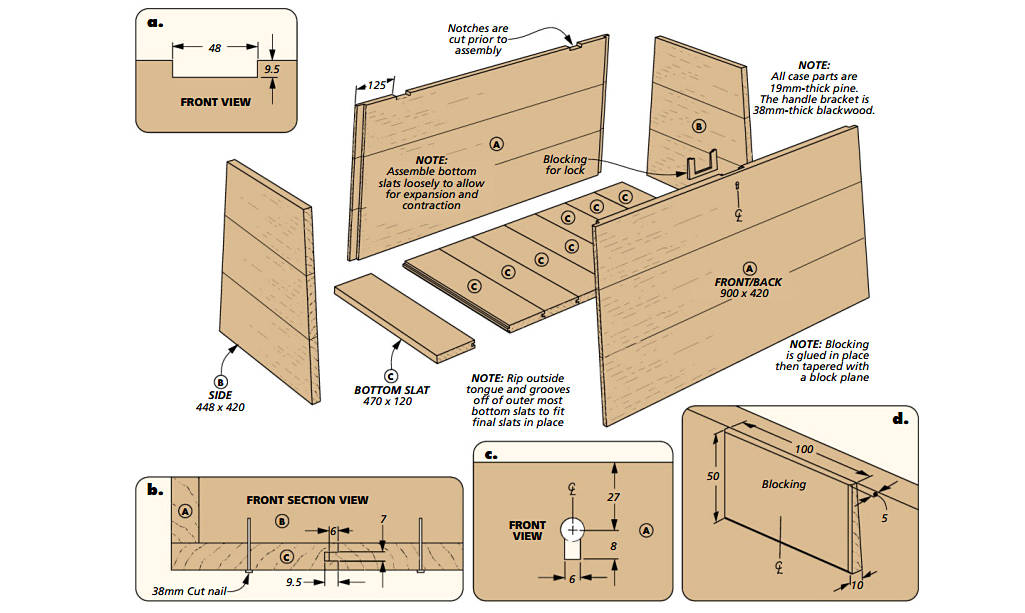
As I mentioned before, the case for the chest is built from solid wood. The pine is lightweight and we planned to paint it. The drawing above will give you general guidance on the path that this sea chest takes.
START WITH THE CASE. Building the case is the first order of business. Because the case is fairly deep, you’ll want to glue up the stock to create the front, back and sides. You might as well glue up the stock for the top that you’ll make later as well.
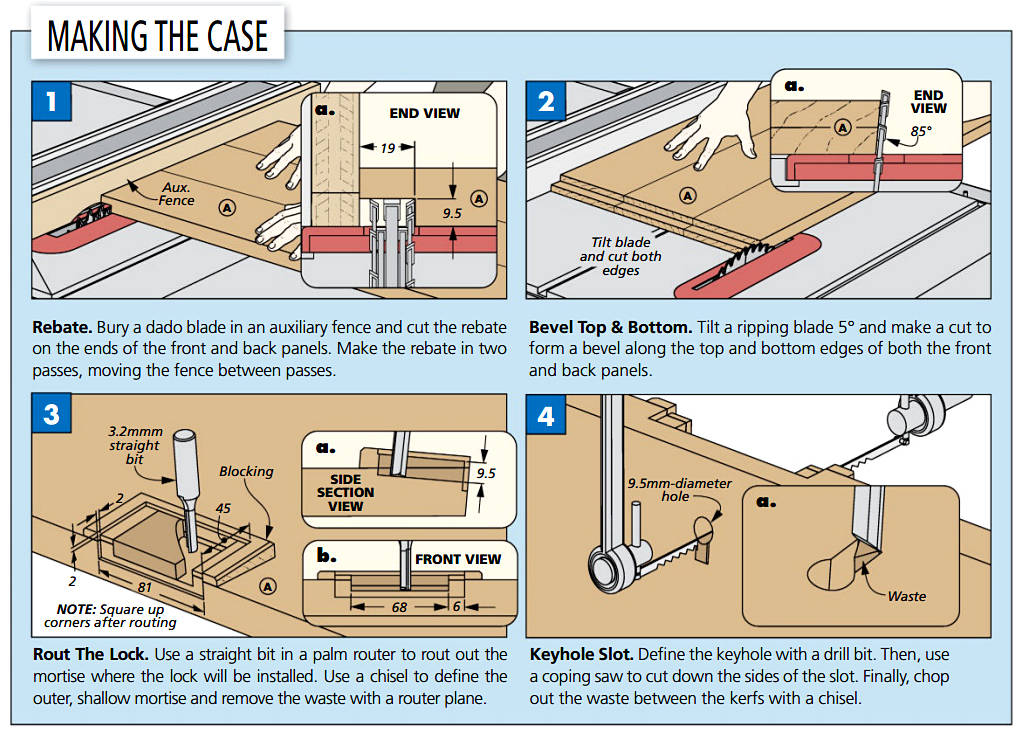
Use a dado blade buried in an auxiliary fence to cut the rebate along each end of the front and back panel (Figure 1). Guide the panel with a mitre gauge if you need extra control.
Now, you can cut the front and back to size. Before making a cut however, note that the front and the back of the chest slant inwards. This means the top and the bottom edges need to be bevelled to compensate for this lean (Figure ‘2a’).
When it comes to cutting the sides to size, they’ll need to be tapered from top to bottom. You can do this at the table saw with a taper jig or with a circular saw and straightedge guide. It’s dealer’s choice here.
HARDWARE WORK. Before assembling the case, there’s more work to do on the front and back panels that’s easier to do without the case glued up. First, the back panel has two notches for hinges. You can see these in detail ‘a.’ You could stand this up at the table saw and cut them with a dado blade (use a tall auxiliary fence to help support the workpiece). However, this is the perfect time to break out a crosscut saw and a chisel and go to town. Use the handsaw to create the walls of the notch first, then chisel out the remaining waste. A router plane or file will help you get a smooth bottom on the notch.
On the front of the case, you’ll want to add blocking onto the lock location to make it thicker and compensate for the angled front. Then, use a router to rout out the mortise for the chest lock (Figure 3). Use your lock as a template, and after the mortise is routed, use a drill bit to drill out the key hole. A coping saw with a blade will help you create the keyhole slot in the front, like you see in Figure 4. With the lock mortise done, you can assemble the case with glue and clamps.
SLAT BOTTOM. The bottom of the case is made from pine as well, and is a series of slats running from front to back. The slats are locked together with a tongue and groove. This can be cut at the table saw using a dado blade. Cut the grooves along one edge of the slats first, then fine-tune the tongues to fit in the grooves.
Make small adjustments here, as you’ll be making passes along both sides of the tongue. When the slats all fit together, you can assemble them and nail them onto the bottom of the case (detail ‘b’).
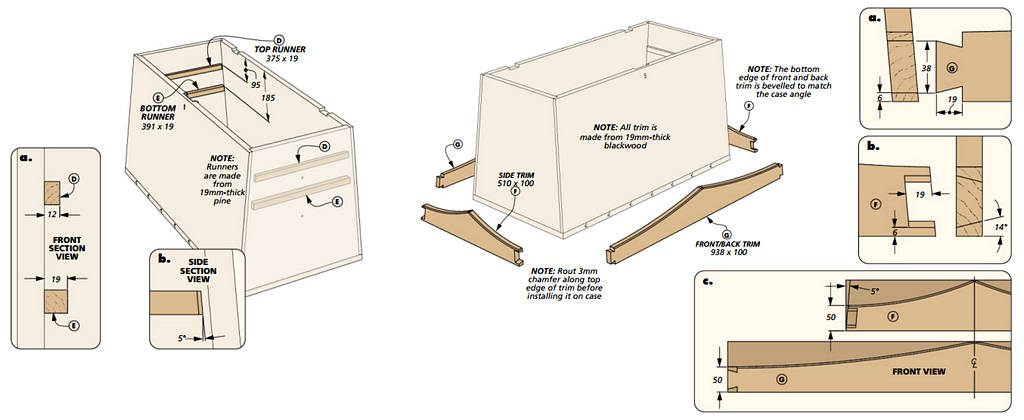
RUNNERS. The final task on the case to take care of is to lay the “tracks” for the sliding tills. You’ll do that by adding the wood runners for the tills to the inside of the case (detail ‘a’).
These are made from solid wood and are simply glued in place. To keep the runners from slipping and sliding around as the glue dries, I would suggest taking a note from traditional furniture makers — use a cordless pin nailer and shoot a couple of pins in each. With the case pretty much wrapped up, it’s time to add some of the decorative trim.
Dark, Rich TRIM
The case of the chest is trimmed in hardwood. Here, we used blackwood. The trim has a few purposes aside from looking good. First, it hides the exposed end grain of the bottom. This shields them (somewhat) from absorbing water. Because, you know, ships can be wet. Second, the dovetailed comers on the trim add additional structural strength to the case of the chest.
CUT TO SHAPE. Before ever thinking about the angled dovetails (they’re not too hard, don’t worry), start by planing the stock to thickness and ripping it to width. As with the case, the bottom edge of the front and back trim is bevelled.
I suggest making a Masonite template for the profiles of the front, back and side trim. This will allow you to rough cut the profile at the bandsaw and clean it up using the template at the router table. Just be careful, because the peak of the profile will cause you to be routing against the grain a little bit. Go super slow and take light passes to avoid chip out.
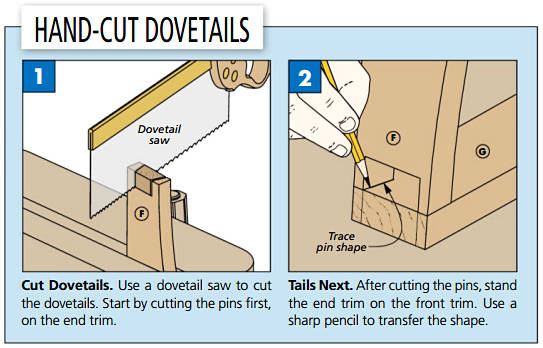 ANGLED DOVETAILS. With the shapes cut, let’s tackle the dovetails. Start by positioning the side pieces of trim in place, and scribe the angle of the case onto the inside of the trim. This will become the baseline for the pins.
Usually, I play for the “cut the tails first” team, but in this instance, I think it’s best to lay out and cut the pins first (Figure 1).
After cutting the pins, (they will look funny with the angled baseline), lay the front trim on your bench and stand the end trim in place. Transfer the pin shape to the front trim with a long marking knife or sharp pencil (Figure 2). Then, it’s a simple matter of cutting the tails.
After you’ve test fit the entire trim and ensured it fits correctly, it’s ready to be glued in place on the case. A note here: if you’re planning on painting your case like we did, I would suggest painting it before adding any of the hardwood trim. It will cut down on the masking. Just leave some “paint free” zones where the trim gets glued on to ensure a good bond. Speaking of which, you can glue the trim in place and sand the proud ends of the dovetails flush.
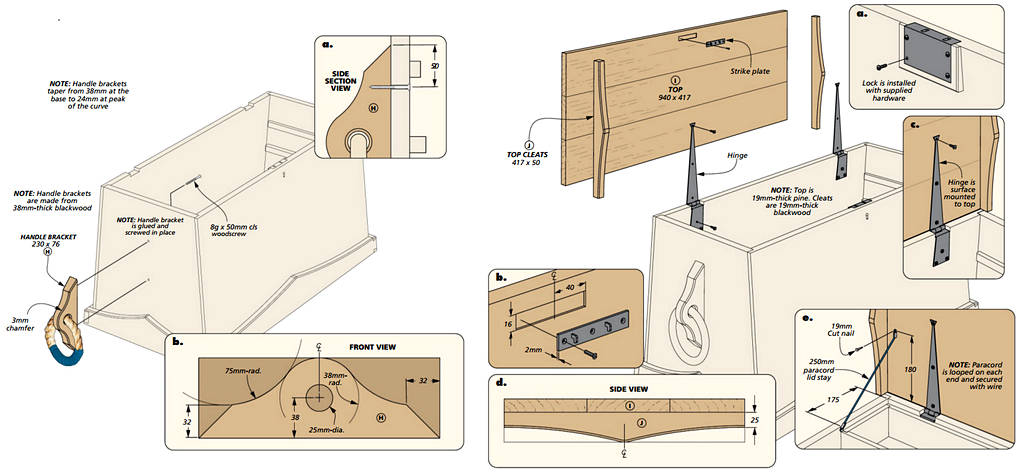
HANDLES. The handles for the chest are made of rope and attach to handle blocks. Create the handle blocks by cutting the shape out of hardwood stock. Drill a hole for the rope before tapering the profile on the bandsaw. Then rout the outside edge with a small chamfer. You can glue the handle block onto the case, and attach it with a couple of screws from the inside.
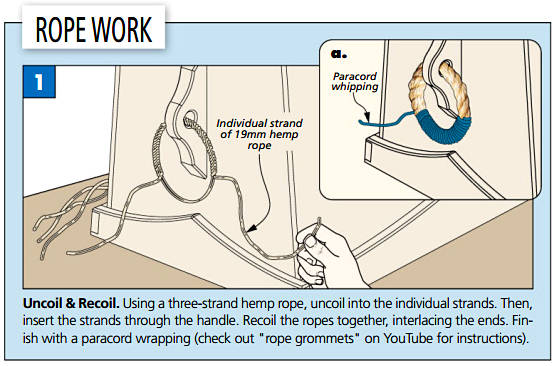 FANCY ROPE WORK. Personally, I think the rope handle on this chest makes the look. It’s a subtle nod to the nautical origins of this chest. To make it, use a piece of hemp rope and cut it to length. After inserting it through the hole in the handle block, you’ll unravel the strands of rope from each end. In a small “twist” of fate, you’ll re-ravel the rope back onto itself marrying the two ends together. It sounds complicated, but it isn’t. Turn to page 18 to see how beckets and quoits are woven from three strand hemp or sisal rope.
After splicing the circle together, you can finish it off. Do this by whipping the handle with some paracord, making a nice, tight coil. We chose a paracord that matched the case colour.
TOP It Off & Add TILLS
To bring it home, the top is next. You’ll finish it off by adding the sliding tills. The top follows a lot of the same steps that you’ve already done, so let’s start there.
WIDE PANEL. If you followed my advice before, you’ll already have the top panel glued up. The first thing to do is to cut it to final size. You can see these dimensions in the drawing above. Install the hinges on the case and temporarily fasten the lid to the hinge with a single screw in each. What you’re doing here is locating the lock strike plate on the lid. Use a pair of sharp, short screws in the strike plate to mark the location, then you can mortise it in. Personally, I use a marking knife and router plane to do this.
FINAL TRIM. The final pieces for the top are to add the top cleats. These mirror the bottom trim and are made the same way. Glue them in place and then you can install the lid.
SLIDING TILLS
The sliding tills are the perfect place to store small items, or tools that you use all of the time. They’re made out of thinner pine, and unlike the case, are straight and square.
REBATE CONSTRUCTION. The tills are built using rebates. Cut the front, back and sides to size. The front and back have a small finger notch in them to aid sliding the tills. I created this by clamping a sacrificial board to the edge of the workpiece and drilling through both pieces with a Forstner bit. Clean up any tool marks with a sanding drum or a dowel wrapped in sandpaper.
At the table saw, use a dado blade buried in an auxiliary fence to cut the rebates at the ends of the front and back. Then, you can glue the tills together. Again, a couple of pin nails in each joint will keep them together while the glue dries.
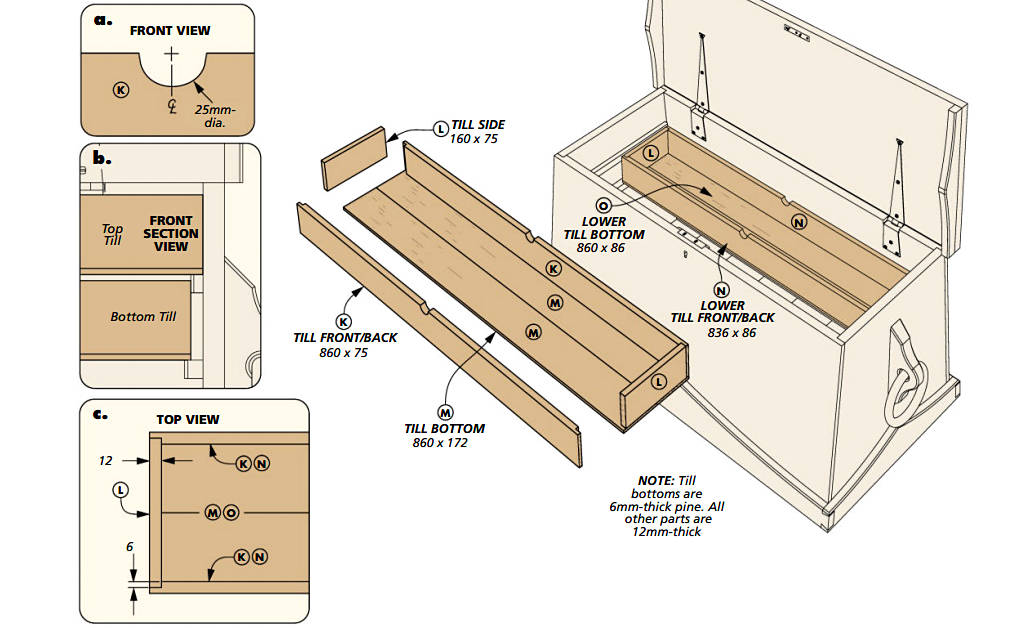
PUNK BOTTOM. Like the case, the bottom of the tills are completely utilitarian. They’re simply thin planks nailed to the bottom of the till. This means that they will be easy to replace if it’s ever needed. In addition, the flat bearing surface makes them slide across the runners just a little easier as well.
With the tills in place, (and maybe a little paste wax to ease the sliding action), the chest is complete. I must say, the more and more I look at this sea chest, the more I can appreciate it as a tool chest. I was a little apprehensive when it was suggested to use it as such instead of a “blanket” type chest. However, the size is perfect to sit next to the workbench and hold a lot of tools. Plus, the sliding tills keep all of your most used hand tools within reach. But, it still makes the perfect storage vessel for any room in your house … or your life at sea.
