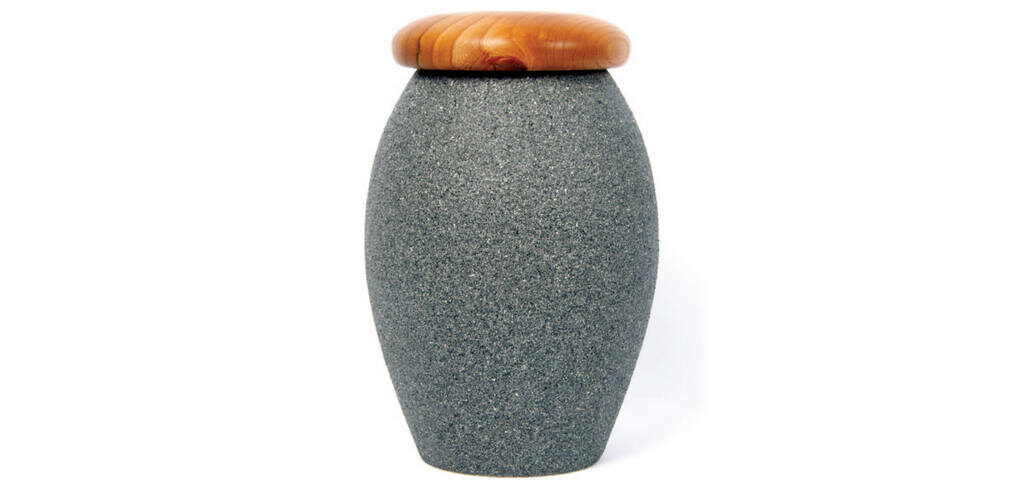
Vessels such as these stone jars were made in many shapes and sizes and used for storing food, liquid and even the ashes of deceased. Numerous stone jars were found in the pyramids in Egypt. These were known as canopic jars, storing human organs for the afterlife. There was no jar for the heart as the Egyptians left it in the body, believing it was the seat of the soul. Beech and elm are the woods used in this project, but as the outside is painted any species of wood could be used. It could be identified as a different wood from the inside but colouring this with a stain will overcome this issue.
1 The blank for the project is a piece of air-dried beech. It was checked for defects that may have made it unsuitable for use before being mounted between two 19mm centres and trued up – with the grain in spindle orientation – with a 25mm spindle roughing gouge. The lathe was initially set to a slow speed and gradually increased to a safe working speed.
2 The piece was brought to a cylinder gradually, traversing across the toolrest with the 25mm spindle roughing gouge. The edge can be dulled quickly on larger pieces, so I like to sharpen my tools regularly as a sharp tool is safer and far more efficient.
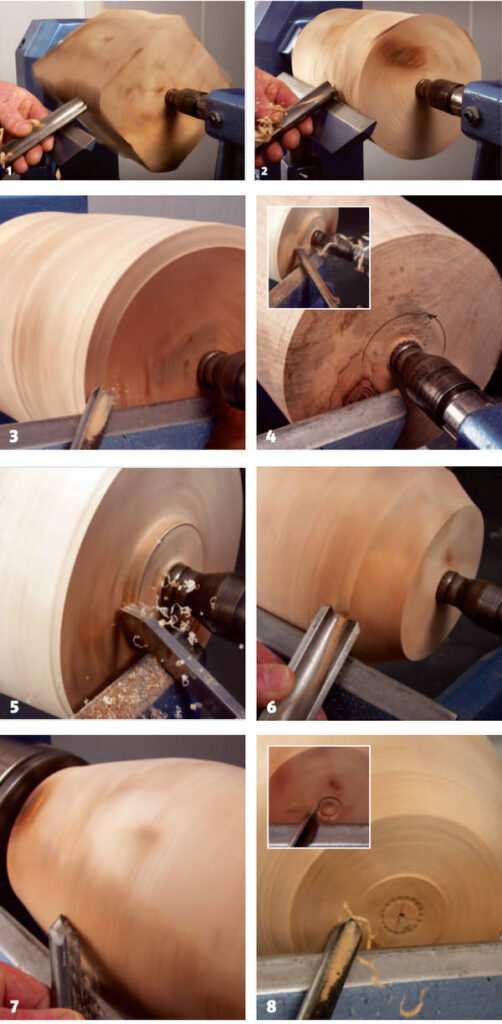
3 Once the piece was brought to a cylinder, I true up the end with a 10mm short-grind bowl gouge. I noticed an inclusion in the piece and addressed this at a later step.
4 I marked out where I needed the tenon to be by measuring 25mm from the centre and drawing a circle. The 10mm bowl gouge removed the bulk of the wood to create a 10mm deep tenon.
5 A 6mm parting tool defines the tenon and creates a clean, crisp 90° corner for the straight serrated jaws to seat against. The piece was secured in the chuck, maintaining tailstock support.
6 I formed the external shape with the 25mm spindle roughing gouge, continuously watching the horizon of the piece. As the shape developed, I got a clearer indication of where I needed to remove more wood by watching this area of the piece.
7 Once the shape was created, I used my 13mm bowl gouge to shear scrape the surface. This refined the shape and helped minimise the sanding.
8 I made certain that the piece was secure in the chuck and the tailstock was removed. The surface was cleaned up with the 10mm short grind bowl gouge. A V-groove was created with the 12mm spindle gouge to allow the drill bit to centre exactly.
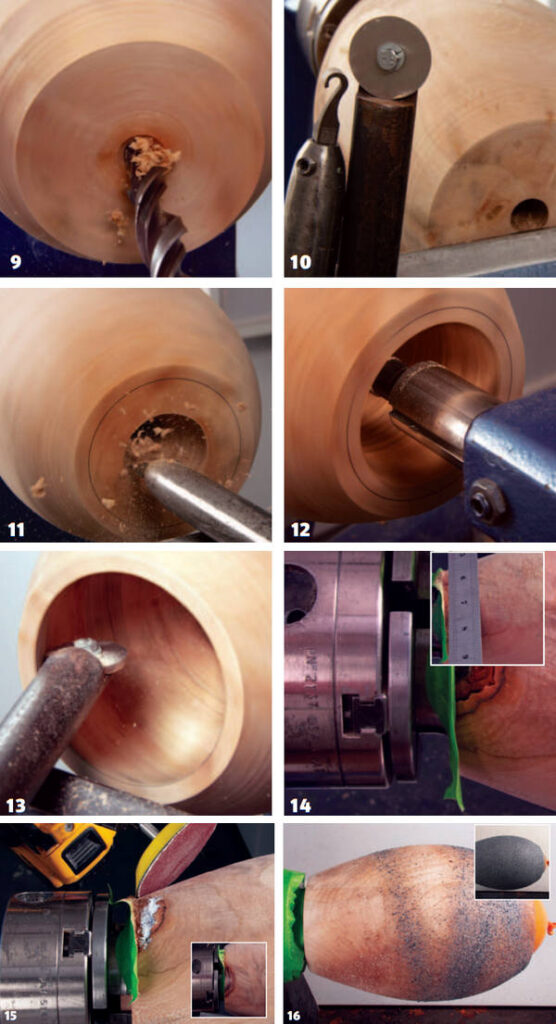
9 A drill bit was secured in a Jacobs chuck in the tailstock and a hole drilled in small increments to the maximum safe depth the drill bit would allow at this stage. Drilling this way ensures the drill bit will not clog up or generate heat which could cause cracks in the workpiece.
10 I chose to use my hook tool on this project. It worked beautifully on the air-dried beech, and I chose a round disc scraper to refine the internal finish.
11 The wall thickness is indicated by the pencil mark. The bulk of the material was removed from the inside with the hook tool. It is important to have the pilot hole drilled in order to start the cut easily.
12 Once the opening was created, the drilling was finished to the correct depth. The quill fits inside the opening, allowing deeper drilling access.
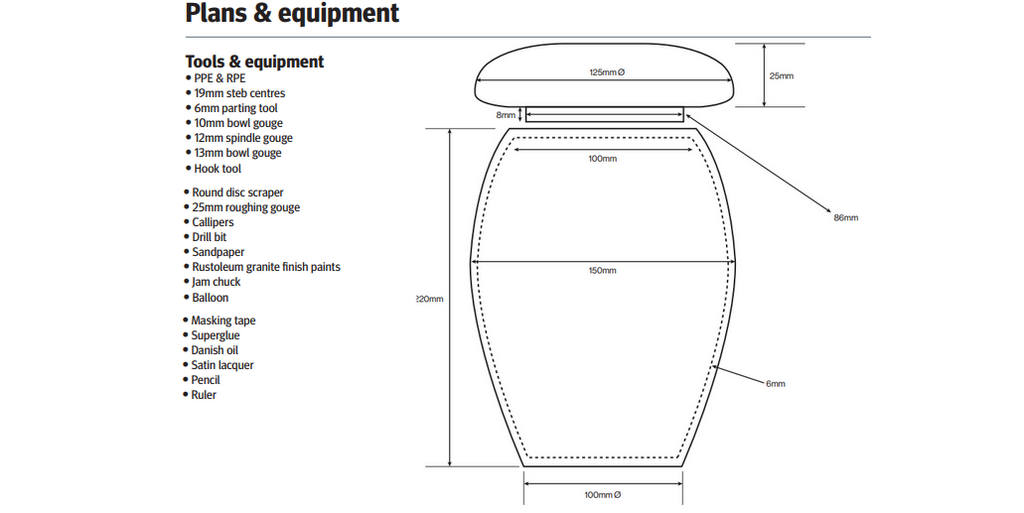
13 With the bulk of the material removed from the inside, it was time to refine the wall thickness. Working in small increments from the rim to the bottom, the 6mm wall thickness was created and refined with the round disc scraper.
14 The outside of the piece needed to be sanded but the inclusion mentioned at the start needed addressing. With some masking tape added to create a reservoir, I filled the void with fine sawdust and packed it in tightly with a steel ruler. I poured thin Superglue over the area and allowed to cure. When it had cured, I repeated the process leaving more time to cure. I poured a small amount more of Superglue over the surface and sprayed some accelerator to make sure it was set.
15 The piece was then sanded with 120,180, and 240 grit sandpaper. As the piece was to be painted, I felt this was a good enough surface and allowed for good adhesion of the paint.
16 With the sanding completed, the graniteeffect paint was added in multiple light coats. Note the balloon inside the vessel to stop paint entering. Once the granite paint was dry, several light coats of satin lacquer were applied to finish the body of the piece.
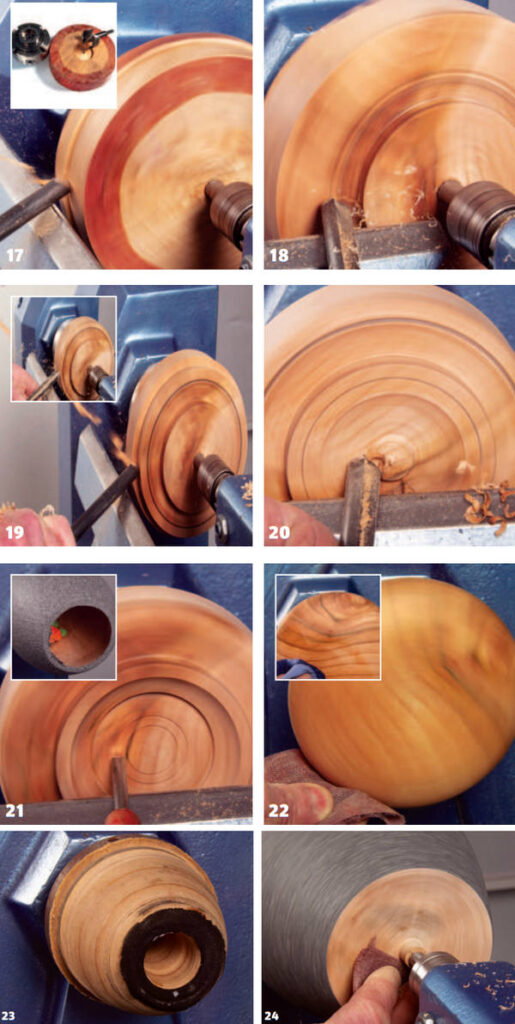
17 For the lid I used a piece of elm, with a 50mm hole drilled to accommodate my chuck jaws. Secured in the chuck with tailstock support, the wood was trued up with the 10mm bowl gouge. I created a 50mm spigot and fitted the piece into the chuck.
18 A measurement of the opening of the vessel was taken and transferred to the lid. This is to be a loose-fitting lid, so 2mm was allowed for clearance. The lid was undercut so when it is on the vessel the outside drapes down slightly, giving a cleaner visual line.
19 Once the tenon was sized the overall diameter was established, allowing for a sufficient overhang of the lid.
20 The tailstock was removed and the piece checked to ensure it was still secure in the chuck. The centre was removed and shaped with the 10mm bowl gouge.
21 A small recess was cut in the centre for a chucking point to finish the top of the lid. This recess was cut cleanly and some detail lines were added. The inside of the lid was then sanded with 120,180,240,320 and 400 grit sandpaper. When the balloon was removed from inside the vessel, the paint had left an uneven surface. A light sanding soon removed this and care was taken not to remove any of the paint on the rim.
22 Once the top was shaped to a simple dome, it was sanded with 120,180,240, 320 and 400 grit sandpaper. Three coats of oil were applied for the finish to the lid.
23 & 24 To finish the base of the vessel, I used one of my vacuum chucks (without the assistance of the vacuum pump). Tailstock support held the piece firmly in place while the bottom was trued up to a concave surface. Sanding was carried out with the same grits up to 400. The small piece in
the middle of the base was removed with a chisel and sanded flat.

